> For the complete documentation index, see [llms.txt](https://helpcenter.channable.com/llms.txt). Markdown versions of documentation pages are available by appending `.md` to page URLs; this page is available as [Markdown](https://helpcenter.channable.com/list-advertise/amazon/list-items-on-amazon/how-to-configure-shipping-templates-for-amazon.md).
# How to configure shipping templates for Amazon
Amazon uses shipping templates to set up specific shipping settings. In Channable, you can assign different shipping templates to specific products. For example, you might create one shipping template for products with shipping costs and another for products with free shipping.
In this article, we'll explain how to set up and use shipping templates from your Amazon Seller account in your Amazon channel in Channable.
***
### Before you start
You'll need:
* An Amazon Seller account
* An Amazon channel in Channable
* The ['Ship by region' setting](https://sellercentral.amazon.nl/help/hub/reference/external/G201337450?initialSessionID=261-2714761-3676459\&ld=AZXXSOADirect\&locale=en-GB) enabled in your Amazon Seller shipping settings.
{% stepper %}
{% step %}
### Create Shipping Templates in your Amazon account
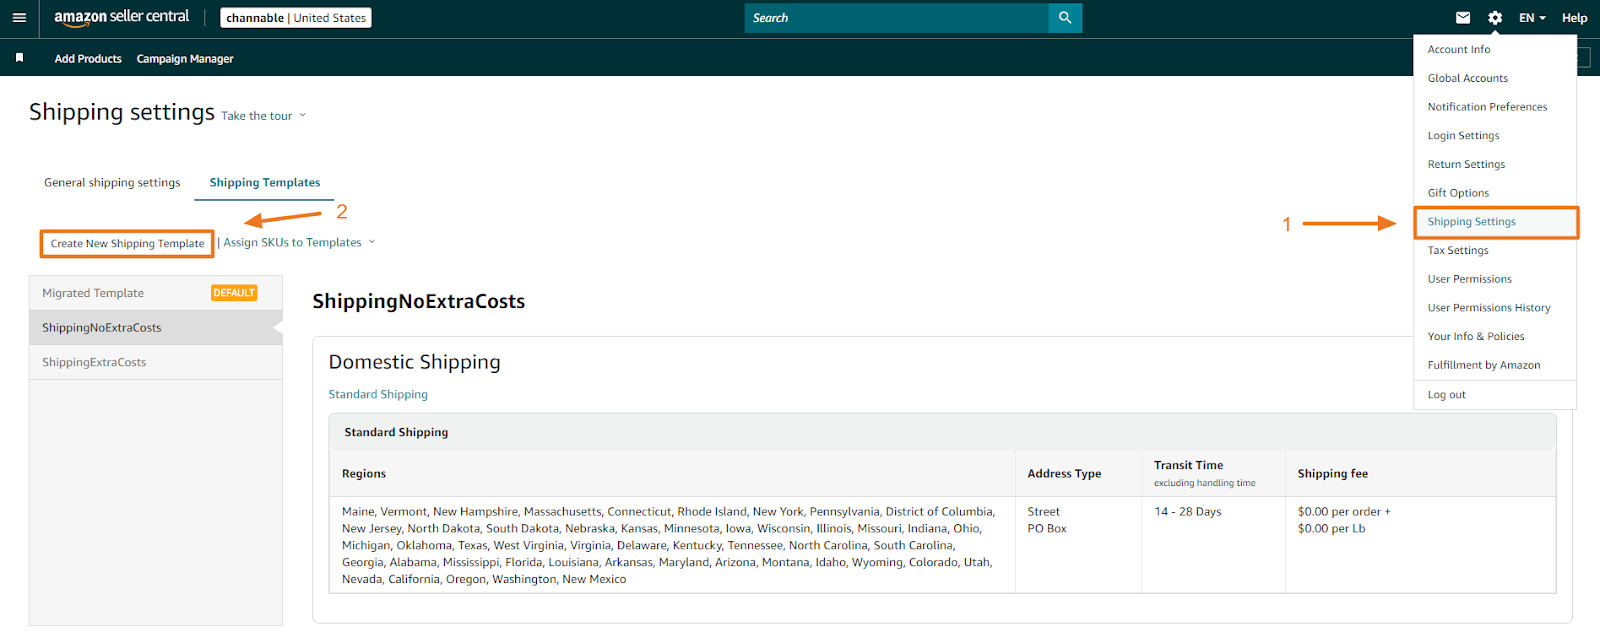
1. In your Amazon seller account, go to **Settings** > **Shipping settings**.
2. Click **Create New Shipping Template** and name your template.
Example: Here, we created two shipping templates titled "ShippingExtraCosts" and "ShippingNoExtraCosts".
{% endstep %}
{% step %}
### Dry run and copy your shipping template ID number
After you create your shipping templates, you can (dry) run your Amazon channel and go to the settings step.
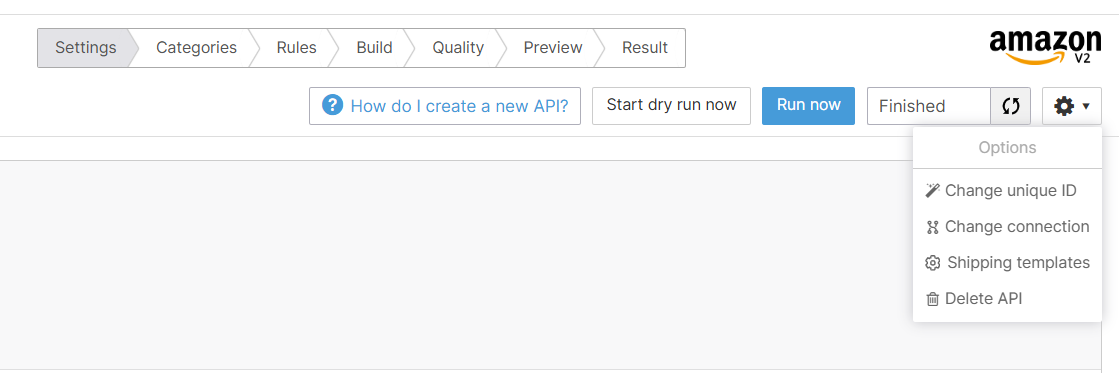
1. Go to the **Settings** step and click **Start dry run now**.
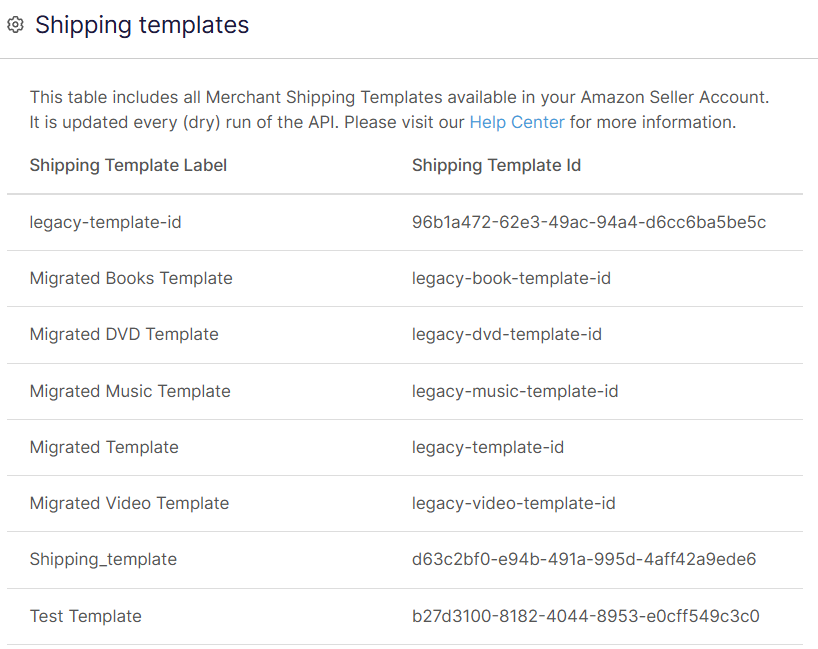
2. Click on the gear dropdown and select **Shipping templates**. A pop-up will appear listing your shipping templates and their IDs.
3. In the **Shipping Template Id** column, copy the shipping template id you want to use for your category. You need this to complete the next step.
{% endstep %}
{% step %}
### Link the field in the Build step
1. Go to the **Build** step > **Category specific attributes** and select the relevant category.
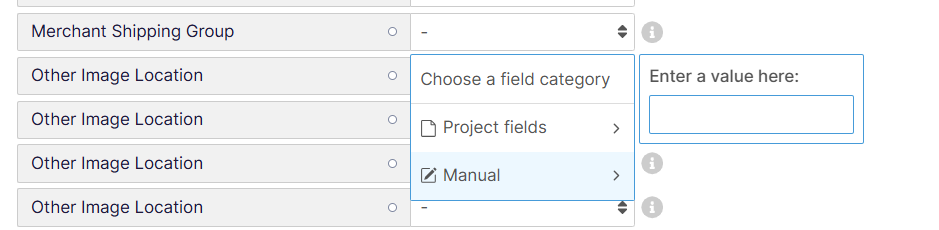
2. Scroll to the **Offer** section. For **Merchant Shipping Group**, click the field, select **Manual**, and paste the id you copied in the previous step.
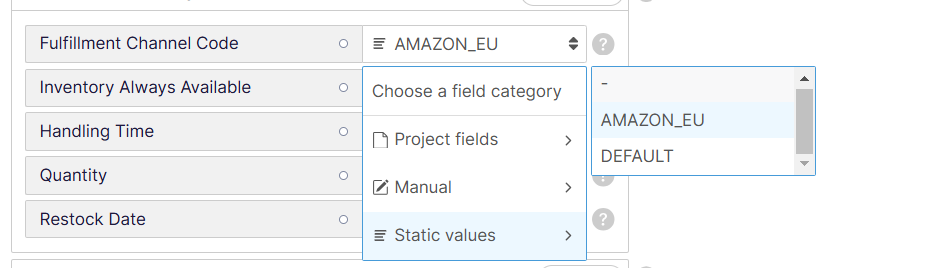
3. For **Fulfillment Availability**, click **+ Add** and fill in the **Fulfillment Channel code** and **Handling Time** fields.
1. **Fulfillment Channel Code** - click the field and select **Static values**. Then:
* If you have a self-fulfilled inventory (MFN - Merchant Fulfillment Network), select **DEFAULT**.
* If you’re fulfilling orders through Amazon’s inventory (AFN - Amazon Fulfillment Network), select the [appropriate Amazon code ](broken://pages/0329a9a5975665f48a1bb322d4930de3d18e1cb8)(e.g. AMAZON\_EU).
2. **Handling time** - fill in the number of days between receiving and shipping an order. By default, this is 1-2 days. Use this field only if you need longer than 2 days.
{% hint style="danger" %}
**Important:** You can't send a product to Amazon that has both an AFN and MFN. To use both, set **Fulfillment Channel Code** as **DEFAULT**, leave the **Handling time** field empty, and push your products to Amazon. After that, in your Amazon seller account, duplicate this listing to create a separate AFN listing by giving it a separate SKU.
{% endhint %}
4. Repeat this step for each of your categories.
Your shipping templates will connect once you run your Amazon channel.
{% endstep %}
{% endstepper %}
---
# Agent Instructions
This documentation is published with GitBook. GitBook is the documentation platform designed so that both humans and AI agents can read, navigate, and reason over technical content effectively. Learn more at gitbook.com.
## Querying This Documentation
If you need additional information that is not directly available in this page, you can query the documentation dynamically by asking a question.
Perform an HTTP GET request on the current page URL with the `ask` query parameter, and the optional `goal` query parameter:
```
GET https://helpcenter.channable.com/list-advertise/amazon/list-items-on-amazon/how-to-configure-shipping-templates-for-amazon.md?ask=&goal=
```
`ask` is the immediate question: it should be specific, self-contained, and written in natural language.
`goal` is optional and describes the broader end goal you are ultimately trying to accomplish on behalf of the user. GitBook uses it to tailor the answer towards what is most useful for that goal.
The response will contain a direct answer to the question and relevant excerpts and sources from the documentation.
Use this mechanism when the answer is not explicitly present in the current page, you need clarification or additional context, or you want to retrieve related documentation sections.