# Channable Help Center

Welcome to Channable!

<p align="center"><button type="button" class="button primary" data-action="ask" data-icon="gitbook-assistant">Ask a question…</button></p>

<table data-view="cards"><thead><tr><th></th><th></th><th data-hidden data-card-target data-type="content-ref"></th><th data-hidden data-card-cover data-type="image">Cover image</th></tr></thead><tbody><tr><td><h4><strong>Get started</strong></h4></td><td>Create an account and learn how to get started with Channable.</td><td><a href="/spaces/UAGSVlvcNsqEqVUgr0tD/pages/LThc2RqOxBKU56Qt3TMy">/spaces/UAGSVlvcNsqEqVUgr0tD/pages/LThc2RqOxBKU56Qt3TMy</a></td><td><a href="/files/zXSWnZBd6COWlD8E5WvL">/files/zXSWnZBd6COWlD8E5WvL</a></td></tr><tr><td><h4><strong>Import data</strong></h4></td><td>Bring your product data into Channable.</td><td><a href="/spaces/Za0iYflHeXmKWGnfFMAN/pages/LThc2RqOxBKU56Qt3TMy">/spaces/Za0iYflHeXmKWGnfFMAN/pages/LThc2RqOxBKU56Qt3TMy</a></td><td><a href="/files/oQjJbaHy7vILjHExVPFw">/files/oQjJbaHy7vILjHExVPFw</a></td></tr><tr><td><h4><strong>Channable for agencies</strong></h4></td><td>Manage clients at scale &#x26; benefit from our tiered Partner Program.</td><td><a href="/spaces/UAGSVlvcNsqEqVUgr0tD/pages/Oxyv4rc0jVViUy6AXbh0">/spaces/UAGSVlvcNsqEqVUgr0tD/pages/Oxyv4rc0jVViUy6AXbh0</a></td><td><a href="/files/J0XwowSj80vhC24gVKeQ">/files/J0XwowSj80vhC24gVKeQ</a></td></tr><tr><td><h4><strong>List on channels</strong></h4></td><td>Create high-performing product listings on channels like Google Shopping, Amazon &#x26; Meta.</td><td><a href="/spaces/F8GepmoSonQRG6RnHOxJ/pages/LThc2RqOxBKU56Qt3TMy">/spaces/F8GepmoSonQRG6RnHOxJ/pages/LThc2RqOxBKU56Qt3TMy</a></td><td><a href="/files/W6SHc1mbsYLhuzT1L9lK">/files/W6SHc1mbsYLhuzT1L9lK</a></td></tr><tr><td><h4><strong>Optimize attributes with AI</strong></h4></td><td>Use AI to generate product titles and descriptions.</td><td><a href="/spaces/u8whzIfip72Kvn3M1bsc/pages/a999d93e60627f4e7f658e7e72c08af72192f52e">/spaces/u8whzIfip72Kvn3M1bsc/pages/a999d93e60627f4e7f658e7e72c08af72192f52e</a></td><td><a href="/files/sOauMXqfaB8m7ZQWqHow">/files/sOauMXqfaB8m7ZQWqHow</a></td></tr><tr><td><h4><strong>Manage orders</strong></h4></td><td>Sync marketplace orders to your eCommerce platform.</td><td><a href="/spaces/F8GepmoSonQRG6RnHOxJ/pages/AF3Es3QBTZHLblOtXp0U">/spaces/F8GepmoSonQRG6RnHOxJ/pages/AF3Es3QBTZHLblOtXp0U</a></td><td><a href="/files/ZcECj9aVUa3yOVtbPXv8">/files/ZcECj9aVUa3yOVtbPXv8</a></td></tr><tr><td><h4><strong>Product creatives at scale</strong></h4></td><td>Generate images for your entire product catalog from a dynamic template.</td><td><a href="/spaces/u8whzIfip72Kvn3M1bsc/pages/HpcdsyhXOS8jsogKkYbp">/spaces/u8whzIfip72Kvn3M1bsc/pages/HpcdsyhXOS8jsogKkYbp</a></td><td><a href="/files/Slnt7hRmInJ8AaTpzJyy">/files/Slnt7hRmInJ8AaTpzJyy</a></td></tr><tr><td><h4><strong>Run ad campaigns</strong></h4></td><td>Create and automate tailored ad campaigns at scale.</td><td><a href="/spaces/F8GepmoSonQRG6RnHOxJ/pages/deLmxoxqUJfl7OJjK6t4">/spaces/F8GepmoSonQRG6RnHOxJ/pages/deLmxoxqUJfl7OJjK6t4</a></td><td><a href="/files/VBNcOBXp54etDUKV6kIo">/files/VBNcOBXp54etDUKV6kIo</a></td></tr><tr><td><h4>Channable <strong>CSS</strong></h4></td><td>Join our Comparison Shopping Service (CSS) for Google Shopping.</td><td><a href="/spaces/bBY5zPT0WiTFQ8xha2EA">/spaces/bBY5zPT0WiTFQ8xha2EA</a></td><td><a href="/files/ljm1Q9CRlRNrKt4hXyHT">/files/ljm1Q9CRlRNrKt4hXyHT</a></td></tr></tbody></table>

***

### Discover other ways to learn

<table data-card-size="large" data-view="cards"><thead><tr><th></th><th></th><th data-hidden data-card-target data-type="content-ref"></th></tr></thead><tbody><tr><td><i class="fa-graduation-cap">:graduation-cap:</i> <strong>Academy</strong></td><td>Get to know our platform in depth, and earn badges and certificates to demonstrate your new skills.</td><td><a href="https://academy.channable.com/">https://academy.channable.com/</a></td></tr><tr><td><i class="fa-bullseye-pointer">:bullseye-pointer:</i> <strong>Demo Center</strong></td><td>See Channable in action, and discover how we can help you grow your sales across channels.</td><td><a href="https://democenter.channable.com/hub/help-center-en">https://democenter.channable.com/hub/help-center-en</a></td></tr><tr><td><i class="fa-swap-arrows">:swap-arrows:</i> <strong>Changelog</strong></td><td>See what's new in Channable, including fixes, improvements, and channel updates.</td><td><a href="/spaces/Celgbro04804WOVz6ZV0">/spaces/Celgbro04804WOVz6ZV0</a></td></tr><tr><td><i class="fa-lightbulb">:lightbulb:</i> <strong>Digital Enablement Hub</strong></td><td>Get the latest product updates, best practices, and practical resources.</td><td><a href="https://get.channable.com/digital-enablement-hub">https://get.channable.com/digital-enablement-hub</a></td></tr></tbody></table>


# Get started with Channable

Create an account and learn how to get started with Channable.

{% columns %}
{% column %}

### Create an account

Sign up for a free trial, discover how to import your product data, and start setting up a channel.

[Discover what you can do with the free trial →](/get-started/channable-free-trial)

<a href="https://www.channable.com/signup" class="button primary">Start free trial</a>
{% endcolumn %}

{% column %}

<figure><img src="/files/7wA1CYrEkGJR1foXkLUU" alt=""><figcaption></figcaption></figure>
{% endcolumn %}
{% endcolumns %}

***

### <i class="fa-bolt">:bolt:</i> Jump straight in

Get started with project creation and importing your product data.

<table data-view="cards"><thead><tr><th></th><th></th><th></th><th data-hidden></th><th data-hidden data-card-target data-type="content-ref"></th></tr></thead><tbody><tr><td><h4><i class="fa-bolt-lightning">:bolt-lightning:</i></h4></td><td><strong>Quickstart guide</strong></td><td>Learn how to get started in Channable.</td><td></td><td><a href="/pages/960b745c1f3c950e24ce475b0cb12606bda8be6b">/pages/960b745c1f3c950e24ce475b0cb12606bda8be6b</a></td></tr><tr><td><h4><i class="fa-folders">:folders:</i></h4></td><td><strong>Create a project</strong></td><td>A project is a workspace where you can organize and manager your product data.</td><td></td><td><a href="/pages/a9afdce74879660cdbc46f9c79afad519d9b6915">/pages/a9afdce74879660cdbc46f9c79afad519d9b6915</a></td></tr><tr><td><h4><i class="fa-file-arrow-down">:file-arrow-down:</i></h4></td><td><strong>Import product data</strong></td><td>To get your products listed on a channel, you'll need to provide Channable with your product data.</td><td></td><td><a href="/spaces/Za0iYflHeXmKWGnfFMAN/pages/LThc2RqOxBKU56Qt3TMy">/spaces/Za0iYflHeXmKWGnfFMAN/pages/LThc2RqOxBKU56Qt3TMy</a></td></tr></tbody></table>

### <i class="fa-wand-magic-sparkles">:wand-magic-sparkles:</i> Manage & improve product data

Bulk edit and improve your product data and images so they're optimized for your chosen channel. Dig into performance metrics to make data-driven decisions.

<table data-view="cards"><thead><tr><th></th><th></th><th></th><th data-hidden></th><th data-hidden data-card-target data-type="content-ref"></th></tr></thead><tbody><tr><td><i class="fa-wand-sparkles">:wand-sparkles:</i></td><td><strong>Bulk edit and enrich your product data with rules</strong></td><td>Get your product data ready to export to a channel.</td><td></td><td><a href="/spaces/u8whzIfip72Kvn3M1bsc/pages/15BqbqcGL2S3AoVkTSLf">/spaces/u8whzIfip72Kvn3M1bsc/pages/15BqbqcGL2S3AoVkTSLf</a></td></tr><tr><td><i class="fa-images">:images:</i></td><td><strong>Create and edit images</strong></td><td>Add additional images, text or other content to your product images</td><td></td><td><a href="/spaces/u8whzIfip72Kvn3M1bsc/pages/7c96ae1561c1fa7a2bcbcc04fae1959e555e0aef">/spaces/u8whzIfip72Kvn3M1bsc/pages/7c96ae1561c1fa7a2bcbcc04fae1959e555e0aef</a></td></tr><tr><td><i class="fa-chart-simple">:chart-simple:</i></td><td><strong>Use performance metrics</strong></td><td>Optimize your ads and listings, spot key trends and make data-driven decisions.</td><td></td><td><a href="/spaces/u8whzIfip72Kvn3M1bsc/pages/f452f00bd468f0b65938349df87be5ef0d45f0fb">/spaces/u8whzIfip72Kvn3M1bsc/pages/f452f00bd468f0b65938349df87be5ef0d45f0fb</a></td></tr></tbody></table>

### <i class="fa-sliders-simple">:sliders-simple:</i> List & advertise

Get your items listed and advertized on popular channels. Boost Google Ad performance, automate repricing strategies, and keep your stock levels synced.

<table data-view="cards"><thead><tr><th></th><th></th><th></th><th data-hidden></th><th data-hidden data-card-target data-type="content-ref"></th></tr></thead><tbody><tr><td><i class="fa-cart-shopping">:cart-shopping:</i></td><td><strong>List your products on a marketplace</strong></td><td>Export to popular online marketplaces like Amazon and bol.</td><td></td><td><a href="/spaces/F8GepmoSonQRG6RnHOxJ/pages/Y2QjTRRTaWGVQDqJRql4">/spaces/F8GepmoSonQRG6RnHOxJ/pages/Y2QjTRRTaWGVQDqJRql4</a></td></tr><tr><td><i class="fa-bullhorn">:bullhorn:</i></td><td><strong>Run ad campaigns</strong></td><td>Advertize on ad platforms like Google Ads and Amazon Ads.</td><td></td><td><a href="/spaces/F8GepmoSonQRG6RnHOxJ">/spaces/F8GepmoSonQRG6RnHOxJ</a></td></tr><tr><td><i class="fa-tags">:tags:</i></td><td><strong>Improve your Google Ad performance</strong></td><td>Boost your Shopping ads with Google Premium CSS.</td><td></td><td><a href="/spaces/bBY5zPT0WiTFQ8xha2EA/pages/JsKd452Nu8XTrHz68zaF">/spaces/bBY5zPT0WiTFQ8xha2EA/pages/JsKd452Nu8XTrHz68zaF</a></td></tr><tr><td><i class="fa-arrow-down-arrow-up">:arrow-down-arrow-up:</i></td><td><strong>Automate repricing strategies</strong></td><td>Outsell the competition and win the Buy Box through real-time price adjustments.</td><td></td><td><a href="/spaces/F8GepmoSonQRG6RnHOxJ/pages/tNEsCxy7zaYhkLw9Ue64">/spaces/F8GepmoSonQRG6RnHOxJ/pages/tNEsCxy7zaYhkLw9Ue64</a></td></tr><tr><td><i class="fa-cube">:cube:</i></td><td><strong>Set up Order Sync</strong></td><td>Keep your stock levels in sync across your webshops and the marketplace you advertise on.</td><td></td><td><a href="/spaces/F8GepmoSonQRG6RnHOxJ/pages/AF3Es3QBTZHLblOtXp0U">/spaces/F8GepmoSonQRG6RnHOxJ/pages/AF3Es3QBTZHLblOtXp0U</a></td></tr></tbody></table>

### Discover other learning resources

<table data-view="cards"><thead><tr><th></th><th></th><th></th><th data-hidden data-card-target data-type="content-ref"></th><th data-hidden data-card-cover data-type="image">Cover image</th></tr></thead><tbody><tr><td><i class="fa-graduation-cap">:graduation-cap:</i></td><td><strong>Channable Academy</strong></td><td>Get to know our platform in depth, and earn badges and certificates to demonstrate your new skills.</td><td><a href="https://academy.channable.com/">https://academy.channable.com/</a></td><td><a href="/files/EiaxNnwsf3u9B8UjAnvX">/files/EiaxNnwsf3u9B8UjAnvX</a></td></tr><tr><td><i class="fa-swap-arrows">:swap-arrows:</i></td><td><strong>Changelog</strong></td><td>Your gateway to understanding how Channable can help you grow your sales across channels.</td><td><a href="/spaces/Celgbro04804WOVz6ZV0">/spaces/Celgbro04804WOVz6ZV0</a></td><td><a href="/files/k4dedaa7wj8BjOrkkere">/files/k4dedaa7wj8BjOrkkere</a></td></tr><tr><td><i class="fa-bullseye-pointer">:bullseye-pointer:</i></td><td><strong>Demo center</strong></td><td>See the latest new features and improvements in Channable.</td><td><a href="https://democenter.channable.com/hub/efxkc6i9oqs9">https://democenter.channable.com/hub/efxkc6i9oqs9</a></td><td><a href="/files/CNgKKyRC8pPUejuC5KXe">/files/CNgKKyRC8pPUejuC5KXe</a></td></tr></tbody></table>


# Channable free trial

[Sign up for a free trial](https://www.channable.com/signup) and start using Channable without activating any channels or sending any data.

<figure><img src="/files/cbf2a9a1a6aa621e9012b43329060f0ee40c8340" alt=""><figcaption></figcaption></figure>

### What you can do with a Channable free trial

* Discover Channable and its possibilities
* Import your product data
* Prepare and improve your product data
* Get free support from our Support team
* Free access to [Channable Academy](https://www.channable.com/channacademy)

{% hint style="info" %}
**Note:** There is no time constraint for a trial account, but to send live data to your chosen channel and/or get a URL for your feed, you need to sign up for a subscription. Learn more about our pricing plans.
{% endhint %}


# Change from a trial account to a paid (live) account

{% stepper %}
{% step %}

### Set up your billing information

* Go to **\[your company] > Company Settings**.
* Go to the **Billing** tab.
* Add your [billing and payment information](/account-billing/manage-your-subscription/billing-and-payment).

{% hint style="warning" %}
Important: If you are a Shopify user and you are selecting your payment method, you will only see one payment method: “Shopify”. This is because you are billed through Shopify and you need to approve the charges in your Shopify account. [Learn more about paying via Shopify](/account-billing/manage-your-subscription/manage-your-channable-subscription/readme).
{% endhint %}
{% endstep %}

{% step %}

### Choose a subscription

{% hint style="info" %}
Tip: Learn more about how our subscriptions work and which package/plan suits your business needs.
{% endhint %}

* Go to **\[your company] > Plans & pricing**.
* Select a package (maximum amount of items), Core plan and any additional modules.
* Click **Complete subscription**.
  {% endstep %}

{% step %}

### Activate your projects and channel(s)

#### Activate your project

* Go to **\[your project] > Settings > Project settings**.
* Click **Activate project**.

#### Activate your channel(s)

* Go to **Channels > \[your channel]**.
* For feeds: go to the **Preview & export** step and click **Activate feed**.
* For APIs: go to the **Settings** step and click **Activate API**.
  {% endstep %}
  {% endstepper %}


# See all features

### List your products on channels

<table data-view="cards"><thead><tr><th></th><th></th><th data-hidden data-card-target data-type="content-ref"></th><th data-hidden data-card-cover data-type="image">Cover image</th></tr></thead><tbody><tr><td><strong>Product feed management</strong></td><td>Prepare and optimize your product data to meet the unique requirements of thousands of online channels.</td><td><a href="https://www.channable.com/products/product-feed-management-tool">https://www.channable.com/products/product-feed-management-tool</a></td><td><a href="/files/Qy6Il68Z5uEcr7K7a0O5">/files/Qy6Il68Z5uEcr7K7a0O5</a></td></tr><tr><td><strong>Marketplaces</strong></td><td>Create and manage your product listings and process orders on top marketplaces like Amazon, eBay and bol.</td><td><a href="https://www.channable.com/products/marketplace-integrator">https://www.channable.com/products/marketplace-integrator</a></td><td><a href="/files/IacnQZYNSPpHNrtAe7z4">/files/IacnQZYNSPpHNrtAe7z4</a></td></tr></tbody></table>

### Improve ad performance

<table data-view="cards"><thead><tr><th></th><th></th><th data-hidden data-card-target data-type="content-ref"></th><th data-hidden data-card-cover data-type="image">Cover image</th></tr></thead><tbody><tr><td><strong>PPC</strong></td><td>Create and monitor your performance-based Pay-Per-Click (PPC) campaigns directly from your product data for Google, Amazon, and bol.</td><td><a href="https://www.channable.com/products/ppc-tool">https://www.channable.com/products/ppc-tool</a></td><td><a href="/files/9yQ0vaEm7kltZriDhOLs">/files/9yQ0vaEm7kltZriDhOLs</a></td></tr><tr><td><strong>Creatives</strong></td><td>Generate optimized, on-brand product images for your listings directly from your feed at scale.</td><td><a href="https://www.channable.com/products/dynamic-image-editor">https://www.channable.com/products/dynamic-image-editor</a></td><td><a href="/files/mTxlfHBslrvsJeEePeae">/files/mTxlfHBslrvsJeEePeae</a></td></tr><tr><td><strong>CSS</strong></td><td>Submit your products to Google Shopping via Google Premium CSS and increase the performance of your Shopping Ads.</td><td><a href="https://www.channable.com/products/css">https://www.channable.com/products/css</a></td><td><a href="/files/XftgiCJqmINkYnusQF2Y">/files/XftgiCJqmINkYnusQF2Y</a></td></tr></tbody></table>

### See how your products are performing

<table data-view="cards"><thead><tr><th></th><th></th><th data-hidden data-card-cover data-type="image">Cover image</th><th data-hidden data-card-target data-type="content-ref"></th></tr></thead><tbody><tr><td><strong>Insights</strong></td><td>Get in-depth, product-level performance data from your connected platforms and manage your budget spend.</td><td><a href="/files/4SV2o61z6eeLBiyeYWyM">/files/4SV2o61z6eeLBiyeYWyM</a></td><td><a href="https://www.channable.com/products/channable-insights">https://www.channable.com/products/channable-insights</a></td></tr><tr><td><strong>Analytics</strong></td><td>Connect Google Analytics to track performance and conversion.</td><td><a href="/files/D5WSa4B10iVqCc71F6Xq">/files/D5WSa4B10iVqCc71F6Xq</a></td><td><a href="https://www.channable.com/products/channable-insights">https://www.channable.com/products/channable-insights</a></td></tr></tbody></table>


# Contact Support

When you can’t find your answer in our Help Center or on our [website](https://www.channable.com/), you can contact us.

{% hint style="info" %}
Our Support Team is available on work days (Monday to Friday) from 09:00-18:00.
{% endhint %}

## Email

* For North America: <support-usa@channable.com>
* Other: [support@channable.com](mailto:support@channable.com,)

## Call

* Find our phone number per country [here](https://www.channable.com/company/contact/).

[![03\_Photo-graphic3.png](/files/b8ff82fb7a5b63bc6a3a57c5a923db31fe5005fe)](https://helpcenter.channable.com/hc/article_attachments/21017894825490)


# Ask Charlie

Get instant answers from Charlie, our AI support assistant, and know when your question is escalated to email support.

{% columns %}
{% column %}

<figure><img src="/files/ENVFYPRhlCSnzO7d1Gh0" alt="" width="375"><figcaption></figcaption></figure>
{% endcolumn %}

{% column valign="middle" %}

#### Need a quick answer? Ask Charlie.

Charlie is our in-tool **AI support assistant**. It helps you get unstuck fast by using our documentation to answer questions and guide you to the right next step.

If your issue needs more than that, Charlie can create an email thread with our Support Team with the context from your chat (so you don't need to repeat yourself!)
{% endcolumn %}
{% endcolumns %}

<details>

<summary><i class="fa-circle-info">:circle-info:</i> Charlie (AI support assistant) disclaimer</summary>

Charlie provides automated support for informational and support purposes only.

When you use Charlie, Channable and our service providers may collect, use, store, and analyze the information you share in the chat, in line with our [Privacy Policy](https://www.channable.com/privacy-policy).

You are responsible for how you use Charlie’s responses. Review them carefully before you act on them. Channable is not liable for actions, losses, or damages that result from using Charlie.

Keep these guidelines in mind:

* **Do not share** sensitive personal information, such as health, financial, or login data.
* **Do not share** trade secrets, internal business strategies, or other confidential company information.
* Responses may be AI-generated and can be inaccurate, incomplete, or outdated.
* Responses are for informational purposes only. They are not advice, decisions, or company commitments.
* AI-generated output is not user-owned content.

By using Charlie, you acknowledge and accept this disclaimer. If you do not agree, do not use Charlie.

</details>

{% hint style="success" %}
**Tip:** Asking Charlie is the fastest way to get help right away. If your question needs human review, you can always escalate to email support.
{% endhint %}

### What Charlie helps with

Charlie can:

* Answer questions based on our documentation
* Guide you through setup steps for different features
* Suggest conditions and actions for rules based on what you want to achieve
* Explain what features do and when to use them
* Point you to relevant guidance if you want to learn more
* Escalate complex issues to our human team

### Why use Charlie?

* Get answers immediately
* Work through setup questions without waiting for email support
* Find the right article or next step faster

### What Charlie knows today

Charlie is trained on selected parts of our Help Center documentation.

Right now, Charlie does **not** cover:

* PPC (Google Ads, Amazon Ads, bol Ads)

{% hint style="info" %}
If you ask about dynamic ads and other PPC related questions, Charlie may not be able to give a complete answer yet, and will suggest escalating to Support.
{% endhint %}

### How Charlie works

{% columns %}
{% column width="58.33333333333333%" valign="middle" %}
{% stepper %}
{% step %}

### Ask your question

In the sidebar, click **Ask Charlie** to start a conversation. Ask a clear question about the task, feature, or issue you are working on.
{% endstep %}

{% step %}

### Get an instant answer

Charlie uses our documentation to answer your question and suggest the next step.
{% endstep %}

{% step %}

### Escalate if needed

If the issue is too complex or needs human review, Charlie can escalate it to our Support Team by email.
{% endstep %}
{% endstepper %}
{% endcolumn %}

{% column width="41.66666666666667%" valign="middle" %}

<figure><img src="/files/b89N3JAR1kjqweMajoO1" alt="" width="375"><figcaption></figcaption></figure>
{% endcolumn %}
{% endcolumns %}

### How escalation works

* Escalation sends your request to email support with the context of your conversation with Charlie
* A support specialist follows up after reviewing your question

{% hint style="warning" %}
We do not offer live support chat. If your question is escalated, you will receive help through email support.
{% endhint %}

### <i class="fa-square-check">:square-check:</i> Tips for better answers from Charlie

* Ask one specific question at a time
* Use the same feature names you see in Channable
* Be specific about the area you're working in (like **Imports**, **Shopify**, **Google Shopping**)
* Describe what you want to achieve, especially for rules questions


# Browser error messages

If you are experiencing any problems with the functionality of the tool in your browser, please follow these steps. To allow us to quickly identify the problem you’re experiencing, it is helpful for us to know your exact problem.

{% stepper %}
{% step %}

### Open the developer console

Open the developer console in your browser while you’re on the page that is having issues.

* In Mozilla Firefox, Google Chrome, or Microsoft Edge, press the F12 key on your keyboard.
* For Safari (Mac OS), read how you can access the developer tools [here](https://support.apple.com/guide/safari/use-the-developer-tools-in-the-develop-menu-sfri20948/mac).
  {% endstep %}

{% step %}

### Go to the Console tab

In the developer console, go to the “Console” tab. Here you can see the messages sent by Channable, and it contains the messages we need to capture. You will see something like this:

<figure><img src="/files/4e6466a1532b9cd8fd11fb7b1564b6f84d5bcb0e" alt=""><figcaption></figcaption></figure>
{% endstep %}

{% step %}

### Save the console messages

Save the messages shown in the Console tab to a file:

* In Firefox: right-click on the messages, and select “export visible messages to” → “file.”
* In Google Chrome and Microsoft Edge: right-click and select “save as” to save the messages to a file.
* In legacy versions of Microsoft Edge: it may not be possible to save log messages directly; instead select them all and copy them to a file using your clipboard.
  {% endstep %}

{% step %}

### Contact technical support

When you have saved the messages log, contact our technical support by sending an email to <support@channable.com>. Please explain the issue you are experiencing and attach the saved log file to the email.
{% endstep %}
{% endstepper %}


# Ways to work with us

Discover the different ways that you can work with Channable.

Discover some of the available features that customers use to achieve their goals with Channable.

***

{% columns %}
{% column %}

### <i class="fa-book-open">:book-open:</i> Help Center

Get answers fast with AI-powered search. Access how-to articles, troubleshooting guides, release notes, and more.
{% endcolumn %}

{% column %}

### <img src="/files/Ve5mjV7bdBJyAIneyIPz" alt="" data-size="line">Channable Academy

Discover Channable features, earn badges, and learn at your own pace with our catalog of interactive courses.&#x20;
{% endcolumn %}

{% column %}

### <i class="fa-headset">:headset:</i> Support Team

Your first point of contact for any technical questions, account problems, or billing errors.&#x20;
{% endcolumn %}
{% endcolumns %}

***

{% columns %}
{% column %}

### <i class="fa-wrench">:wrench:</i> Technical Account Managers

(Technical Enablement service). Sit back and relax while we deliver complex technical setups from start to finish. Never worry about implementation again.
{% endcolumn %}

{% column %}

### <i class="fa-ranking-star">:ranking-star:</i> Customer Success Managers

(Paid service). Your strategic partner within Channable. We'll provide big-picture guidance to help you achieve your business goals, and maintain a bird's-eye view of your account.
{% endcolumn %}

{% column %}

### <i class="fa-person-chalkboard">:person-chalkboard:</i> Instructor-led training

(Invitation only). Learn directly from Channable experts at one of our live training events. Discover how to set up key Channable features in 60-90 minutes.
{% endcolumn %}
{% endcolumns %}

***

[Contact us](https://www.channable.com/contact) to discover how we can support your success.&#x20;


# Quickstart guide

Channable is a Multichannel eCommerce Platform that helps you to:

* List, advertise and optimize your products at scale across channels such as Google, Amazon and bol.
* Create and manage product advertisements, set up connections with marketplaces, and create PPC campaigns.
* Find out how your listings are performing with useful insights and analytics and use this data to adapt your strategy to increase sales.

There are lots of powerful things you can do with Channable but we recommend that you start with this guide to help you with the basic setup.

### Create a project

Once you have [created a Channable account](/get-started/getting-started/create-a-channable-account), you’re ready to create your first project. Log in to [Channable](https://app.channable.com/) and go to the **Projects** section.

{% stepper %}
{% step %}

### Add your first project

To add your first project, click **+ Add new project** and give it a name. Click **Save** and then you will be navigated to **Getting started** — Channable’s Onboarding hub.

{% hint style="info" %}
**Note:** A project is the specific setup for all the information regarding your webshop: your product data and how it is shared with different channels. You can set up multiple projects if you have multiple webshops or if you sell your products in different language markets.
{% endhint %}
{% endstep %}

{% step %}

### Onboarding hub

After adding your first project, Channable shows an onboarding checklist in the platform to help you get started. Items are checked off automatically as you complete the steps.

{% hint style="info" %}
**Note:** Every time you complete a step, navigate back to the **Getting started** checklist to continue. This also helps you become familiar with navigating the different sections of Channable.
{% endhint %}

Follow the onboarding steps below to complete your setup.
{% endstep %}
{% endstepper %}

<figure><img src="/files/b1d55ce1e09b2762c2caa013529cb6ff7416f02b" alt=""><figcaption></figcaption></figure>

## Onboarding steps

### Import your product data

To add your product data into Channable, click **Add import**, which navigates you to the **Setup** section. Channable offers many options for [importing your product data](/import-data) such as via an eCommerce platform (e.g., Magento or Shopify) or via a data source (e.g., XML or Google Sheets).

<figure><img src="/files/7938aea3d9c40754b5b6ed05e0d3a0e824273bc5" alt=""><figcaption></figcaption></figure>

{% hint style="warning" %}
Your import must meet specific [requirements](/import-data/import-how-to/import-your-product-data/import-via-a-data-file/requirements-for-import-files).
{% endhint %}

### View your imported items

Once you have imported your data, click **View items** to go to the **Items** section where you can view all the products you imported.

Review your product data to ensure it imported successfully. If your data is split between multiple sources or you want to add missing information, you can [combine multiple imports](/import-data/import-how-to/combine-multiple-imports) to enrich your product data.

<figure><img src="/files/f2ba039112356e925df90aa7d05160da2cd59ca9" alt=""><figcaption></figcaption></figure>

### Set up your first channel

After reviewing your product data, set up the channel you will use to advertise your products.&#x20;

Go to **Channels**. Choose the platform you'd like to set up a channel for and select it to get started.

### Feeds

To set up a feed, follow these steps:

* [Categorization](/list-advertise/list-on-channels/set-up-a-feed/set-up-a-feed-categories-step)
* [Rules](/list-advertise/list-on-channels/set-up-a-feed/set-up-a-feed-rules)
* [Mapping](/list-advertise/list-on-channels/set-up-a-feed/set-up-a-feed-mapping-step)
* [Quality](/list-advertise/list-on-channels/set-up-a-feed/set-up-a-feed-quality-step)
* [Preview & export](/list-advertise/list-on-channels/set-up-a-feed/set-up-a-feed-preview-and-export-step)

{% hint style="info" %}
**Note:** There are specific guides for setting up [popular export feeds](/list-advertise/list-on-channels/set-up-a-feed), such as [Google](/list-advertise/google/list-items-on-google-shopping), [Meta](/list-advertise/meta/get-started-with-meta) and [Galaxus](/list-advertise/list-on-channels/galaxus).
{% endhint %}

<figure><img src="/files/AZRqL1sWuxDRDU9UOD8p" alt=""><figcaption></figcaption></figure>

### Marketplaces&#x20;

To set up a marketplace channel (API), follow a similar series of steps:

* [Categorization](/list-advertise/sell-on-marketplaces/get-started-with-marketplaces/marketplaces-categorization-step)
* [Rules](/list-advertise/sell-on-marketplaces/get-started-with-marketplaces/marketplaces-rules-step)
* [Build and Attributes](/list-advertise/sell-on-marketplaces/get-started-with-marketplaces/marketplaces-build-step)
* [Result](/list-advertise/sell-on-marketplaces/get-started-with-marketplaces/marketplaces-result-step)

{% hint style="info" %}
**Note:** There are specific guides for setting up with [popular marketplaces](/list-advertise/sell-on-marketplaces/get-started-with-marketplaces), such as [Amazon](/list-advertise/amazon/list-items-on-amazon), [bol ](/list-advertise/bol/list-items-on-bol)and [eBay](/list-advertise/sell-on-marketplaces/ebay/how-to-set-up-an-ebay-channel).
{% endhint %}

<figure><img src="/files/O4HbpZoBghSvDcGTdHRV" alt=""><figcaption></figcaption></figure>

### Select a plan

Channable has flexible pricing plans and add-ons. Click **Select a plan** to [compare the plans](/account-billing/manage-your-subscription/channables-pricing-plans) and choose one that best fits your business needs.

<figure><img src="/files/bc92e1eb443759388e83a4ce223eedefb10d3909" alt=""><figcaption></figcaption></figure>

{% hint style="info" %}
**Note:** You can set up the Channable platform using your [trial account](/get-started/channable-free-trial) but you need to confirm your subscription to send live product data and activate your channels. See our [pricing](/account-billing/manage-your-subscription/channables-pricing-plans) and [subscription & invoicing](/account-billing/manage-your-subscription/channables-pricing-plans) pages for details.
{% endhint %}

### Activate your channel

To finish your setup, activate the channel you configured and click **Activate channel**. This activates the project you're working in and your chosen channel.

<figure><img src="/files/86690eea90ea758195cdcd97eecd13158177c7c3" alt=""><figcaption></figcaption></figure>

If you prefer to activate later without using the onboarding checklist, activate your current project under **Projects > \[Project] > Settings** and your channel under **\[Channel] > Settings**.

<figure><img src="/files/f25580522c8d3776971f9732db279dcc67573cd4" alt=""><figcaption></figcaption></figure>

* **If you set up a feed**, check that you have a [feed file URL](/list-advertise/list-on-channels/set-up-a-feed/set-up-a-feed-preview-and-export-step) in the **Preview** step. Copy the URL and paste it into the settings of your chosen marketplace.
* **If you set up an API**, check whether your items are showing in the chosen channel/marketplace — they may not appear immediately, so check again later.

<figure><img src="/files/C3y5tpgpUGakuzEmfG1A" alt=""><figcaption></figcaption></figure>

### All done!

Your products should now be listed on your chosen channel or marketplace. Use our Help Center as you continue with Channable and [contact our Support department](https://www.channable.com/contact) if you need more help.


# Create a Channable account

To create your account, sign up for a free trial by providing some basic information about your business, including your business email address and company name, or by signing up with Single Sign-On (SSO).

If your company already has a Channable account, they can [add you as a user](/account-billing/manage-your-account-and-settings/manage-user-roles-in-a-channable-account).&#x20;

### Get started with Channable

After activating your account, you can immediately [start using Channable](/get-started) to optimize and manage your product data.&#x20;

Ready to learn how you can use Channable? Take a look at [our academy](/get-started/getting-started/channable-academy-complete-courses-and-earn-badges) to begin your learning journey.

### Sign up with email

You can only sign up to Channable with a **business** email address, or with [Single Sign On (SSO)](/account-billing/manage-your-account-and-settings/set-up-and-manage-single-sign-on-sso).

You cannot sign up to Channable via the form with a personal email address that uses a domain such as Gmail\*, Yahoo, or Outlook.

{% hint style="info" %}
**Note:** If you're unsure about your email domain's eligibility or have questions about our email policy, please [contact our support team.](https://www.channable.com/contact)&#x20;
{% endhint %}

### Sign up with SSO

If you want to sign up to Channable with a Google account, you will need to use [SSO](/account-billing/manage-your-account-and-settings/set-up-and-manage-single-sign-on-sso) by clicking the **Sign up with Google** button.

The SSO provider will ask you to confirm that you want to share your basic personal details with Channable, and that you agree with the privacy policy and terms of service. We will ask you to provide some additional information before creating your account.

{% hint style="info" %}
**Note:** With SSO, you do not need to create a password or use one to log in. If you later want to log in using a password, you can disconnect SSO.
{% endhint %}

{% hint style="info" %}
Once you've signed up to Channable, you can [invite other users to join you](/account-billing/manage-your-account-and-settings/manage-user-roles-in-a-channable-account).
{% endhint %}


# Create a new project

{% hint style="info" %}
**Note:** Once you have [created a Channable account](/get-started/getting-started/create-a-channable-account), you’re ready to create your first project.
{% endhint %}

{% stepper %}
{% step %}
Log in to [Channable](https://app.channable.com/).
{% endstep %}

{% step %}
Go to **Projects**.
{% endstep %}

{% step %}
Click **+** **Add new project** and give your project a name.
{% endstep %}

{% step %}
Click **Save.**
{% endstep %}
{% endstepper %}

<figure><img src="/files/ed38b2d25482dd3ac483cc12051f91126d112043" alt=""><figcaption></figcaption></figure>


# Project settings

### Project settings tab

Each project has its own **Project settings** page, which you can find by navigating to **Settings > Project settings** in the main navigation.

<figure><img src="/files/Q6JrCAAFtmByR2YMwVhs" alt="" width="563"><figcaption></figcaption></figure>

#### Project name

This is the name of the project, which will be shown on the main screen. We recommend including the webshop and the language of the items in the name, e.g. "Example Shop EN".

#### Status

This shows if the project is activated in Channable using one of two possible colors:

:yellow\_circle: **Yellow (Inactive / not live)**

When a project is inactive, the import will not be updated automatically every day, and the exports will not run automatically every day. An inactive project and the number of imported items in that project are not counted for the pricing model.

:blue\_circle: **Blue (Active / live)**

When a project is live, the import will run daily at the time that is displayed. If you want to change the time, you can do so in the **Schedule settings**. After the import has run, the exports will start running, meaning that we update all product data every day.

If you would like to update your data multiple times a day, please [contact us](https://www.channable.com/company/contact/) for further information. As soon as the project is live, we will count this as a project in the pricing, and you can see the total number of imported items by going to **Plans & pricing** in the settings menu.

### Schedule settings tab

{% hint style="info" %}
**Note:** Learn more about [**Schedule settings**](/get-started/getting-started/create-a-new-project/edit-your-project-schedule-settings).
{% endhint %}

<figure><img src="/files/u3OHajFLzwoDBoXTwTjn" alt="" width="563"><figcaption></figcaption></figure>


# Move or duplicate a project

The process of moving or duplicating a project from one account to another can only be done by our Support Team. This requires a process and careful attention to make sure everything is moved properly. Once you’re ready, [contact Support](https://www.channable.com/contact), and we’ll assist you with moving the project.

### Before you start

#### Make sure to

Complete the following steps before contacting our Support Team:

{% hint style="warning" %}
You must have written approval (via email) from the Owner of the Channable Company because the project is their intellectual property.

Temporary deactivation of order connections: When a project is moved or duplicated, our Support team will temporarily deactivate any active order connections during the transfer.

Inactive duplicated projects: If a project is duplicated, the new version will be inactive when placed in the receiving account.
{% endhint %}

{% stepper %}
{% step %}

### Get written approval

You need written approval (via email) from the **Owner** of the Channable Company because the project is their intellectual property.
{% endstep %}

{% step %}

### Check your account details

Confirm that the account where the project is moving to has the correct access and all necessary details set up.
{% endstep %}

{% step %}

### Update your subscription

Make sure that the account receiving the project has an updated [pricing plan](/account-billing/manage-your-subscription/channables-pricing-plans) that supports the new project.
{% endstep %}

{% step %}

### Add the necessary connections

Ensure that all connections used by the project (in **Imports** and **Connections**) are set up in the account where the project will be moved.
{% endstep %}
{% endstepper %}


# Edit your project schedule settings

You can edit your project **Schedule settings** in **\[your project] > Settings > Schedule settings**. You can select your time zone and set up at which scheduled time slots your project should run.

These time slots are the times all imports and **active** exports (feeds, Marketplaces, and Text Ads/Shopping Campaign generators) will run and your data will sync with these channels.

<figure><img src="/files/0af1993b5a63b63ab16248793ac7f7e99d25d7ad" alt=""><figcaption></figcaption></figure>

### In timezone

This is the timezone of the daily data sync. You can adjust it to the timezone of your choice or to the timezone that your webshop is based in.

### Schedule time slots

This shows how many times per day the project is scheduled to run the imports and exports. The default setting is 1 time slot a day.

With our **Core Plus** or **Core Pro** plan, we can offer extra data syncs to a maximum of 24 timeslots per day at a quarter of an hour interval. Find more about our more our [Core plans](https://www.channable.com/pricing).

{% hint style="info" %}
This is only applicable after you activate your project in the [project settings](/get-started/getting-started/create-a-new-project/project-settings).
{% endhint %}

<figure><img src="/files/d2fe74dce932d131d09cfed8d5e1583641affb0c" alt=""><figcaption></figcaption></figure>


# Delete a project

{% hint style="warning" %}
Caution: Deleting a project is permanent. You cannot recover a removed project!
{% endhint %}

Before you can delete a project, you must first deactivate it.

{% stepper %}
{% step %}

### Deactivate the project

* Go to **\[Your project] > Settings > Project settings.**
* Click **Deactivate project**.

{% hint style="info" %}
**Note:** Deactivating a project will also deactivate any remaining active channels in the project.
{% endhint %}

![](/files/72b4052ff565eefd63d0f72bb38b569c7fa5c8e2)
{% endstep %}

{% step %}

### Delete the project

* Go to **\[Your project] > Settings > Project settings.**
* Click the gear dropdown and select **Delete project**.
* Type "delete" in the field and click **Delete project** to confirm.

![](/files/11a7091fad2b7d0c66c3da88c300113e80ad2e14)
{% endstep %}
{% endstepper %}


# Explore the project dashboard

When you open a project you will see the dashboard. The dashboard is an overview of everything that happens in that specific project. In this dashboard, you will see the total number of imported items, the total number of channels, and when this project was last updated. If the project is inactive, the project is not automatically updated every day, so it may be more than 24 hours ago. By default, you will also see an overview of your feed quality scores for your feeds.

<figure><img src="/files/339c0370ce4144f53f22ca8c5d7874e5b09aafdc" alt=""><figcaption></figcaption></figure>

When you start using our Order sync, Repricer or Analytics functionalities new dashboards will automatically be added to this overview.

### Explanation of the different parts of the dashboard

#### Total number of items

This shows how many products have been imported into this specific project. Would you like a detailed overview of the number of items per channel, or would you like to view another period?&#x20;

Click on "Detailed view" or on the "Total number of items" box.

When you click "Detailed view" or the "Total number of items" box, you can change the display of the graph. For example, you can exclude channels from the graph by clicking the channel in the graph.

You can also change the period that the graph shows. Adjust the displayed period by clicking the dates in the upper left corner.&#x20;

Choose from several standard options like "seven days", or pick a custom period using the manual date selection. To save this overview, download the item data as CSV by clicking "Download as CSV" in the lower right corner.

<figure><img src="/files/c5de6414232c80af89813be7ea377defe0c8e544" alt=""><figcaption></figcaption></figure>

#### Total number of channels

The total number of channels shows how many channels the products will be exported to. Detailed information about how many products are exported per channel can also be found in the detailed items overview.

#### Last update

The last update shows when the whole project was last updated by the automatic updates that you set in the schedule settings. More information about the [schedule settings](/get-started/getting-started/create-a-new-project/edit-your-project-schedule-settings) can be found here. If the project is inactive, the project is not automatically updated every day, so it may be more than 24 hours ago.

{% hint style="info" %}
Note: This only applies when an automatic update produced changes to the project, which might not happen on every run. A change will be shown when the number of imported products has changed, for example.
{% endhint %}


# Fields in Channable


# Understanding a unique ID

Learn what a unique ID is, why it matters in Channable, and how to set or change it for your project.

### A unique ID in Channable

A unique ID is an **identifier that we use to identify your items within Channable**. It’s important that every item has its own unique ID, meaning no two items should share the same ID.

Uniqueness is especially important when using features like [AI enriched attributes](/manage-improve-product-data/optimize-attributes-with-ai/ai-enriched-attributes-in-channable) and [AI text generation](/manage-improve-product-data/optimize-attributes-with-ai/how-to-use-ai-generated-text) in **Optimize**:

* Channable uses the unique ID field to apply and track these enrichments and AI generations.
* If your product data contains new and refurbished versions of the item and they share the same ID, they will be treated as the exact same item by Channable.
* If multiple items share the same Unique ID, and one of them is enriched with an AI-generated attribute or has AI generated text for a certain field, all items sharing that ID will receive the same value for that field.
* Duplicate IDs can lead to errors. For example, an enriched color attribute meant for a pair of sneakers being incorrectly applied to a t-shirt.
* If a unique ID field is empty for several products, they won’t be shown in AI enrichments and generators.

Examples of commonly used unique ID fields:

* id
* SKU
* product\_id
* mpn

### How Channable automatically selects your unique ID

{% hint style="info" %}
**Note:** We automatically select a unique ID for the items in your project. It is not necessary to check your unique ID until you use features in **Optimize**.
{% endhint %}

Based on your product data, we’re usually able **automatically to select a unique ID for your items** in your Channable project. We choose this ID using:

* the name of the field (commonly used unique ID fields)
* how many other products have the same ID (duplicates)
* the length of the values in the field (no longform texts)

Based on these factors, **we choose the ID field that has the least amount of duplicates**.

If you are setting up AI-related attributes or AI text generators in **Optimize**, you will be notified via a banner that a unique ID was automatically set up:

{% stepper %}
{% step %}
Go to **\[your project] > Optimize**.
{% endstep %}

{% step %}
Click the **AI enriched attributes** or **AI generated text** tab.
{% endstep %}
{% endstepper %}

If we can select a unique ID for your product data, a banner will show indicating the field that we chose. If we cannot select a unique ID, you need to set one up manually.

### How to set up a unique ID (from Optimize or manually)

If we could not select a unique ID for your items, you can select one in **Optimize > AI enriched attributes** or **AI generated text** from the banner OR you can set one up manually:

{% stepper %}
{% step %}
Go to **\[your project] > Setup**.
{% endstep %}

{% step %}
Go to the **ID fields** tab.
{% endstep %}

{% step %}
At **Field containing Unique ID**, select a unique ID. Make sure to choose the option that has the least amount of duplicates.
{% endstep %}

{% step %}
Click **Save**.
{% endstep %}
{% endstepper %}

{% hint style="warning" %}
**Important:** If you select an ID that has duplicates (multiple products share the same ID), add an import rule to [remove the duplicate items](/manage-improve-product-data/rules-bulk-edit-and-enrich/how-to-use-actions-then-in-rules/rule-action-remove-duplicate-items).
{% endhint %}

<figure><img src="/files/c40635291ec419eddd785ca93772a95ed6a06f53" alt=""><figcaption></figcaption></figure>

### Unique ID errors

When selecting a unique ID field at Field containing Unique ID, you may see an indication in the dropdown that the field contains duplicates.

* **If the field contains duplicates**
  * If you know your field has duplicate entries, apply a rule to [remove the duplicate items](https://helpcenter.channable.com/hc/en-us/articles/360011144819-Rule-Remove-duplicate-items).
* **If the field does not contain duplicates**
  * If you are certain that the data in the field is unique but you are still seeing a “x duplicates" warning, it is likely, e.g., a character limit issue and the field contains 50+ characters. We flag “bad ID candidates” and not only fields with duplicates, but we display only “duplicate(s)” message in order not to make it more complicated for user, since the majority of cases are about duplicated values.

<figure><img src="/files/IeX4mUHw65gmQ70x2vog" alt=""><figcaption></figcaption></figure>

### How to change a unique ID

{% hint style="danger" %}
**Caution:** If you change your unique ID and you have already generated attributes or AI texts in **Optimize**, these values will be removed.
{% endhint %}

{% stepper %}
{% step %}
Go to **\[your project] > Setup**.
{% endstep %}

{% step %}
Go to the **ID fields** tab.
{% endstep %}

{% step %}
At **Field containing Unique ID**, select a different unique ID. Make sure to choose the option that has the least amount of duplicates.
{% endstep %}

{% step %}
Click **Save**.<br>
{% endstep %}
{% endstepper %}


# Types of fields in Channable

### Import fields

Import fields are the fields that Channable finds in your product data. These fields identify information about your products like their descriptions, prices and categories. Your import fields might have different names compared to Channable's project fields.

### Project fields

Project fields are standardized fields in Channable. We use these fields to organize your product data so that it matches what channels expect. In **Setup > Import > \[your import] > Edit mapping**, you need to map your import fields to Channable's project fields.

{% hint style="success" %}
**Tip:** Learn about [how Channable manages import and project fields](/get-started/getting-started/fields-in-channable/field-mapping-in-channable).
{% endhint %}

There are different types of project fields:

#### Text fields

* For words and phrases like product titles and descriptions
* Examples: title, description

#### Number fields

* For numeric values like prices and quantities
* Examples: price, stock

#### Date and time fields

* For time and scheduling information
* Examples: sale\_start\_date, availability\_date

{% hint style="success" %}
**Tip:** Learn more about how to [use date and time fields](/import-data/import-concepts/import-fields/use-a-date-field-in-the-import-mapping) in imports.
{% endhint %}

#### GTIN (Global Trade Item Number) fields

* For identifying products
* Examples: gtin, ean, upc, isbn

#### Object fields

* For nested data like JSON/XML
* Examples: variations, attributes


# Field mapping in Channable

When you [import product data](/import-data) into Channable, either by connecting an eCommerce platform or by uploading a data source like an XML file, Channable will use the information in your import to structure your product data in Channable.

We call this “mapping”. Essentially, it’s the process of looking at the data you provide and saying “Okay, in your source, you call this piece of information ‘country’, but in Channable we call it ‘shipping country’, and that’s what Google Shopping (or another export channel) will expect it to be called when we send it to them. Let’s make sure we match the data you’ve provided to what the channel will receive.”

In this way, mapping makes it possible for Channable to process and standardize product data from a variety of sources so that you can list your products on any supported channel.

Let’s take a closer look at the mapping process:

{% stepper %}
{% step %}

### Import fields

Regardless of the import method you use, Channable will look at your imported data and automatically separate and organize all of the information into what we call “import fields”. For example, you might have import fields that look like this:

* shipping country
* price
* Image Src
  {% endstep %}

{% step %}

### Project fields

Next, Channable will create standardized fields based on your “import fields”. We call these fields “project fields”.

So Channable will map your import fields to the created project fields like this:

* shipping country → shipping\_country
* price → price
* Image Src → image\_src

Channable won’t always get the mapping right automatically and sometimes you need to [edit the name of your project field](/get-started/getting-started/fields-in-channable/map-and-add-fields) so that it maps correctly. This is necessary for these four standardized fields: id, link, image\_link, and price. Naming these fields differently causes warnings in your import mapping, so it is best to name these fields in this standard way.

Project fields are customizable and if you need to improve your imported product data, you can [add additional project fields](/get-started/getting-started/fields-in-channable/map-and-add-fields).
{% endstep %}
{% endstepper %}

{% hint style="info" %}
There are a few [types of fields](/get-started/getting-started/fields-in-channable/types-of-fields-in-channable) in Channable.
{% endhint %}


# Map and add fields

### Map your import fields to project fields in Edit mapping

After you [add an import](broken://pages/E13K3gaPlsHoRLZ6lP2m) to your project, Channable maps your product data and you are navigated to **Setup.**

To ensure that your product data fields are recognized by Channable, you need to map your fields in **Setup > Import > \[Added import] > Edit mapping**.

If you have warnings in **Edit mapping** about the fields `id`, `link`, `image_link`, or `price`, this means that Channable cannot map your import data to these fields. It is likely that your import field names are named differently because Channable creates project fields based on your import field names.

<figure><img src="/files/7c679e3b5e8f3ee85423d7694b22de225f46989f" alt=""><figcaption></figcaption></figure>

We recommend changing the names of the project fields so that your fields are mapped correctly and so that there are no warnings.

Follow these steps to edit your project fields so that they have the recommended field names, using the `image_link` field (with the warning “Please map one field to **image\_link**”) as an example:

{% stepper %}
{% step %}

### Find the import field

Find the field in your import fields that contains the product URL or link and check the name of the field. The field could be named “Image Src” or something similar.
{% endstep %}

{% step %}

### Edit the mapped project field

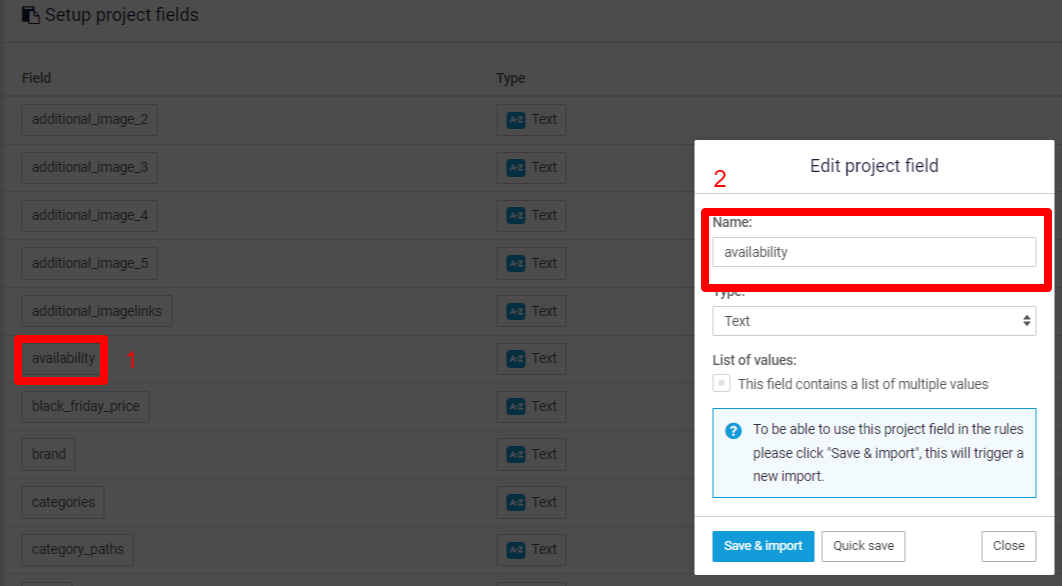
In the Project field column, find the corresponding mapped field (for example `image_src`) and click **Edit**. In the popup, rename the field to `image_link`. This is the recommended name for this field, as indicated in the warning.
{% endstep %}

{% step %}

### Save and re-import

Click **Save and import**. Now the warning should no longer be showing because your import field “Image Src” is mapped to the project field `image_link`.
{% endstep %}
{% endstepper %}

{% hint style="info" %}
**Note:** Instead of editing the project field `image_src`, you can add a new project field with the name `image_link`.
{% endhint %}

***

### Add a new project field

You can add new project fields for information that's not present in your import feed by following these steps:

{% stepper %}
{% step %}

### Open Add project field

Go to **Setup > Project fields** and click **+ Add project field**.
{% endstep %}

{% step %}

### Name the new field

In the popup, give the new field a name.

{% hint style="warning" %}
You can’t use capital letters or spaces in project field names. We recommend using an underscore (`_`) instead.
{% endhint %}
{% endstep %}

{% step %}

### Choose a field type

Next, choose a type for the field.

{% hint style="info" %}
**Note:** Choose an accurate field type because the type determines how you can use that information in Channable. For example, when you [create rules](/manage-improve-product-data/rules-bulk-edit-and-enrich/rules-in-channable), if you have a field with a date in it but in the import mapping the type is set to "Text", you cannot use the field in [date rules](/manage-improve-product-data/rules-bulk-edit-and-enrich/how-to-use-conditions-if-in-rules/rule-conditions-dates). ['EAN' and 'Gtin'](broken://pages/5e11019f66897994875b3416d4533026b7a3b450) also have [rule limitations](/manage-improve-product-data/rules-bulk-edit-and-enrich/how-to-use-conditions-if-in-rules/rule-condition-invalid-gtin-or-ean).
{% endhint %}
{% endstep %}

{% step %}

### List of values (optional)

If the field contains multiple values, check the box at **List of values**.
{% endstep %}

{% step %}

### Save and import

Click **Save and import**.
{% endstep %}

{% step %}

### Map the new field

[Map your new field](/get-started/getting-started/fields-in-channable/map-and-add-fields).
{% endstep %}
{% endstepper %}

<figure><img src="/files/cd0e2cd6402048aeca76300a603c51d185db96fd" alt=""><figcaption></figcaption></figure>

{% hint style="info" %}
If you have the Channable [Insights plan](/account-billing/manage-your-subscription/channables-pricing-plans), the **Add/Edit project field** popup has an extra field for using [Profit on ad spend (POAS)](/manage-improve-product-data/insights/profit-on-ad-spend) and there is an extra column in **Setup > Project fields**. [Set up POAS](/manage-improve-product-data/insights/profit-on-ad-spend/set-up-profit-on-ad-spend) to gain insights into how much profit you are making on your ad campaigns.
{% endhint %}


# Connections in Channable

In Channable, a connection links your account to an external platform, such as a webshop, marketplace, or advertising network. Connections allow Channable to receive and send product and order data, sync orders, and manage campaigns on the platform you’re using.

### What do connections do?

Connections serve three main functions:

* Send data from Channable to a platform.
* Verify your account with the connected platform (e.g. webshop, seller account).
* Provide platform-specific requirements for listing your products.

{% hint style="warning" %}
**Important:** Creating a connection won’t slow down or negatively impact your webshop performance, existing advertisements and/or listings. No updates or changes are made until you activate and run a channel.
{% endhint %}

### Different types of connections

#### Import connections

**Use:** To bring product data into Channable

Import connections connect Channable to where your product catalog is hosted—usually your webshop. Once connected, Channable can pull your product data in automatically.

#### Advertising connections

**Use:** To run ad campaigns from Channable on ad platforms (e.g. Google ads, Amazon ads)

Advertising connections allow Channable to create ad campaigns for advertising tools. These connections sync with your existing ad accounts and help you optimize your listings for paid campaigns.

#### Marketplace connections

**Use:** To list products on marketplaces (e.g. Amazon, bol)

To list on a marketplace through Channable, you need to connect your Channable account to that specific marketplace’s seller account. This validates your account and lets you send product listings.

Some marketplaces require a separate connection per region.

For example:

For Amazon, you need a different Amazon connection per region, as you need an Amazon account for each storefront (e.g. French Amazon account to sell on Amazon in France \[amazon.fr])

#### Order connections (add-on for Marketplaces)

Use: To sync orders between Channable and your webshop

Order connections send and sync order data (stock levels, shipping status, tracking information) from the marketplaces you’re listing on back to your eCommerce platform.


# How to renew a connection

Renew an expired, outdated, or faulty connection and complete Shopify follow-up steps.

If your connection has expired, become outdated, or stopped working, renew it to restore syncing.

To learn more about expired, outdated, and faulty connections, refer to [Understanding expired, outdated, and faulty connections](/get-started/getting-started/connections-in-channable/understanding-expired-outdated-and-faulty-connections).

### <i class="fa-memo-circle-check">:memo-circle-check:</i> Before you start

**Good to know**

* Make sure you log in to the correct webshop or seller account before you renew.
* You do not need to upgrade your plan to renew a connection.

### Renew a connection

{% stepper %}
{% step %}

### Open Connections

In Channable, go to **Company settings** > **Connections**.
{% endstep %}

{% step %}

### Edit your connection

A list of your connections appears. Click **Edit** for the connection you want to renew.
{% endstep %}

{% step %}

### Renew the connection

Click **Renew**. Channable redirects you to the platform to confirm the renewal.

* If you use Shopify, approve the updated permissions if Shopify prompts you.
* If you use Shopify and the refresh does not start, go to **Installed apps** in Shopify, open **Channable**, and click **Open app**.
  {% endstep %}

{% step %}

### Return to Channable

Once you confirm the renewal, you return to Channable and the connection is renewed.
{% endstep %}
{% endstepper %}

### Extra steps for Shopify

If you renewed a Shopify connection, complete these checks after the refresh.

{% stepper %}
{% step %}

### Check the import status

The authorization issue may be fixed, while the import still shows **Failed**.

Check the status before you continue.
{% endstep %}

{% step %}

### Run the import again if needed

Go to **Setup** > **Import**.

If you see a red **Failed** button next to **Run now**, click **Run now**.

You may also see the failed state in **Setup** > **Settings**.
{% endstep %}

{% step %}

### Re-send failed orders manually

If you use order connections, re-send any failed orders manually after renewal.

Re-sent orders can take some time to appear in Shopify.
{% endstep %}
{% endstepper %}

### Troubleshooting Shopify renewal

<details>

<summary>I get an error during renewal</summary>

Check these points:

* You are logged in to the correct Shopify store.
* The **Channable** app is still installed.
* You approved any updated permissions shown by Shopify.

If the renewal still fails, contact <support@channable.com>.

</details>

<details>

<summary>The Shopify import still shows Failed after renewal</summary>

Go to **Setup** > **Import** and click **Run now**.

If the import still fails, contact <support@channable.com>.

</details>

<details>

<summary>I already uninstalled the Shopify app</summary>

Reinstall the **Channable** app first.

After reinstalling, return to Channable and renew the connection.

</details>


# Understanding expired, outdated, and faulty connections

This article explains how and why connections expire or become faulty and what to do next.

To learn how to renew a connection, refer to [How to renew a connection](/get-started/getting-started/connections-in-channable/how-to-renew-a-connection).

### Use cases

* The connection shows **Expired** on your connections page → **Renew your connection**
* The core flow works, but new features fail → See **Outdated connections**
* You’re experiencing errors with no expired label → See **Faulty connections**

<details>

<summary>Expired connections</summary>

Some platforms only authorize you to connect for a certain period of time. Once authorization expires, the connection stops working until you renew it.

**Symptoms of expired connections**

* Updates to your listings and ads aren’t sent to the marketplace
* Changes made in Channable don’t appear on the marketplace / your webshop
* Orders are blocked and don’t appear in Channable or your webshop

**What to do**

* Renew the expired connection

You can find expired connections on the **Connections** page in your Channable account. Expired connections are labeled **Expired**. We also send an email to notify you to update your connection.

</details>

<details>

<summary>Outdated connections</summary>

Some connections need a manual refresh, even if they don’t have a fixed expiry date. This often happens when a platform tightens their access rights or policies, or when scopes change to support new functionality.

**Symptoms of outdated connections**

* Core flows work, but newer features/flows fail
* Connection has stopped working entirely

{% hint style="info" %}
**Example**

If Channable adds support for a new Shopify feature or policy change that requires additional read and write scopes, your Shopify connection might continue to retrieve orders, but new feature endpoints fail. In some cases, policy changes could block requests entirely until you renew the connection.
{% endhint %}

**What to do**

* Renew your connection to apply the latest scopes, or opt out of that feature (conditional).

If renewing doesn’t help, treat it like a faulty connection.

</details>

<details>

<summary>Faulty connections</summary>

Faulty connections occur due to errors or misconfiguration. They can cause partial errors but still go through, or fully fail.

**Symptoms of faulty connections**

* Items and ads may update sporadically or not at all
* Only some changes might get through, leading to incomplete or incorrect product information
* Orders don’t sync properly, causing delays or missing orders

**Common causes**

* Rate limits
* Revoked or changed credentials
* Platform outage or temporary errors on the platform’s side

**What to do**

* Check the error message and attempt to solve the issue.
* Renew your connection.

If problems persist, contact Support. In your message, include the following:

* Connection name and platform
* Last successful sync time
* Exact error message shown

</details>

### Known connections with expiration times

Important: This table is a loose indication of when you can expect a marketplace connection to expire. Actual times may change at the platform’s discretion.

| **Marketplace**  | **Expiration time** |
| ---------------- | ------------------- |
| Afosto           | Varies              |
| AliExpress       | Varies              |
| Amazon           | 1 year              |
| Bol              | 1 year              |
| eBay             | 18 months           |
| Google Analytics | Varies              |
| Google Shopping  | Varies              |
| Miravia          | 2 years             |
| 2dehands         | Varies              |


# Viewing your connections Connections overview

Channable connections are the 3rd party platforms that we work with and which are available for you to use.

Some examples of connections are:

* Google AdWords and Analytics
* Bol.com
* Admarkt (Marktplaats)
* Lightspeed
* PrestaShop

### How to delete existing connections

{% stepper %}
{% step %}

### Access Company settings

In the navigation menu, go to **\[Your company] > Company settings > Connections**. This will open an overview of all the connections you have established.
{% endstep %}

{% step %}

### Edit the connection

Navigate to the connection you want to delete and click the "edit" button located to the right of the connection.

<figure><img src="/files/e47de48c1f05c8f3292afb13f0bdcc1a2736e270" alt=""><figcaption></figcaption></figure>
{% endstep %}

{% step %}

### Delete the connection

After you have accessed the edit option, click the options gear at the top right corner and click "delete connection".

<figure><img src="/files/546cc70e8bf25e9401e152032adfab93c615a330" alt=""><figcaption></figcaption></figure>

{% endstep %}
{% endstepper %}


# Channable Academy: Complete courses and earn badges

The Channable Academy is an online learning center with interactive courses you can follow to expand your Channable knowledge and skills.

### How to access the Channable Academy

Go to [academy.channable.com](http://academy.channable.com/) and sign in with Single-Sign-On (SSO).

OR

Log into [Channable](https://app.channable.com/) and go to **Channable Academy** in the main navigation menu.

### Log in with Single-Sign-On (SSO)

You need to sign in to the Channable Academy using your Channable account. This means that you only need one account to use both the Channable platform and Channable Academy.

{% hint style="success" %}
**Tip:** We support [SSO through Google](/account-billing/manage-your-account-and-settings/set-up-and-manage-single-sign-on-sso) for logging into Channable. You need to have a Google account with a verified email address.
{% endhint %}

### Earn Channable Academy badges

We offer shareable digital badges that you can share, for example, on LinkedIn. Our digital badges demonstrate your Channable proficiency by representing specific knowledge and skills.

We issue these badges using Accredible.

### Who to contact for support

{% columns %}
{% column %}
**Contact Accredible:**

* If you have issues signing into Accredible
* If you have questions related to the Accredible platform
  {% endcolumn %}

{% column %}
**Contact Channable Support:**

* If you did not receive your badge
* If you encounter a bug in the course or quiz that you’d like to report
  {% endcolumn %}
  {% endcolumns %}

<details>

<summary>Issues with the Accredible platform</summary>

* Go to their [Help Center](https://help.accredible.com/s/article/how-do-i-use-my-new-credential?language=en_US)
* Or [contact Accredible’s support team](https://help.accredible.com/s/contactsupport?language=en_US)

</details>

<details>

<summary>Issues with Channable Academy</summary>

* [Contact our Support team](/get-started/contact-support)

</details>


# Channable Academy certificates

If you have lost your Channacademy certificates, or if you've never received them, you can request them again by entering your email address in the [Credential Retrieval Tool](https://v2.accounts.accredible.com/retrieve-credentials?app=recipient-portal\&origin=https:%2F%2Fwww.credential.net).

### How to retrieve your credentials

{% stepper %}
{% step %}

### Open the Credential Retrieval Tool

Head over to the online [Credential Retrieval Tool.](https://v2.accounts.accredible.com/retrieve-credentials?app=recipient-portal\&origin=https:%2F%2Fwww.credential.net)
{% endstep %}

{% step %}

### Enter your email

Enter the email address you used in your Channacademy and which you received the credentials for. It's important to use the right email address since this is how we find your credentials.
{% endstep %}

{% step %}

### Retrieve your credentials

Click on "Retrieve my credentials".
{% endstep %}

{% step %}

### Check your email

You should now receive an email containing links to all the certificates belonging to that email address.
{% endstep %}
{% endstepper %}

<details>

<summary>I still didn't receive my credentials</summary>

If you didn't receive an email with links to your credentials or your email address isn't accepted in the Credential Retrieval Tool, then please [contact our Technical support department](https://www.channable.com/contact).

</details>


# Get started as an agency

Learn how agencies can get started with Channable, use the Agency Dashboard, and understand the Partner Program.

## Join Channable's Agency Partner Program

{% columns %}
{% column %}
The Agency Partner Program is for agencies and freelancers who actively manage client accounts in Channable.

Join the program to get agency-specific access, support, and partner benefits as you grow.

You can also earn partner commission when you actively manage client accounts. See [How partner commission works](#how-partner-commission-works).

{% endcolumn %}

{% column %}

<h2 align="center"><img src="/files/PmW3nJci2gZlck2thPUW" alt="" data-size="original"></h2>

{% endcolumn %}
{% endcolumns %}

{% hint style="info" %}
Fill out [this form](https://www.channable.com/partner-apply) to get started. We will contact you with the next steps.
{% endhint %}

{% stepper %}
{% step %}

### Apply to join

Complete the [partner application form](https://www.channable.com/partner-apply).

After approval, you sign the partner agreement and receive your partner code.
{% endstep %}

{% step %}

### Get access to your Agency Dashboard

Once your setup is complete, you get your own [Agency Dashboard](/get-started/getting-started-agencies/agency-dashboard).

Use it to manage client access, review connected companies, and support your team.
{% endstep %}

{% step %}

### Invite your colleagues

You can invite unlimited agency colleagues at no extra cost.

Once your **Agency Dashboard** is ready, add your collaborators and manage their roles in one place. Learn more in [Manage access to your Agency Dashboard](/get-started/getting-started-agencies/agency-dashboard/manage-access-to-your-agency-dashboard).
{% endstep %}

{% step %}

### Start managing client accounts

Connect existing client companies or create new ones from the **Agency Dashboard**.

This is how you manage access across your agency and work toward partner benefits and commission.
{% endstep %}
{% endstepper %}

{% tabs %}
{% tab title="Benefits" %}
Channable lets agencies manage their clients' channels from one place.

Instead of working in separate tools or isolated accounts, your team works from a central structure.

Key benefits include:

* **Feed management:** Build, clean, and optimize product feeds for Google Shopping, Meta, marketplaces, and more.
* **PPC automation:** Launch and manage dynamic campaigns at scale without manual updates per client.
* **Marketplace integration:** Connect clients to Amazon, bol, Zalando, and many other marketplaces.
* **Shared account structure:** One **Agency Dashboard** gives your whole team access to connected client accounts.
* **Scalability:** The setup stays consistent as your client portfolio grows.
* **Dedicated guidance:** As an agency partner, you work with a dedicated Customer Success Manager.

Your Customer Success Manager supports you with:

* strategic sessions
* tailored training
* regular impact reviews

This helps you scale efficiently, improve client performance, and get more out of Channable.
{% endtab %}

{% tab title="Eligibility" %}
The program is open to:

* agencies of any size
* freelancers
* teams that want shared access to multiple client accounts
  {% endtab %}

{% tab title="Pricing" %}
Joining the Agency Partner Program is free.

There are no extra fees for agencies to participate in the program.

The standard monthly Channable subscription still applies and can be paid either by your client or by your agency.
{% endtab %}
{% endtabs %}

### How partner levels work

Your partner level is based on your managed customers and their combined revenue.

You progress through three levels: **Bronze**, **Silver**, and **Gold**.

<table><thead><tr><th width="146.805419921875">Level</th><th>Best for</th><th>Includes</th></tr></thead><tbody><tr><td><strong>Bronze</strong></td><td>New partners building their first managed client base.</td><td>Official partner status, basic co-marketing, and support while you get started. Most agencies reach this level in about 3 months.</td></tr><tr><td><strong>Silver</strong></td><td>Growing partners managing more clients and revenue.</td><td>Dedicated support, more visibility in the Partner Directory, and access to product training.</td></tr><tr><td><strong>Gold</strong></td><td>Established partners with the strongest program footprint.</td><td>Priority support, early feature access, co-marketing opportunities, and the highest partner commission.</td></tr></tbody></table>

{% hint style="info" %}
Some partner criteria also depend on agency training. See [Agency partner level training requirements](/get-started/getting-started-agencies/get-started-as-an-agency/agency-partner-level-training-requirements).
{% endhint %}

### How partner commission works

To claim partner commission, you must actively manage your clients' Channable accounts.

This means:

* creating and maintaining feeds
* acting as the first line of technical support for your clients' basic questions

Make sure the correct partner code is linked to each client company. Learn how in [How to use a Partner code](/get-started/getting-started-agencies/get-started-as-an-agency/how-to-use-a-partner-code).

### Build the right client setup

We recommend connecting clients through the **Agency Dashboard** instead of working only with direct user invites.

This gives your team a clearer account structure and makes access management easier as your agency grows.

To set up client access, start with:

* [Agency Dashboard](/get-started/getting-started-agencies/agency-dashboard)
* [Types of access to client companies](/get-started/getting-started-agencies/agency-dashboard/types-of-access-to-client-companies)
* [Request access to existing companies](/get-started/getting-started-agencies/agency-dashboard/request-access-to-existing-companies)

<table data-view="cards"><thead><tr><th></th><th></th><th data-hidden></th><th data-hidden data-card-target data-type="content-ref"></th></tr></thead><tbody><tr><td><h4><i class="fa-handshake-angle">:handshake-angle:</i></h4></td><td><strong>How to use a partner code</strong></td><td></td><td><a href="/pages/c92fc53950d16bd9e03dbf216bfc700c56271bab">/pages/c92fc53950d16bd9e03dbf216bfc700c56271bab</a></td></tr><tr><td><h4><i class="fa-handshake-angle">:handshake-angle:</i></h4></td><td><strong>Agency Dashboard</strong></td><td></td><td><a href="/pages/f06301e589a42e6765dd4d10563596f92e5c4b31">/pages/f06301e589a42e6765dd4d10563596f92e5c4b31</a></td></tr><tr><td><h4><i class="fa-gear">:gear:</i></h4></td><td><strong>Types of access to client companies</strong></td><td></td><td><a href="/pages/2B3OInNmaHhV9SOqTeNt">/pages/2B3OInNmaHhV9SOqTeNt</a></td></tr></tbody></table>


# How to use a Partner code

Learn what a Partner code is, how partner levels work, and where to add the code.

{% hint style="info" %}
For the full Agency Partner Program overview, start with [Get started as an agency](/get-started/getting-started-agencies/get-started-as-an-agency).
{% endhint %}

<details>

<summary>What is a Partner code?</summary>

This code is linked to a specific marketing agency and is used to determine which accounts are actively managed by the linked agency.

The Partner code is shared by Channable when the partner agreement is signed.

</details>

<details>

<summary>How is my Partner Level determined?</summary>

Your partner level is based on your managed customers and their combined revenue.

For the full overview of partner levels, benefits, and training criteria, see [Get started as an agency](/get-started/getting-started-agencies/get-started-as-an-agency).

</details>

<details>

<summary>Where do I fill in the Partner code?</summary>

To add a Partner code to a Channable account, **the agency first has to be** [**granted access** **to the account**](/get-started/getting-started-agencies/agency-dashboard/request-access-to-existing-companies)**.**

Once the agency has access to the account, the company owner can:

1. Go to **Company settings > Agency details.**
2. At **Managing agency (partner code),** the Partner code can be filled in.
3. Click **Save**.

<figure><img src="/files/cLPX8eNToI09taJ4EcR2" alt=""><figcaption></figcaption></figure>

{% hint style="warning" %}
**Important:** If your Partner code is **not** filled in, you will **not** be receiving the Partner commission from Channable for managing those clients. On the main page of the Agency Dashboard, notice the checkmark next to the clients for which you receive a partner commission.
{% endhint %}

<figure><img src="/files/32187a8b4524475f78f865f3379571abb4f46467" alt=""><figcaption></figcaption></figure>

</details>

<details>

<summary>Who can fill in the Partner code?</summary>

Only users with the **Owner** role can fill in the Partner code as the managing agency. Learn more about [user roles and rights](/account-billing/manage-your-account-and-settings/manage-user-roles-in-a-channable-account).

</details>


# Agency partner level training requirements

A [minimum number](#minimum-trained-users-per-partner-level) of [trained agency users](#what-counts-as-a-trained-agency-user) is now part of the Agency Partner Program criteria.

For the full Agency Partner Program overview, including partner levels and commission, see [Get started as an agency](/get-started/getting-started-agencies/get-started-as-an-agency).

It applies:

* to agencies joining the Partner Program on or after 1 July 2026
* to all existing partners in the Partner Program from 1 January 2027

{% hint style="warning" %}
If you are an existing partner and you do not meet the minimum training requirement from 1 January 2027, you may be downgraded or lose partner status.
{% endhint %}

### What counts as a trained agency user

A trained agency user is an agency user who has either:

* completed a course through [Channable Academy](/get-started/getting-started/channable-academy-complete-courses-and-earn-badges)
* attended an in-person training provided by Channable

{% hint style="info" %}
There is currently no requirement to complete a specific course or in-person training. This may change in the future, in which case we will inform you.
{% endhint %}

### How we check your training status

There is currently no self-service way for agencies to check how many trained users they have.

Channable checks this during Partner Program reviews, alongside the other Partner Program criteria.

We can verify completed training because Channable Academy is connected to our CRM system.

{% hint style="info" %}
You do not need to report this manually. We review the training requirement as part of the full Partner Program assessment.
{% endhint %}

{% hint style="success" %}
We are working on a way to make this visible so agencies can check their trained users themselves.
{% endhint %}

### Minimum trained users per partner level

This requirement is in addition to the existing Partner Program criteria, including the minimum number of managed live customers and minimum monthly revenue. See the full [Partner Program criteria](https://get.channable.com/agency-partner-program).

| Partner Level | Minimum trained agency users |
| ------------- | ---------------------------- |
| **Bronze**    | 1                            |
| **Silver**    | 2                            |
| **Gold**      | 2                            |


# Find an agency partner

Find a Channable agency partner to help with feeds, campaigns, and eCommerce growth.

If you want expert help with Channable, work with an agency partner.

<figure><img src="/files/HSOq5e5nGH7wqEqeXP0A" alt="" width="375"><figcaption></figcaption></figure>

Whether you’re optimizing product feeds, automating campaigns, or scaling your eCommerce strategy, the right partner makes all the difference.

Explore our curated directory of agency experts who know Channable inside and out and are ready to help.

[Find an agency partner](https://partners.channable.com/agencies)

{% hint style="info" %}
Agency partners can help with feed optimization, campaign automation, marketplace setup, and broader eCommerce growth.
{% endhint %}


# Agency Dashboard

Learn how to use the Agency Dashboard to manage client companies, monitor account issues, and control agency access.

The **Agency Dashboard** is your central place to manage client companies and agency users.

For the full Agency Partner Program overview, start with [Get started as an agency](/get-started/getting-started-agencies/get-started-as-an-agency).

### Agency Dashboard benefits

* **See all connected companies:** Monitor the client companies your agency manages, all from one view.
* **Manage access across your team:** Agency users automatically get access to connected companies.
* **Respond faster to issues:** Review account errors and take action without switching between accounts.
* **Disconnect companies when needed:** Remove access cleanly when a client relationship ends.


# Types of access to client companies

Learn the difference between direct and agency access to client companies in the Agency Dashboard and why we recommend agency access.

There are two options to have client companies appear in the Agency Dashboard.

For the broader Agency Partner Program overview, see [Get started as an agency](/get-started/getting-started-agencies/get-started-as-an-agency).

* **Direct access:** your email address has been directly invited to a company, as an Owner, Employee, or Collaborator, in the **\[Your company] > Company settings > Manage access**.
* **Agency access:** you have access to the company because it is connected to your agency through the Agency Dashboard (by [requesting access with a link](/get-started/getting-started-agencies/agency-dashboard/request-access-to-existing-companies) or [creating a new company from the dashboard](/get-started/getting-started-agencies/agency-dashboard/create-a-new-company-for-your-client)).

{% hint style="warning" %}
**Important:** Only having a partner code filled in the settings doesn't change anything! The reason for this is that it is possible for an advertiser to have two agencies, however, only one partner code can be filled in. This would result in only one of the two agencies being connected. This is why you should request access with a link.
{% endhint %}

Due to allowing for these two types, the companies you see in the Agency Dashboard vary from the companies your colleague sees.

### Agency access

#### Example:

Anna, Peter, and Max work at an Agency. They use Channable to manage all their clients and they have their own Agency Dashboard.

* In total, they work with three clients:
  * Anna’s email address `anna@agency.com` is invited to Client 1.
  * Peter’s email address `peter@agency.com` is invited to Client 2.
  * Anna has created Client 3 from the Agency Dashboard, thus it is connected to the Agency. Max is a new employee at the Agency, and he was just added to the Agency Dashboard in Channable.
* As a result, Anna will see Client 1 and Client 3. She can not see Client 2 due to a lack of access rights or invitation to that client.
* Similarly, Peter will only see Clients 2 and 3, and Max will only see Client 3.

### Why we recommend agency access

#### **Simplified client management**

* When you sign a new client and add their company to the Agency Dashboard through Agency Access, all users will automatically see the new client account.
* If you stop working with a client, one of the marketers can remove the company from the Agency Dashboard, and it will no longer be visible to anyone. This helps maintain a clear overview with minimal effort.

#### **Streamlined agency user management**

* If a colleague is suddenly unavailable, there's no need to worry about their access to client companies, as all agency users have access automatically. Similarly, If a new colleague joins the agency, the Agency Lead can simply add them to the Agency Dashboard, and they will immediately have access to all clients.
* If a colleague leaves the agency, by removing them from the Agency Dashboard you will automatically restrict their access to client companies.

**I want my colleagues from the agency to see my clients**

If you find yourself in a situation similar to that of the Agency in the example above, and you want everyone to see the same companies in the Agency Dashboard, follow these steps:

1. Click **Convert access** next to your **Direct Access** companies. The access will be automatically converted, and all agency users will have access to that company.
2. The owner of the company will receive an email with a notification about the connection, along with a link to disconnect the company from the agency if they choose to.

<details>

<summary>How can I see which access type I have with a certain company?</summary>

On the main page look at the Access Type. To determine the type of access you have to a company, you can look at the role displayed in the “Access Type” column.

If you have **agency access**, meaning the company is connected to the agency, your role will be displayed as a **Marketer or Agency lead.**

On the other hand, if you have **direct access**, meaning your email address was invited to the company, your role will be displayed as an **Employee, Collaborator, or Owner.**

The image shows companies with agency access marked in orange and companies with direct access marked in blue.

</details>

#### Connected companies <a href="#h_01hgb8twrjg7re8awhtvv393zr" id="h_01hgb8twrjg7re8awhtvv393zr"></a>

In the **Connected companies** tab, the companies displayed there are all connected to your agency. If a company is shown on the main page but not in **Connected companies**, it means you have direct access to it.


# Manage access to your Agency Dashboard

Learn how to invite agency users, assign roles, and manage access to your Agency Dashboard.

### Locations for applying user permissions

User permissions in Channable are set across three key areas, each impacting access and functionality differently:

* **Agency Dashboard**
* **Main company**
* **Client companies**

<figure><img src="/files/8ee30260ccbf068610bee2e871a2ffe59978917e" alt=""><figcaption></figcaption></figure>

### Types of Agency roles

Agency roles in Channable, such as **Marketeer** and **Agency Lead.** These roles define user access across the Agency Dashboard, the agency’s main company, and client companies.

<table data-header-hidden><thead><tr><th width="178.333251953125"></th><th></th><th></th><th></th></tr></thead><tbody><tr><td><strong>Role</strong></td><td><strong>Agency Dashboard</strong></td><td><strong>Main company (of the agency)</strong></td><td><strong>Client companies</strong></td></tr><tr><td><strong>Marketeer</strong></td><td>Can see other users in the Agency Dashboard.</td><td>Permissions equivalent to an <strong>Employee</strong> role.</td><td>Permissions equivalent to an <strong>Employee</strong> role.</td></tr><tr><td><strong>Agency Lead</strong></td><td>Can change user roles (e.g., promote a <strong>Marketeer</strong> to <strong>Agency Lead</strong>).<br>Can add or remove agency users.</td><td>Permissions equivalent to an <strong>Owner</strong> role.</td><td>Permissions equivalent to an <strong>Employee</strong> role.</td></tr></tbody></table>

{% hint style="info" %}
Learn more about [user roles in Channable](/account-billing/manage-your-account-and-settings/manage-user-roles-in-a-channable-account).
{% endhint %}

### Invite others to access your Agency Dashboard

1. Go to the **Agency Users** tab and click **Invite users**.

   <figure><img src="https://helpcenter.channable.com/~gitbook/image?url=https%3A%2F%2Fcontent.gitbook.com%2Fcontent%2FUAGSVlvcNsqEqVUgr0tD%2Fblobs%2F4iwdKHGZwpm3AsjXvclc%2F19238108127378&#x26;width=768&#x26;dpr=3&#x26;quality=100&#x26;sign=4da6d65a&#x26;sv=2" alt=""><figcaption></figcaption></figure>
2. At **Invite email**, enter the email address of the team member you wish to invite and at **Role**, select their role (**Marketeer** or **Agency Lead**). Click **Invite user**.

   <figure><img src="https://helpcenter.channable.com/~gitbook/image?url=https%3A%2F%2Fcontent.gitbook.com%2Fcontent%2FUAGSVlvcNsqEqVUgr0tD%2Fblobs%2F8W5sJjdfF13ZJfQqTTLM%2F19238094303122&#x26;width=768&#x26;dpr=3&#x26;quality=100&#x26;sign=24961ee0&#x26;sv=2" alt=""><figcaption></figcaption></figure>
3. The invited user will receive an email instructions on how to continue.
4. After inviting a team member, they will show on the **Agency Users** page once they accept the invitation. If the invitation has not yet been accepted, you can find the user in the **Pending invites** tab.

   <figure><img src="https://helpcenter.channable.com/~gitbook/image?url=https%3A%2F%2Fcontent.gitbook.com%2Fcontent%2FUAGSVlvcNsqEqVUgr0tD%2Fblobs%2FiwrPAUqYFipCnQRXFfDR%2F19238094306194&#x26;width=768&#x26;dpr=3&#x26;quality=100&#x26;sign=64492c4b&#x26;sv=2" alt=""><figcaption></figcaption></figure>

{% hint style="info" %}
**Note:** The person you invite will automatically have access to all your managed companies. If you want a client to see how you are managing their account, [invite them to their specific company account ](/account-billing/manage-your-account-and-settings/manage-user-roles-in-a-channable-account)instead.
{% endhint %}

### Remove a user from the Agency Dashboard

1. Go to the **Agency users** section.
2. Locate the user you want to remove and click the cogwheel icon next to their name.
3. In the pop up, select **Remove user from the agency** from the dropdown.<br>

<figure><img src="/files/965ca0b106bc1ca1ae55ace9b4d2f7b59dad5850" alt=""><figcaption></figcaption></figure>

Once completed, the user will be removed from your **Agency Dashboard** and will no longer have access to your connected companies.

### Change a user role

1. Go to the **Agency Users** section.
2. Locate the user whose role you want to change and click the cogwheel icon next to their name.
3. Select **Manage role** from the dropdown.<br>

<figure><img src="/files/28951b8e04d6100ffa809565ad488842e9e68e01" alt=""><figcaption></figcaption></figure>


# Request access to existing companies

Learn how to request access to an existing company through your Agency Dashboard.

Imagine you have just signed a new client and they already have a company in Channable. To request access to that Company through your Agency Dashboard, follow these steps:

{% stepper %}
{% step %}

### Request new access

On the main page of your Agency Dashboard, click **Request new access**.

<figure><img src="/files/839b4bacafc04d55a03f4c02904c03201169ced8" alt=""><figcaption></figcaption></figure>
{% endstep %}

{% step %}

### Generate request link

On the next page, click **Generate request for access link**.

<figure><img src="/files/c667e16f1fcf60dde83ee1c9b9dacab93fd68458" alt=""><figcaption></figcaption></figure>
{% endstep %}

{% step %}

### Send link to the company's Owner

Make sure to send the link to the email address of the person with the **Owner** role of the company. Learn more about [user roles](/account-billing/manage-your-account-and-settings/manage-user-roles-in-a-channable-account).
{% endstep %}

{% step %}

### Client grants access

Your client should open the link, select the Channable company they wish to give you access to, and click **Grant access**.<br>

<figure><img src="/files/d8226fccd885bd676ce34094498a865e3b362ea4" alt=""><figcaption></figcaption></figure>
{% endstep %}

{% step %}

### Company shows in your Agency Dashboard

Once access has been granted, the Channable company will automatically appear in your Agency Dashboard. All agency users will immediately have access to the new company, so there's no need to add them manually.
{% endstep %}
{% endstepper %}


# Create a new company for your client

Learn how to create a new client company from your Agency Dashboard.

{% hint style="info" %}
**Note:** If you create a company from the Agency Dashboard, other users (your colleagues) in the Agency Dashboard will have access to it.
{% endhint %}

1. Go to your **Agency Dashboard**.
2. Click **Create new company**.

<figure><img src="/files/5e85d652f8b0eb20ab2c264f8c95c94faf7f9b84" alt=""><figcaption></figcaption></figure>

3. In the pop up, add the:
   1. **Company name**
   2. **Country**
   3. **Telephone number**
4. Click **Continue**. Your partner code will be automatically filled in.

<figure><img src="/files/d51ce0fb8ef3c88edb666901031c21de8d559713" alt=""><figcaption></figcaption></figure>

Later you can decide if you want to [invite your client](/account-billing/manage-your-account-and-settings/manage-user-roles-in-a-channable-account) to have access to the company.


# Change error notifications for agency users

Learn how to change error notification settings for agency users in the Agency Dashboard.

All agency users will automatically receive email notifications about errors from all customers (including those [connected to the Agency Dashboard with the link](/get-started/getting-started-agencies/agency-dashboard/request-access-to-existing-companies)).

If you prefer not to receive these notifications, you can opt out by following these steps:

{% hint style="warning" %}
**Important:** These notification settings are specific to each user and company. Saving the settings will only impact your own account, not the accounts of other users who have access to the company. For example, if Marie opts in and Anna opts out, Marie will keep receiving error messages while Anna will not.
{% endhint %}

1. Log in using the email address for which you want to adjust the settings.
2. Go to **Companies** in the Agency Dashboard and locate the <i class="fa-bell-ring">:bell-ring:</i> icon next to the relevant company.

<figure><img src="/files/6660c5cd0e135a30309341f8f47b27acbcb6ce07" alt=""><figcaption></figcaption></figure>

3. On the **Notifications settings** page, select the option "No notifications" in all sections.
4. Click **Save**.

<figure><img src="/files/d587bd441dc67fde6fe650209537d31129f5a251" alt=""><figcaption></figcaption></figure>


# Remove a company

Learn how to remove a company from your Agency Dashboard or revoke direct access to it.

### Option 1: You were directly invited to the company as a User via your email address

1. On the **Agency Dashboard**, select the company you want to remove from the list, or use the search bar.

<figure><img src="/files/e94ef45847f38fe8b492f9942884c951e8ba8a5f" alt=""><figcaption></figcaption></figure>

2. Once the company is selected, the resulting page will lead to the company project. On the left side menu, click **Manage Access**.

<figure><img src="/files/1892102c956bba516493b2138daa0f4d34a624e1" alt=""><figcaption></figcaption></figure>

3. If you are the **Owner** of the company, [contact our support team](https://www.channable.com/contact) and request to be deleted from that company.
4. If you are a **Collaborator** or **Employee**, you can remove yourself by clicking **Remove yourself**.

{% hint style="info" %}
**Note:** Employees and Collaborators have different views for this process.
{% endhint %}

### Option 2: The company was connected to your Agency Dashboard via a link

1. Go to the **Connected companies t**ab in your Agency Dashboard.
2. Locate the company you want to remove and click the <i class="fa-link-slash">:link-slash:</i> icon in the “Disconnect company” column. <br>

<figure><img src="/files/6c63a2f96367c93be9bb11523eeec0d8126979a1" alt=""><figcaption></figcaption></figure>

3. In the pop up, click **Disconnect company**.

<figure><img src="/files/6a08331c4bc5a7284fcaca7d1e60dea38ed1575e" alt=""><figcaption></figcaption></figure>

The company will no longer appear on your main page in the Agency Dashboard, and noone from your agency should have access to it. If certain users can still see the company, they should follow the instructions in [Option 1](#option-1-you-were-directly-invited-to-the-company-as-a-user-via-your-email-address) to remove themselves from the company.


# Import product data

Bring your product data into Channable

{% columns %}
{% column valign="middle" %}

### Get started

Import your product data into Channable to build listings for your channels.

[Choose the import method based on your data source →](/import-data/import-how-to/import-your-product-data)
{% endcolumn %}

{% column %}

<figure><img src="/files/JC1dTtv2gWJgxW1ixe2K" alt="" width="375"><figcaption></figcaption></figure>
{% endcolumn %}
{% endcolumns %}

***

#### Choose your import method based on your data source

<table data-view="cards"><thead><tr><th></th><th></th><th></th><th data-hidden data-card-target data-type="content-ref"></th></tr></thead><tbody><tr><td><i class="fa-file-import">:file-import:</i></td><td><strong>Import via a data file</strong></td><td>Import your product data into Channable via a data file such as XML or CSV.</td><td><a href="/spaces/Za0iYflHeXmKWGnfFMAN/pages/8kDEIRabBgj0meVX0iwJ">/spaces/Za0iYflHeXmKWGnfFMAN/pages/8kDEIRabBgj0meVX0iwJ</a></td></tr><tr><td><i class="fa-cart-arrow-down">:cart-arrow-down:</i></td><td><strong>Import via a webshop</strong></td><td>Import your product data into Channable by connecting a supported webshop.</td><td><a href="/spaces/Za0iYflHeXmKWGnfFMAN/pages/vaDyaIxwwfqUIIdeJCKr">/spaces/Za0iYflHeXmKWGnfFMAN/pages/vaDyaIxwwfqUIIdeJCKr</a></td></tr></tbody></table>

#### Learn key import concepts for working with your product data

<table data-view="cards"><thead><tr><th></th><th></th><th></th><th data-hidden data-card-target data-type="content-ref"></th></tr></thead><tbody><tr><td><i class="fa-arrow-down-to-bracket">:arrow-down-to-bracket:</i></td><td><strong>Learn about importing product data</strong></td><td>To start working with your data in Channable, you first need to import it.</td><td><a href="/spaces/Za0iYflHeXmKWGnfFMAN/pages/hIQl9ilwVlspX312zJrj">/spaces/Za0iYflHeXmKWGnfFMAN/pages/hIQl9ilwVlspX312zJrj</a></td></tr><tr><td><i class="fa-arrow-down-to-bracket">:arrow-down-to-bracket:</i></td><td><strong>Learn about import fields</strong></td><td>Information about your product data is stored in 'import fields'. Learn how to work with them.</td><td><a href="/spaces/Za0iYflHeXmKWGnfFMAN/pages/bSKaCuvAsEacAfc6NaA8">/spaces/Za0iYflHeXmKWGnfFMAN/pages/bSKaCuvAsEacAfc6NaA8</a></td></tr></tbody></table>

#### Troubleshoot import errors before you continue

<table data-view="cards"><thead><tr><th></th><th></th><th></th><th data-hidden data-card-target data-type="content-ref"></th></tr></thead><tbody><tr><td><i class="fa-wrench">:wrench:</i></td><td><strong>Troubleshooting: Import errors</strong></td><td>Find solutions to common import errors.</td><td><a href="/spaces/Za0iYflHeXmKWGnfFMAN/pages/QbIZi9CaLie7ird01ooZ">/spaces/Za0iYflHeXmKWGnfFMAN/pages/QbIZi9CaLie7ird01ooZ</a></td></tr></tbody></table>

#### Manage and monitor your imports after setup

<table data-view="cards"><thead><tr><th></th><th></th><th></th><th data-hidden data-card-target data-type="content-ref"></th></tr></thead><tbody><tr><td><i class="fa-merge">:merge:</i></td><td><strong>Combine multiple imports</strong></td><td>Combine data from multiple sources to enrich items or add shared data.</td><td><a href="/spaces/Za0iYflHeXmKWGnfFMAN/pages/rn0Xdp1OsrxTz5nIwsQF">/spaces/Za0iYflHeXmKWGnfFMAN/pages/rn0Xdp1OsrxTz5nIwsQF</a></td></tr><tr><td><i class="fa-list-radio">:list-radio:</i></td><td><strong>Reorder your imports</strong></td><td>Change the order of your imports when import priority affects the result.</td><td><a href="/spaces/Za0iYflHeXmKWGnfFMAN/pages/LxJdl75jyKunAHu4jkBW">/spaces/Za0iYflHeXmKWGnfFMAN/pages/LxJdl75jyKunAHu4jkBW</a></td></tr><tr><td><i class="fa-clock">:clock:</i></td><td><strong>Change the frequency of data updates</strong></td><td>Adjust your project schedule when your data needs to update more often.</td><td><a href="/spaces/Za0iYflHeXmKWGnfFMAN/pages/6MRmVe06HFI86RBh5lm7">/spaces/Za0iYflHeXmKWGnfFMAN/pages/6MRmVe06HFI86RBh5lm7</a></td></tr><tr><td><i class="fa-eye">:eye:</i></td><td><strong>View your items</strong></td><td>Review imported items and inspect the data for each product.</td><td><a href="/spaces/Za0iYflHeXmKWGnfFMAN/pages/zvsYKwD4eNhiMBTuWTAA">/spaces/Za0iYflHeXmKWGnfFMAN/pages/zvsYKwD4eNhiMBTuWTAA</a></td></tr></tbody></table>

#### Handle advanced import setups when your source needs them

<table data-view="cards"><thead><tr><th></th><th></th><th></th><th data-hidden data-card-target data-type="content-ref"></th></tr></thead><tbody><tr><td><i class="fa-key">:key:</i></td><td><strong>Importing a password protected feed</strong></td><td>Set up authentication for protected XML, CSV, JSON, or TXT feeds.</td><td><a href="/spaces/Za0iYflHeXmKWGnfFMAN/pages/ueY2w3iFJ12u9mXhPEIK">/spaces/Za0iYflHeXmKWGnfFMAN/pages/ueY2w3iFJ12u9mXhPEIK</a></td></tr><tr><td><i class="fa-cloud-sun">:cloud-sun:</i></td><td><strong>Add weather data to your import</strong></td><td>Combine weather data with your product data for weather-based automation.</td><td><a href="/spaces/Za0iYflHeXmKWGnfFMAN/pages/sm2XUCMqewSCWTJBPwHY">/spaces/Za0iYflHeXmKWGnfFMAN/pages/sm2XUCMqewSCWTJBPwHY</a></td></tr></tbody></table>


# Import your product data

Learn about the different options for importing your product data into Channable.

### Choose your import type

Channable offers several different import type options:

* [**Import via a data file**](/import-data/import-how-to/import-your-product-data/import-via-a-data-file): Import from XML, CSV, TXT, JSON, Google Sheets, or Google Cloud Storage.
* [**Import via a webshop**](/import-data/import-how-to/import-your-product-data/import-via-a-webshop): Import from popular webshops, such as Shopify, WooCommerce, or Magento.

Choose the import option that best fits your business. A data file import can be quicker if you already have a clean feed. A webshop import is often easier when you use a supported platform and can connect it directly.

| Import type                                                                                              | Typical setup effort | Best fit when                                                                                                                       | Why choose it                                                                                                                     |
| -------------------------------------------------------------------------------------------------------- | -------------------- | ----------------------------------------------------------------------------------------------------------------------------------- | --------------------------------------------------------------------------------------------------------------------------------- |
| [**Import via a webshop**](/import-data/import-how-to/import-your-product-data/import-via-a-webshop)     | `●○○` Low            | You use a supported webshop platform, such as Shopify, WooCommerce, or Magento.                                                     | It connects Channable directly to your store, so setup is often simpler and you do not need to create a separate data feed first. |
| [**Import via a data file**](/import-data/import-how-to/import-your-product-data/import-via-a-data-file) | `●●○` Medium         | You already have a product feed, spreadsheet, or export file. It also fits when your platform is not listed as a supported webshop. | It gives you a flexible import route from XML, CSV, TXT, JSON, Google Sheets, or Google Cloud Storage.                            |

***

### Meet channel requirements

Each channel has its own product data requirements. Fields, formats, and naming can differ per channel.

After you start your import, Channable organizes your source data into [import fields](/import-data/import-concepts/import-fields) and maps them to standardized project fields. This helps you prepare one product catalog for multiple channels.

Before you finish your import, review your field mapping carefully:

* Check that important fields like `id`, `price`, `link`, and `image_link` are mapped correctly.
* Fix any warnings in **Edit mapping** before you continue.
* Rename or remap fields if your source uses different field names.

For the next step, see [Map your import fields to project fields](/import-data/import-concepts/import-fields/map-your-import-fields-to-project-fields).


# Import via a data file

Choose a file type (CSV, XML, Google Sheets, TXT, or JSON) and import product data into Channable.

{% hint style="warning" %}
Your import file must meet [specific structure requirements](/import-data/import-how-to/import-your-product-data/import-via-a-data-file/requirements-for-import-files).
{% endhint %}

{% hint style="info" %}
Good to know

CSV, TXT, XML, and JSON importers support compressed `.gz` and `.zip` files.
{% endhint %}

### Choose a data file import type

<table data-view="cards"><thead><tr><th></th><th data-hidden data-card-cover data-type="image">Cover image</th><th data-hidden data-card-target data-type="content-ref"></th></tr></thead><tbody><tr><td>CSV (recommended)</td><td><a href="/files/FeJY5xu5brga7uvojFwy">/files/FeJY5xu5brga7uvojFwy</a></td><td><a href="/pages/1vy2cjATox8fNxtEIu6q">/pages/1vy2cjATox8fNxtEIu6q</a></td></tr><tr><td>XML</td><td><a href="/files/9R7DFUoQTcNtMR9RAKRX">/files/9R7DFUoQTcNtMR9RAKRX</a></td><td><a href="/pages/OeiRtPOifmBzjaYhxNvb">/pages/OeiRtPOifmBzjaYhxNvb</a></td></tr><tr><td>Google Sheets</td><td><a href="/files/4rhkD2y7RCVSuEphzGQ7">/files/4rhkD2y7RCVSuEphzGQ7</a></td><td><a href="/pages/52d1V69hd1kOOUzUFNhF">/pages/52d1V69hd1kOOUzUFNhF</a></td></tr><tr><td>TXT</td><td><a href="/files/j8GB40OUDaGHGlQyuDR2">/files/j8GB40OUDaGHGlQyuDR2</a></td><td><a href="/pages/06RFM1rB9Hk3rljqvaDt">/pages/06RFM1rB9Hk3rljqvaDt</a></td></tr><tr><td>JSON</td><td><a href="/files/X6GxezgausTIg24ALTXc">/files/X6GxezgausTIg24ALTXc</a></td><td><a href="/pages/7XrEJj0cOO2vk7D2NOwi">/pages/7XrEJj0cOO2vk7D2NOwi</a></td></tr></tbody></table>


# Requirements for import files

Structure rules, limits, and field guidance for import files and data feeds.

If you want to import your product information into Channable, you can use an import file/data feed such as an XML, CSV, TXT, Google Spreadsheet, or JSON. We have several tips and requirements for using an import file, which can be read in this article.

{% hint style="info" %}
This article is a reference for creating import files. Most export channels may require additional or different fields.
{% endhint %}

### General requirements

* The data feed must be available at an online URL so it can be downloaded at any moment.
* The data feed must be updated at the same URL (preferably at least once a day) with the latest product information (stock, prices, etc.).
* The data feed must be in one of these formats: XML, CSV, TXT, Google Spreadsheet, or JSON.
* CSV, TXT, XML, and JSON feeds can be compressed as `.gz` or `.zip` files.

{% hint style="warning" %}
**Important:** We only support flat XML and JSON structures. We don’t import values from XML attributes. (e.g. for `<color attribute="color">pink</color>`, the `attribute="color"` part can’t be imported.)
{% endhint %}

### Limits

* The number of imports per project is, by default, limited to 50.
* Each imported file may contain at most 10 million items.
* Each imported file may be no larger than 10 GB.

[Contact support](https://www.channable.com/contact) if you run into these limits so we can help you think about a solution.

### Fields

If you're building your own file (XML, CSV, or TXT) without experience, it can be hard to imagine which fields to include. Below is a standard overview of fields categorized by example/extra information and status.

| Field                      | Example / extra information                                | Status      |
| -------------------------- | ---------------------------------------------------------- | ----------- |
| additional\_image\_link    | Links to extra images, separated by commas                 | Recommended |
| age\_group                 | Adult/kids                                                 | Recommended |
| availability               | In stock / out of stock                                    | Mandatory   |
| brand                      |                                                            | Mandatory   |
| color                      |                                                            | Recommended |
| condition                  | New / used                                                 | Recommended |
| description                |                                                            | Mandatory   |
| delivery\_time             | 2-3 days                                                   | Recommended |
| gender                     | Male/female                                                | Recommended |
| google\_product\_category  |                                                            | Optional    |
| gtin/ean                   | EAN13-code                                                 | Recommended |
| id                         | 012608-BLUE-XXL (unique id preferably with color and size) | Mandatory   |
| image\_link                | Main image link                                            | Mandatory   |
| item\_group\_id            | 012608-BLUE (variant ID preferably with color)             | Recommended |
| link                       | <http://www.onlinestore.com/item>                          | Mandatory   |
| material                   | Material of the item, e.g. 100% cotton                     | Recommended |
| mpn                        | Manufacturer product number                                | Recommended |
| price                      |                                                            | Mandatory   |
| product\_type              | Breadcrumb of the item, e.g. men/sweaters                  | Mandatory   |
| sale\_price                | Discounted price                                           | Mandatory   |
| shipping\_price            |                                                            | Recommended |
| size                       |                                                            | Mandatory   |
| stock                      | Amount in stock, e.g. 12                                   | Recommended |
| title                      |                                                            | Mandatory   |
| percentage\_variant\_sizes | Percentage of available sizes per color (variant)          | Recommended |
| percentage\_product\_sizes | Percentage of available sizes per article                  | Recommended |

{% hint style="info" %}
Important: This article is to be used as a reference only as most export channels will require you to import additional/different fields.
{% endhint %}

### Structuring your file

* [Learn about delimiters](/import-data/import-how-to/import-your-product-data/import-via-a-data-file/requirements-for-import-files/delimiters)
* [Learn about quoting](/import-data/import-how-to/import-your-product-data/import-via-a-data-file/requirements-for-import-files/quoting)
* [Learn about encoding](/import-data/import-how-to/import-your-product-data/import-via-a-data-file/requirements-for-import-files/encoding)


# Delimiters

Learn which delimiters Channable supports and how to select the right one for your import file.

Delimiters are characters used to separate each field within your imported data file. Choosing the right delimiter is important to ensure fields are correctly interpreted from your dataset.

In this article, we go over common delimiters, delimiter options, and why delimiters are important.

***

### Common delimiters

The following are common delimiters used to separate data:

* **Comma** (`,`): Commonly used for CSV files.
* **Semicolon** (`;`): Often used in European data to avoid misinterpreting values (e.g. comma can be used as a decimal separator for price).
* **Tab:** Used in files with separated tabs. In text, this is represented with a large space.
* **Vertical bar** (`|`): Common alternative when commas or semicolons appear within your data.
* **Tilde** (`~`)
* **Circumflex** (`^`)

### How Channable handles delimiters

When importing product data from a data file, you'll be prompted to select your delimiter type.

* **Automatically detect:** Channable will attempt to automatically identify your delimiter by analyzing the structure of your data file.
* **Manually select:** Choose the delimiter that exactly matches the separation character used in your data file.

### Why selecting the right delimiter is important

If you choose the wrong delimiter, Channable may not be able to correctly separate your product's attributes (e.g. price, description, name). This often results in whole rows appearing as single, unseparated fields, or being included in the wrong columns.

You can notice this immediately in the **Edit mapping** stage of your import, or in **Items**.


# Quoting

Learn how quoting works in import files and how it affects field parsing.

Quoting settings specify how your text fields are encapsulated. It's an important part of correctly handling data that includes delimiters.

In this article, we explain your quoting options when importing product data, and why quoting is important.

***

### Quoting options in Channable

When importing product data from a data file, you'll be prompted to select your **Quoting** type.

* **Automatically detect:** Channable will attempt to automatically identify your quoting method.
* **Yes:** Select this if the text fields in your data file are enclosed in quotation marks (e.g. "product name", "description"). This tells Channable to treat everything within the quotes as a single field.
* **No:** Select this if your data fields aren't enclosed in quotation marks.

### Why selecting the right quoting is important

If quoting is determined incorrectly, it can affect how Channable interprets your data.

Example:

* Delimiter chosen: comma (`,`)
* Description without quotes:

  ```
  100% cotton, breathable, and stylish shirt
  ```

  The comma in the description may be misinterpreted as a field separator, causing the row to be parsed incorrectly.
* Description with quotes:

  ```
  "100% cotton, breathable, and stylish shirt"
  ```

  The entire quoted text will be treated as a single field, preventing commas inside the text from splitting the row.

{% hint style="info" %}
If your text fields can contain delimiter characters (commas, semicolons, tabs, etc.), ensure quoting is enabled or your file uses a quoting convention so those characters are not treated as field separators.
{% endhint %}


# Encoding

Learn which file encodings Channable supports and how to avoid character issues.

Encoding ensures all characters in your data file are displayed correctly when importing your product data. Choosing the wrong encoding type can lead to misinterpreted data, which can affect your entire dataset.

For example, special characters like `é` and `ä` can appear as strange symbols or quotation marks (`?`).

***

### Common encoding types

* **UTF-8:** Recommended for most languages. Can handle a wide array of characters.
* **ISO-8859-1:** Suitable for data containing characters from Western European languages. Supports a more limited character set compared to UTF-8.

### How Channable handles encoding

When importing product data from a data file, you'll be prompted to select your encoding type.

* **Automatically detect:** Channable will attempt to automatically identify your encoding type by analyzing common patterns in your data file. This works for most standard imports.
* **Manually select:** If you know your file's specific coding type, select it from the list.

### Why is selecting the right encoding important?

If after importing your product data you see strange, unreadable characters, or special characters are missing, this is likely an encoding error.

Selecting the right encoding tells Channable how to interpret your data to ensure your product names, descriptions, and other attributes display correctly.


# UPC / EAN / GTIN numbers

Understand product identifiers and how to use UPC, EAN, and GTIN values in your import.

### What is a GTIN?

GTINs, or Global Trade Item Numbers, are specific numbers assigned to your products to identify them. This number can be found on the product usually in a combination of barcode. Many marketplaces require you to send a GTIN together with your product information.

GTINs are unique to each product and can be different depending on the region or product type. GTINs are internationally recognized and thus make the ideal identifier for your products.

You've probably worked with or seen different variations of GTINs considering they can have different names depending on the region. The most common ones are UPCs, EANs, or ISBNs.

### What are UPCs and EANs?

UPCs and EANs are two of the different variations that are part of a GTIN. UPCs are mainly used in North America and used for almost all products (except for multipacks and books).

While the name is often used interchangeably, EANs and UPCs are not exactly the same as GTINs. EANs and UPCs are a type of barcode which you will see on almost all products and the GTIN is the number encoded within this barcode.

### What types of GTINs are there?

#### UPCs

UPCs are barcodes consisting of black lines and white spaces containing a 12-digit GTIN in a machine-readable format. This type is mainly used in North America.

[![01\_UPC\_2x.png](/files/4c759b5675ea51ed1d88d6ee5590f4609d2bcd1b)](https://helpcenter.channable.com/hc/article_attachments/21017067376146)

#### EANs

EANs are similar to UPCs only they consist of an 8 or 13-digit GTIN in a machine-readable format. This type is mainly used in Europe. The 13-digit type is the most commonly used.

[![02\_EAN\_2x.png](/files/a5534f476c67dddedf038087a638b4d39f18ce0f)](https://helpcenter.channable.com/hc/article_attachments/21017088089618)

#### ISBN

ISBNs are a type of GTIN specifically used for books worldwide and contain a 13-digit GTIN.

[![03\_ISBN\_2x.png](/files/b0e94fa1abdfce61e32ea8dbaff590789893b228)](https://helpcenter.channable.com/hc/article_attachments/21017067379346)

#### ASIN

ASINs are an identifier specifically for the Amazon marketplace and consist of a 10 symbol combination of letters and/or numbers.

[![04\_ASIN\_2x.png](/files/77eed87936f05782105c03b652c87f51fb45eb9b)](https://helpcenter.channable.com/hc/article_attachments/21017088096530)


# Add UPC / EAN / GTIN numbers to your import

Add UPC, EAN, or GTIN values to your import and map them correctly.

Most marketplaces require that you provide the UPC, EAN or GTIN number of a product. They use this to match product information based on this barcode. It depends on the marketplace which type of barcodes you need; some local marketplaces only accept EAN, whereas the global marketplaces usually accept any of these codes.

If these codes are not included in your import, you can add them manually.

{% stepper %}
{% step %}

### Get UPC / EAN / GTIN numbers for your products

If you don’t have these barcodes yet, there are two ways to get them:

* Ask your supplier — they should keep a list of barcodes for their products.
* [Buy barcodes for your products](https://www.gs1.org/standards/get-barcodes) from GS1, which is the official global barcode provider.
  {% endstep %}

{% step %}

### Create a data feed

Create a data feed in a Google Spreadsheet that contains all barcodes which you will import into Channable.

* Create a new Google Spreadsheet.
* Use the first row as a header. For example use ‘ID’ for the first column and ‘EAN’ for the second column.

![Import-EANs-Google-Sheets.png](/files/88ee3d305c7d74e88eb028bc5bff04eaf7d162fd)

* In the first column, provide all the IDs of your products.
* In the second column, put the matching UPC / EAN / GTIN for each product.
* Use the steps in [this article](/import-data/import-how-to/import-your-product-data/import-via-a-data-file/google-sheets) to import this sheet into Channable.

{% hint style="info" %}
Instead of ID, you can use another unique identifier for your products in the sheet (such as SKU or the product title). It is important that the identifier is unique and already exists in Channable. Make sure it is exactly the same as what you have in Channable (it is case-sensitive).
{% endhint %}
{% endstep %}

{% step %}

### Combine the data feed with your main import

* After you’ve provided the link to the Google Spreadsheet in Channable, you’re taken to the “Edit mapping” screen.
* At the bottom of the page you can specify which fields you want to combine. Select the field that is present in your main import and in the Google Spreadsheet data feed (in this case, it is id).

![Channable - combine on id](/files/5e9dc0e26dc4323b5efdc451e24ac0d9a762d4f8)

* Click **Save & Import**. The Google Spreadsheet will now be imported, and the barcode information will be added to your items.
  {% endstep %}
  {% endstepper %}


# Optimize bandwidth

Reduce import file size and bandwidth usage for faster, lighter updates.

### Bandwidth optimization using the ETag header

When you have a feed that changes less often than your project is scheduled to run, re-downloading the entire feed at every run would be wasteful. It could unnecessarily delay your project, and you incur unnecessary egress costs with your hosting provider.

To avoid unnecessary downloads, you can turn on bandwidth optimization for http and https imports. When this setting is turned on, we will still check your file at every run, but if your server indicates that the file did not change since the previous download, then we will not download it again.

<figure><img src="/files/916b069416e99a7f1c09e4d63cf1af703c0bfb10" alt=""><figcaption></figcaption></figure>

### Technical details

When bandwidth optimization is turned on, during a download we save the value of the [ETag http header](https://developer.mozilla.org/en-US/docs/Web/HTTP/Headers/ETag), if your server includes it in the response. At the next run, we include an [If-None-Match http header](https://developer.mozilla.org/en-US/docs/Web/HTTP/Headers/If-None-Match) with our request, that holds the previously observed ETag value. If your server then responds with http status code “304 Not Modified”, then we know that the file did not change.

This means that for bandwidth optimization to apply, your server must do two things:

* It must include an ETag header in its response
* It must respect the If-None-Match request header

Common servers such as Apache, Nginx, and Amazon S3, support this out of the box, so you don’t need to take any special care to take advantage of bandwidth optimization.

If your server does not include an ETag header, or if it never serves a “304 Not Modified” response, then bandwidth optimization has no effect, and we will download the entire file at every run.

### Q\&A

<details>

<summary>How do I know if bandwidth optimization is effective?</summary>

When we tried to import a file, but it did not change since the last import, you can see this in the status updates for that importer:

<figure><img src="/files/1c5683b59f5a8bd0d133b8dc2a22bc44a52fec4a" alt=""><figcaption></figcaption></figure>

</details>

<details>

<summary>Could data in Channable become outdated when bandwidth optimization is turned on?</summary>

No, there is no risk of stale data, if your server is behaving properly. Channable will still check if newer data is available at every scheduled run, and every time you click “run now” on the import, even when bandwidth optimization is turned on.

</details>

<details>

<summary>Is there any downside to enabling bandwidth optimization?</summary>

No, if your server is behaving properly, it is always safe to turn on bandwidth optimization. If your server does not support the features that are required to optimize bandwidth, the optimization will be ineffective, but it will not be harmful.

</details>

<details>

<summary>When should I turn off bandwidth optimization?</summary>

If your server is misconfigured, or if it contains a bug, it might respond with a “304 Not Modified” response, even when your feed did in fact change. The most common mistake is a server that sends a constant ETag value, which does not change even when your feed does. In this case, data in Channable would become stale. If you are unable to resolve this at your server, you can turn off bandwidth optimization in Channable.

</details>

<details>

<summary>Does bandwidth optimization prevent all unnecessary downloads?</summary>

We will still download your feed once every 10 days, even if your server indicates that the feed did not change. For files that change less often, this means that we occasionally download the entire file, but bandwidth optimization still saves at least 90% of your bandwidth.

</details>


# XML

Import product data from an XML feed and map fields to project fields.

In this article, you'll learn how to import product data from a XML file.

<details>

<summary>Example XML code</summary>

![XML.png](/files/a110efdd991966b7af0bd16360acfc4ed79d4ec8)

</details>

### Before you start

{% hint style="warning" %}
Important: Before importing, ensure your data file meets the [requirements for import files](/import-data/import-how-to/import-your-product-data/import-via-a-data-file/requirements-for-import-files).
{% endhint %}

{% hint style="info" %}
Good to know

* Your data feed URL **must be in an accessible online location**.
* CSV, TXT, XML, and JSON importers support compressed `.gz` and `.zip` files.
* The data feed has to be updated on the same URL, preferably at least once a day, with the latest product information such as stock and prices.
  {% endhint %}

### Your data source and Import settings

1. In Channable, go to **Setup > Import** and click **+ Choose import method**.
2. Select the XML file type.
3. Provide the requested information:
   * For **Name**, give your import a descriptive name (e.g. "Webshop XML import").
   * For **XML file url**, add the URL to fetch your live product data.
   * For **Authentication**, select your authentication type (if using one).
   * For **Encoding**, select your [encoding type](/import-data/import-how-to/import-your-product-data/import-via-a-data-file/requirements-for-import-files/encoding).
     * **Automatically detect:** Channable will attempt to automatically identify your coding type.
     * If your file is encoded with a specific type, select it from the list.
4. Click **Run import**.&#x20;

### Import mapping

This page displays fields retrieved from your data feed (e.g. price, description, title).

* **Imported data field:** Fields from your import data.
* **Project field:** Corresponding project fields in Channable. Our system will automatically detect and link most fields to standardized fields.

Match (map) your imported fields to a corresponding project field. Channable does most mapping automatically, but it's important to review and adjust before importing.

{% hint style="info" %}
Note: We create new project fields if we can't assign your import field to a standardized field. These fields will have a project field with the same name as your import field.
{% endhint %}

#### Before you continue

{% hint style="info" %}

* Compare and adjust mapping:

  Review your **Imported data fields** against Channable's matched **Project fields**. If a field was matched incorrectly, click on the field to select a different field.
* Check and correct field types:

  Check that the right field type is assigned to your project fields. If a field has the wrong type, click **Edit** next to the field, select the correct type in the dropdown, and click **Save & Import**.
* Exclude fields (optional):

  To exclude a field from being included in your product data, click the checkbox in the **Select** column for that field and click **Do not import selected fields**.
  {% endhint %}

Once you've finished mapping, click **Save & Import** to start importing your product data. Depending on how much data you're importing, it can take a while to finish.

{% hint style="info" %}
Note: Check the **Status** column in **Setup** to check your import progress. Your product data is fully imported when the Status is **Finished**.
{% endhint %}

***

### Overview

* Go to **Overview** to view your imported products.
* After your product data has finished importing, click on an item to see detailed information.

<figure><img src="/files/OOmR6aDntkdmtBWWCtEH" alt=""><figcaption></figcaption></figure>

Your import is now successfully set up! You can now use this product data to create and optimize Feeds, Marketplaces, Shopping Ads, and more in Channable.


# CSV

Import product data from a CSV feed and map fields to project fields.

A CSV file is a simple text file used to store tables of data, like spreadsheets or databases. Each line corresponds to a row, and values are commonly separated by commas. Opening CSV files directly in Excel can result in disorganized data, as Excel might not separate columns correctly. Understanding how to open CSV files properly in Excel ensures your data is displayed accurately and is easy to work with.

{% hint style="success" %}
**Note:** CSV is currently the best-optimized path to get data into Channable and using this format will result in the highest import speed.
{% endhint %}

<details>

<summary>Example CSV file</summary>

![CSV.png](/files/b618eda810e9c502a05652390ae77505b351a11f)

</details>

### Before you start

{% hint style="warning" %}
**Important:** Before importing, ensure your data file meets the [requirements for import files](/import-data/import-how-to/import-your-product-data/import-via-a-data-file/requirements-for-import-files).
{% endhint %}

{% hint style="info" %}
Good to know

* Your data feed URL **must be in an accessible online location**.
* CSV, TXT, XML, and JSON importers support compressed `.gz` and `.zip` files.
* The data feed has to be updated on the same URL, preferably at least once a day, with the latest product information such as stock and prices.
  {% endhint %}

### Your data source and Import settings

1. In Channable, go to **Setup > Import** and click **+ Choose import method**.
2. Select the CSV file type.
3. Provide the requested information:
   * For **Name**, give your import a descriptive name (e.g. "Webshop CSV import").
   * For **CSV file url**, add the URL to fetch your live product data.
   * For **Authentication**, select your authentication type (if using one).
   * For **Encoding**, select your [encoding type](/import-data/import-how-to/import-your-product-data/import-via-a-data-file/requirements-for-import-files/encoding).
     * **Automatically detect:** Channable will attempt to automatically identify your coding type.
     * If your file is encoded with a specific type, select it from the list.
4. Click **Run import**.&#x20;

### Import mapping

This page displays fields retrieved from your data feed (e.g. price, description, title).

* **Imported data field:** Fields from your import data.
* **Project field:** Corresponding project fields in Channable. Our system will automatically detect and link most fields to standardized fields.

Match (map) your imported fields to a corresponding project field. Channable does most mapping automatically, but it's important to review and adjust before importing.

{% hint style="info" %}
**Note:** We create new project fields if we can't assign your import field to a standardized field. These fields will have a project field with the same name as your import field.
{% endhint %}

#### Before you continue

{% hint style="info" %}

* Compare and adjust mapping:

  Review your **Imported data fields** against Channable's matched **Project fields**. If a field was matched incorrectly, click on the field to select a different field.
* Check and correct field types:

  Check that the right field type is assigned to your project fields. If a field has the wrong type, click **Edit** next to the field, select the correct type in the dropdown, and click **Save & Import**.
* Exclude fields (optional):

  To exclude a field from being included in your product data, click the checkbox in the **Select** column for that field and click **Do not import selected fields**.
  {% endhint %}

Once you've finished mapping, click **Save & Import** to start importing your product data. Depending on how much data you're importing, it can take a while to finish.

{% hint style="info" %}
**Note:** Check the **Status** column in **Setup** to check your import progress. Your product data is fully imported when the Status is **Finished**.
{% endhint %}

***

### Overview

* Go to **Overview** to view your imported products.
* After your product data has finished importing, click on an item to see detailed information.

Your import is now successfully set up! You can now use this product data to create and optimize Feeds, Marketplaces, Shopping Ads, and more in Channable.

<figure><img src="/files/OOmR6aDntkdmtBWWCtEH" alt=""><figcaption></figcaption></figure>

### Opening a CSV file in Excel

Follow the steps below to open a CSV file in Excel.

1. Open a new Excel file.
2. Navigate to the *Data* tab and choose *From Text/CSV*.
3. Set *File Origin* to **65001: Unicode (UTF-8)**.
4. Determine the delimiter used in your CSV file (e.g., comma, semicolon or tab) and select the value for the *Delimiter* option.
5. Click *Load* in the bottom right corner to correctly open the CSV file in Excel.

<figure><img src="/files/a9107080350b31c1f9faf7629d9252a796273e4f" alt=""><figcaption></figcaption></figure>

<figure><img src="/files/a03af339d4f0bc57cf6bc064fecade9aa73ab019" alt=""><figcaption></figcaption></figure>

By following these steps, you can ensure that your CSV files open correctly in Excel, preserving the data's accuracy.


# TXT

Import product data from a TXT feed, set encoding, and map fields to project fields.

In this article, you'll learn how to import product data from a TXT file.

### Before you start

{% hint style="warning" %}
Important: Before importing, ensure your data file meets the [requirements for import files](/import-data/import-how-to/import-your-product-data/import-via-a-data-file/requirements-for-import-files).
{% endhint %}

{% hint style="info" %}
Good to know

* Your data feed URL **must be in an accessible online location**.
* CSV, TXT, XML, and JSON importers support compressed `.gz` and `.zip` files.
* The data feed has to be updated on the same URL, preferably at least once a day, with the latest product information such as stock and prices.
  {% endhint %}

### Your data source and Import settings

1. In Channable, go to **Setup > Import** and click **+ Choose import method**.
2. Select the TXT file type.
3. Provide the requested information:
   * For **Name**, give your import a descriptive name (e.g. "Webshop TXT import").
   * For **TXT** **file url**, add the URL to fetch your live product data.
   * For **Authentication**, select your authentication type (if using one).
   * For **Encoding**, select your [encoding type](/import-data/import-how-to/import-your-product-data/import-via-a-data-file/requirements-for-import-files/encoding).
     * **Automatically detect:** Channable will attempt to automatically identify your coding type.
     * If your file is encoded with a specific type, select it from the list.
4. Click **Start import**. You will be directed to the **Edit mapping** page to import your product data.

### Import mapping

This page displays fields retrieved from your data feed (e.g. price, description, title).

* **Imported data field:** Fields from your import data.
* **Project field:** Corresponding project fields in Channable. Our system will automatically detect and link most fields to standardized fields.

Match (map) your imported fields to a corresponding project field. Channable does most mapping automatically, but it's important to review and adjust before importing.

{% hint style="info" %}
Note: We create new project fields if we can't assign your import field to a standardized field. These fields will have a project field with the same name as your import field.
{% endhint %}

#### Before you continue

{% hint style="info" %}

* Compare and adjust mapping:

  Review your **Imported data fields** against Channable's matched **Project fields**. If a field was matched incorrectly, click on the field to select a different field.
* Check and correct field types:

  Check that the right field type is assigned to your project fields. If a field has the wrong type, click **Edit** next to the field, select the correct type in the dropdown, and click **Save & Import**.
* Exclude fields (optional):

  To exclude a field from being included in your product data, click the checkbox in the **Select** column for that field and click **Do not import selected fields**.
  {% endhint %}

Once you've finished mapping, click **Save & Import** to start importing your product data. Depending on how much data you're importing, it can take a while to finish.

{% hint style="info" %}
Note: Check the **Status** column in **Setup** to check your import progress. Your product data is fully imported when the Status is **Finished**.
{% endhint %}

***

### Overview

* Go to **Overview** to view your imported products.
* After your product data has finished importing, click on an item to see detailed information.

<figure><img src="/files/OOmR6aDntkdmtBWWCtEH" alt=""><figcaption></figcaption></figure>

Your import is now successfully set up! You can now use this product data to create and optimize Feeds, Marketplaces, Shopping Ads, and more in Channable.


# JSON

Import product data from a JSON feed and map fields to project fields.

In this article, you'll learn how to import product data from a JSON file.

<details>

<summary>Example JSON file</summary>

![JSON.png](/files/309829a034922e21ea0b278e5f5b627a02e35a74)

</details>

### Before you start

{% hint style="warning" %}
Important: Before importing, ensure your data file meets the [requirements for import files](/import-data/import-how-to/import-your-product-data/import-via-a-data-file/requirements-for-import-files).
{% endhint %}

{% hint style="info" %}
Good to know

* Your data feed URL **must be in an accessible online location**.
* CSV, TXT, XML, and JSON importers support compressed `.gz` and `.zip` files.
* The data feed has to be updated on the same URL, preferably at least once a day, with the latest product information such as stock and prices.
  {% endhint %}

### Your data source and Import settings

1. In Channable, go to **Setup > Import** and click **+ Choose import method**.
2. Select the JSON file type.
3. Provide the requested information:
   * For **Name**, give your import a descriptive name (e.g. "Webshop JSON import").
   * For **JSON file url**, add the URL to fetch your live product data.
   * For **Authentication**, select your authentication type (if using one).
   * For **Encoding**, select your [encoding type](/import-data/import-how-to/import-your-product-data/import-via-a-data-file/requirements-for-import-files/encoding).
     * **Automatically detect:** Channable will attempt to automatically identify your coding type.
     * If your file is encoded with a specific type, select it from the list.
4. Click **Start import**. You will be directed to the **Edit mapping** page to import your product data.

### Import mapping

This page displays fields retrieved from your data feed (e.g. price, description, title).

* **Imported data field:** Fields from your import data.
* **Project field:** Corresponding project fields in Channable. Our system will automatically detect and link most fields to standardized fields.

Match (map) your imported fields to a corresponding project field. Channable does most mapping automatically, but it's important to review and adjust before importing.

{% hint style="info" %}
Note: We create new project fields if we can't assign your import field to a standardized field. These fields will have a project field with the same name as your import field.
{% endhint %}

#### Before you continue

{% hint style="info" %}

* Compare and adjust mapping:

  Review your **Imported data fields** against Channable's matched **Project fields**. If a field was matched incorrectly, click on the field to select a different field.
* Check and correct field types:

  Check that the right field type is assigned to your project fields. If a field has the wrong type, click **Edit** next to the field, select the correct type in the dropdown, and click **Save & Import**.
* Exclude fields (optional):

  To exclude a field from being included in your product data, click the checkbox in the **Select** column for that field and click **Do not import selected fields**.
  {% endhint %}

Once you've finished mapping, click **Save & Import** to start importing your product data. Depending on how much data you're importing, it can take a while to finish.

Note: Check the **Status** column in **Setup** to check your import progress. Your product data is fully imported when the Status is **Finished**.

***

### Overview

* Go to **Overview** to view your imported products.
* After your product data has finished importing, click on an item to see detailed information.

<figure><img src="/files/OOmR6aDntkdmtBWWCtEH" alt=""><figcaption></figcaption></figure>

Your import is now successfully set up! You can now use this product data to create and optimize Feeds, Marketplaces, Shopping Ads, and more in Channable.


# Google Sheets

Import product data from a public Google Sheet URL and map fields to project fields.

{% hint style="info" %}
Good to know

* Your data feed URL **must be in an accessible online location**.
* The data feed has to be updated on the same URL (recommended at least once a day) with the latest product information (e.g. available stock, prices).
  {% endhint %}

### Step 1: Your data source

{% hint style="warning" %}
**Important:** Before you start, make sure your Google sheet is [shared and publicly available](/import-data/import-how-to/import-your-product-data/import-via-a-data-file/google-sheets/share-a-google-sheet-make-publicly-available).
{% endhint %}

* In Channable, go to **Setup > Import** and click **+ Choose import method**.
* Select the Google sheets file type.

### Step 2: Import settings

* Provide the requested information:
  * For **Name**, give your import a descriptive name (e.g., "Webshop Google import").
  * For **Google spreadsheet url**, add the URL to fetch your live product data.
* Click **Run import**.&#x20;

### Step 3: Import mapping

This page displays fields retrieved from your data feed (e.g. price, description, title).

* **Imported data field:** Fields from your import data.
* **Project field:** Corresponding project fields in Channable. Our system will automatically detect and link most fields to standardized fields.

Match (map) your imported fields to a corresponding project field. Channable does most mapping automatically, but review and adjust before importing.

{% hint style="info" %}
**Note:** We create new project fields if we can't assign your import field to a standardized field. These fields will have a project field with the same name as your import field.
{% endhint %}

{% hint style="info" %}
Before you continue

1. Compare and adjust mapping:
   * Review your **Imported data fields** against Channable's matched **Project fields**. If a field was matched incorrectly, click on the field to select a different field.
2. Check and correct field types:
   * Check that the right field type is assigned to your project fields. If a field has the wrong type, click **Edit** next to the field, select the correct type in the dropdown, and click **Save & Import**.
3. Exclude fields (optional):
   * To exclude a field from being included in your product data, click the checkbox in the **Select** column for that field and click **Do not import selected fields**.

Once you've finished mapping, click **Save & Import** to start importing your product data. Depending on how much data you're importing, it can take a while to finish.

Note: Check the **Status** column in **Setup** to check your import progress. Your product data is fully imported when the Status is **Finished**.
{% endhint %}

### Step 3: Overview

* Go to **Overview** to view your imported products.
* After your product data has finished importing, click on an item to see detailed information.

<figure><img src="/files/OOmR6aDntkdmtBWWCtEH" alt=""><figcaption></figcaption></figure>

Your import is now successfully set up! You can now use this product data to create and optimize Feeds, Marketplaces, Shopping Ads, and more in Channable.

#### Read next

{% content-ref url="/pages/rn0Xdp1OsrxTz5nIwsQF" %}
[Combine multiple imports](/import-data/import-how-to/combine-multiple-imports)
{% endcontent-ref %}

{% content-ref url="/pages/XAtuxaZAvIvN503Rx8Kc" %}
[Share a Google sheet (make publicly available)](/import-data/import-how-to/import-your-product-data/import-via-a-data-file/google-sheets/share-a-google-sheet-make-publicly-available)
{% endcontent-ref %}


# Share a Google sheet (make publicly available)

Make a Google Sheet public so Channable can import it.

{% stepper %}
{% step %}

### Open your Google sheet

Open the Google sheet containing your product data and go to the sheet (tab) that you want to share.
{% endstep %}

{% step %}

### Click Share

Click the **Share** button.

<figure><img src="/files/5286758da645bdbf131f5ea872398cb11a4a8d34" alt=""><figcaption></figcaption></figure>
{% endstep %}

{% step %}

### Set general access

In the pop-up, under **General access**, click the dropdown and choose the option **Anyone with the link**. Then select the **Editor** role.

<figure><img src="/files/6e40c645a2f45ffd25f421bbdbeee9476cbdd550" alt=""><figcaption></figcaption></figure>
{% endstep %}

{% step %}

### Copy the link

Copy the created link — you'll need this to import your product data [using Google sheets](/import-data/import-how-to/import-your-product-data/import-via-a-data-file/google-sheets).
{% endstep %}

{% step %}

### If sharing only one sheet tab

If you have multiple sheet tabs and only want to share one, go to the sheet tab you want to share and copy the URL from the browser address bar.
{% endstep %}

{% step %}

### Finish

Click **Done**.
{% endstep %}
{% endstepper %}

{% hint style="warning" %}
Important: If you have multiple sheet tabs and you only want to share a single tab, make sure you copy the URL from the browser address bar while that specific tab is active.
{% endhint %}


# Google Cloud Storage

Import XML, CSV, TXT, or JSON files from Google Cloud Storage.

You can import an XML, CSV, TXT, or JSON file directly from your Google Cloud Storage (GCS).

{% stepper %}
{% step %}

### Your data source and Import settings

* In Channable, go to **Setup > Import** and click **+ Choose import method** (or <i class="fa-plus">:plus:</i> **Combine imports** if you added an import in this project).
* Select the file type you need: XML, CSV, TXT, or JSON.
  {% endstep %}

{% step %}

* At **Name**, add a name for your import.
* At **\[type of] file url**, paste your GCS file URL from Google Cloud.
  * Make sure your URL starts with “`https://storage.cloud.google.com`”.
* At **Authentication**, select "Google Cloud Storage (GCS)".
* For **Upload GCS Service Account Key file**, create and download a Service Account key file [using Google Cloud](https://cloud.google.com/iam/docs/keys-create-delete#iam-service-account-keys-create-console). Once you have created the file, upload it.
* For **Encoding**, **Quoting** and **Delimiter**, select "Automatically detect".
* Click **Run import**.&#x20;

{% hint style="warning" %}
For security reasons, make sure that your Google Service Account has as few permissions as necessary. For example, make sure the account only allows read access for the files you want to import.
{% endhint %}

<figure><img src="/files/6LDTuPfwmtjNHeuDAQKP" alt=""><figcaption></figcaption></figure>

{% hint style="info" %}
If a file in GCS is available publicly, you do not need to set up authentication (Check **Public URL** in Google Cloud). You can select “No authentication” at **Authentication**.
{% endhint %}

<figure><img src="/files/e656d22ae5cf90a9d36bb93db71241c929af7bac" alt=""><figcaption></figcaption></figure>
{% endstep %}

{% step %}

### Import mapping

This page displays fields retrieved from your data feed (e.g. price, description, title).

* **Imported data field:** Fields from your import data.
* **Project field:** Corresponding project fields in Channable. Our system will automatically detect and link most fields to standardized fields.

Match (map) your imported fields to a corresponding project field. Channable does most mapping automatically, but it's important to review and adjust before importing.

{% hint style="info" %}
Note: We create new project fields if we can't assign your import field to a standardized field. These fields will have a project field with the same name as your import field.
{% endhint %}

#### Before you continue

{% hint style="info" %}

* Compare and adjust mapping:

  Review your **Imported data fields** against Channable's matched **Project fields**. If a field was matched incorrectly, click on the field to select a different field.
* Check and correct field types:

  Check that the right field type is assigned to your project fields. If a field has the wrong type, click **Edit** next to the field, select the correct type in the dropdown, and click **Save & Import**.
* Exclude fields (optional):

  To exclude a field from being included in your product data, click the checkbox in the **Select** column for that field and click **Do not import selected fields**.
  {% endhint %}

Once you've finished mapping, click **Save & Import** to start importing your product data. Depending on how much data you're importing, it can take a while to finish.

{% hint style="info" %}
**Note:** Check the **Status** column in **Setup** to check your import progress. Your product data is fully imported when the Status is **Finished**.
{% endhint %}

Your data will start importing from Google Cloud Storage.
{% endstep %}
{% endstepper %}


# Import via a webshop

Connect a supported webshop platform and import product data directly into Channable.

### Popular webshops

<table data-view="cards"><thead><tr><th></th><th data-hidden data-card-cover data-type="image">Cover image</th><th data-hidden data-card-target data-type="content-ref"></th></tr></thead><tbody><tr><td><strong>Shopify</strong></td><td><a href="/files/mLnE8drllNeiMJVnKbvg">/files/mLnE8drllNeiMJVnKbvg</a></td><td><a href="/pages/E3VT7keldKMlG0bSly4X">/pages/E3VT7keldKMlG0bSly4X</a></td></tr><tr><td><strong>WooCommerce</strong></td><td><a href="/files/ykT5ooJRebrBHPK09Ngs">/files/ykT5ooJRebrBHPK09Ngs</a></td><td><a href="/pages/wVRFFyYWD8RGaZKMcs6I">/pages/wVRFFyYWD8RGaZKMcs6I</a></td></tr><tr><td><strong>Magento 1</strong></td><td><a href="/files/6DdaR0I5YXyaPNBVg6uV">/files/6DdaR0I5YXyaPNBVg6uV</a></td><td><a href="/pages/3l5yV4WWALsaAA1A6Xzm">/pages/3l5yV4WWALsaAA1A6Xzm</a></td></tr></tbody></table>

### Webshops A-Z

<table data-view="cards"><thead><tr><th></th><th data-hidden data-card-target data-type="content-ref"></th><th data-hidden data-card-cover data-type="image">Cover image</th></tr></thead><tbody><tr><td><strong>Afosto</strong></td><td><a href="/pages/c8Z0UfJd2aaMV1hzAJdU">/pages/c8Z0UfJd2aaMV1hzAJdU</a></td><td><a href="/files/s18YONHYO4yZRjMMpQs7">/files/s18YONHYO4yZRjMMpQs7</a></td></tr><tr><td><strong>Akeneo</strong></td><td><a href="/pages/ImjOzHq2nAzTmW3q9xqR">/pages/ImjOzHq2nAzTmW3q9xqR</a></td><td><a href="/files/GnrYJ0WAm4eCW0Bxfeb1">/files/GnrYJ0WAm4eCW0Bxfeb1</a></td></tr><tr><td><strong>Amazon AWS S3 Server</strong></td><td><a href="/pages/9CxfxHeaRIvVVqWTpeM3">/pages/9CxfxHeaRIvVVqWTpeM3</a></td><td><a href="/files/eH0Xa14o8pYy7L0NrYzo">/files/eH0Xa14o8pYy7L0NrYzo</a></td></tr><tr><td><strong>BigCommerce</strong></td><td><a href="/pages/uRfuQ1ImNtAy9zdhE1Sg">/pages/uRfuQ1ImNtAy9zdhE1Sg</a></td><td><a href="/files/8WmnFOg4h7VVJhnxr9qe">/files/8WmnFOg4h7VVJhnxr9qe</a></td></tr><tr><td><strong>CCV Shop</strong></td><td><a href="/pages/w3IHzrjxcV60iBlkJi0I">/pages/w3IHzrjxcV60iBlkJi0I</a></td><td><a href="/files/ol7yJ67U6hYGHll3HeqG">/files/ol7yJ67U6hYGHll3HeqG</a></td></tr><tr><td><strong>inRiver</strong></td><td><a href="/pages/h4JuapNS9i8Kq1DFNYFL">/pages/h4JuapNS9i8Kq1DFNYFL</a></td><td><a href="/files/s5DJ7S5VymKbTI4UbKHJ">/files/s5DJ7S5VymKbTI4UbKHJ</a></td></tr><tr><td><strong>Lightspeed</strong></td><td><a href="/pages/KoVbYWmXLccfwasx3j7n">/pages/KoVbYWmXLccfwasx3j7n</a></td><td><a href="/files/3gcIqPyLyN71oUfbA3nn">/files/3gcIqPyLyN71oUfbA3nn</a></td></tr><tr><td><strong>Lightspeed eCom E-series</strong></td><td><a href="/pages/3PbSlYcbPT7AI3Ob3s0L">/pages/3PbSlYcbPT7AI3Ob3s0L</a></td><td><a href="/files/wIhtl6kaSROsrdoF5x8r">/files/wIhtl6kaSROsrdoF5x8r</a></td></tr><tr><td><strong>Magento 1</strong></td><td><a href="/pages/GxerkeNCdQZelq6YZkDu">/pages/GxerkeNCdQZelq6YZkDu</a></td><td><a href="/files/nVOHL3DQYQHPpZzC0vnX">/files/nVOHL3DQYQHPpZzC0vnX</a></td></tr><tr><td><strong>Magento 2</strong></td><td><a href="/pages/3l5yV4WWALsaAA1A6Xzm">/pages/3l5yV4WWALsaAA1A6Xzm</a></td><td><a href="/files/IaMUVrOj6PPpHggBhSMX">/files/IaMUVrOj6PPpHggBhSMX</a></td></tr><tr><td><strong>Mijnwebwinkel (MyOnlineStore)</strong></td><td><a href="/pages/U1gqdq85LQ0YlLQKg0yZ">/pages/U1gqdq85LQ0YlLQKg0yZ</a></td><td><a href="/files/qHvPYvSfWgbAKB05U5P6">/files/qHvPYvSfWgbAKB05U5P6</a></td></tr><tr><td><strong>Oxid</strong></td><td><a href="/pages/CZfhXaED6VGOD3blyaeM">/pages/CZfhXaED6VGOD3blyaeM</a></td><td><a href="/files/F2OoMdTPHdGw5tSDR6Al">/files/F2OoMdTPHdGw5tSDR6Al</a></td></tr><tr><td><strong>PrestaShop</strong></td><td><a href="/pages/Dxfq4K2gZw0wO4Q8FTba">/pages/Dxfq4K2gZw0wO4Q8FTba</a></td><td><a href="/files/O7pzm5kcoJuLqPQan9zG">/files/O7pzm5kcoJuLqPQan9zG</a></td></tr><tr><td><strong>Shopify</strong></td><td><a href="/pages/E3VT7keldKMlG0bSly4X">/pages/E3VT7keldKMlG0bSly4X</a></td><td><a href="/files/VWJT3lyg24Zk7y9cr3Ez">/files/VWJT3lyg24Zk7y9cr3Ez</a></td></tr><tr><td><strong>Shoptrader</strong></td><td><a href="/pages/kbxQy1QueclS8BfLFPde">/pages/kbxQy1QueclS8BfLFPde</a></td><td><a href="/files/ZDXs11GAKxTUqChF6vWh">/files/ZDXs11GAKxTUqChF6vWh</a></td></tr><tr><td><strong>Shopware 5</strong></td><td><a href="/pages/cqmaHTlgdDilNnIqL6Or">/pages/cqmaHTlgdDilNnIqL6Or</a></td><td><a href="/files/etKpCbipw9BywwBJtThi">/files/etKpCbipw9BywwBJtThi</a></td></tr><tr><td><strong>Shopware 6</strong></td><td><a href="/pages/NswceFT1o9J58eTd9S2T">/pages/NswceFT1o9J58eTd9S2T</a></td><td><a href="/files/d4tlSThcmYSRX4gia8Xf">/files/d4tlSThcmYSRX4gia8Xf</a></td></tr><tr><td><strong>Squarespace</strong></td><td><a href="/pages/45bBwX8OT7hgMki5InVG">/pages/45bBwX8OT7hgMki5InVG</a></td><td><a href="/files/IfykiFxXsabXRmCGfeWv">/files/IfykiFxXsabXRmCGfeWv</a></td></tr><tr><td><strong>WooCommerce</strong></td><td><a href="/pages/wVRFFyYWD8RGaZKMcs6I">/pages/wVRFFyYWD8RGaZKMcs6I</a></td><td><a href="/files/Lbbie1OdE22YWxlmrzC6">/files/Lbbie1OdE22YWxlmrzC6</a></td></tr></tbody></table>

### Import from other webshop platforms

Most eCommerce platforms enable you to create CSV or XML data feeds using plugins or built-in features. If you can't do this on your own, ask your website developer or technical support team for help.

If you still face challenges or have questions about the data we need, please [contact our Support team](https://www.channable.com/contact).


# Afosto

Import product data from your Afosto store into Channable.

### Before you start

You’ll need

* An Afosto account

{% stepper %}
{% step %}

### Your data source

* In Channable, open the project you want to import your product data to.
* Go to **Setup > Import** and click **+ Choose import method**. Select **Afosto**.
* Click **Add new connection** or select an existing connection.&#x20;
* For **Label**, give your connection a name. By default, this is "Afosto".
* Click **Connect with Afosto**. You'll be redirected to your Afosto account.
* Log in to your Afosto account, if you haven't done so.
* Review and accept the permissions to connect your account to Channable. You'll be redirected back to Channable to set up your connection.
  {% endstep %}

{% step %}

### Import settings

{% stepper %}
{% step %}
For **Name**, give your Afosto connection a descriptive name (e.g. "Afosto NL").
{% endstep %}

{% step %}
For **External service id**, select the relevant ID.
{% endstep %}

{% step %}
Click **Run import**. You'll be redirected to the **Import Mapping** page to map your product information.
{% endstep %}
{% endstepper %}
{% endstep %}

{% step %}

### Import mapping

This page displays fields retrieved from your Afosto account (e.g. price, description, title). We match these fields to standardized fields to make it easier for you to set up multiple channels with the same product data.

{% hint style="info" %}
Tip: Want to learn more about how import mapping works in Channable? Read our [dedicated guide on mapping](/get-started/getting-started/fields-in-channable/field-mapping-in-channable).
{% endhint %}

{% stepper %}
{% step %}
Compare and adjust mapping.

* Review your **Imported data fields** against Channable's matched **Project fields**. If a field was matched incorrectly, click on the field to select a different field.
  {% endstep %}

{% step %}
Check the field type.

* If a field has the wrong field type, click **Edit** next to the field, select the correct type in the dropdown, and click **Save & Import**.
  {% endstep %}

{% step %}
Exclude fields (if needed).

* To exclude a field from being included in your product data, click the checkbox in the **Select** column for that field and select the **Exclude** checkbox.&#x20;
  {% endstep %}

{% step %}
When you’re ready, click **Save & Import** to start importing your Afosto product data.
{% endstep %}
{% endstepper %}
{% endstep %}

{% step %}

### Overview

* Go to **Overview** to view your imported products.
* After your product data has finished importing, click on an item to see detailed information.

<figure><img src="/files/OOmR6aDntkdmtBWWCtEH" alt=""><figcaption></figcaption></figure>

Your Afosto import is now successfully set up! You can now use this product data to create and optimize Feeds, Marketplaces, Shopping Ads, and more in Channable.
{% endstep %}
{% endstepper %}

{% hint style="warning" %}
Your Afosto connection may expire after using it for a while, resulting in a 'failed API' error message. To continue importing your product data, you'll need to [refresh your connection](broken://pages/ff06acf91842be7c59116d13905169242ab90a73).
{% endhint %}


# Akeneo

Import product data from Akeneo into Channable.

In this article, you'll learn how to import your product data from Akeneo into Channable.

***

### <i class="fa-memo-circle-check">:memo-circle-check:</i> Before you start

**You'll need**

* An Akeneo account
* If you want to include images in listings: built-in image sharing in Akeneo or a third-party application such as TwicPics

{% hint style="info" %}
Channable supports built-in image import from Akeneo. We also still support TwicPics if you want to keep your current setup.
{% endhint %}

**Good to know**

* If built-in image import is enabled in Akeneo, Channable imports images as a list of URLs.
* Akeneo offers flexible organization options. This means that different project fields (e.g `description` ) can have variations for different languages or scopes.
  * To use your Akeneo product data across different channels, Channable **unnests these fields** and creates a field for each unique combination. You can identify unnested fields by an underscore `_` connecting the parts.

<details>

<summary>Example: Description fields split to account for different locales and scopes</summary>

<figure><img src="/files/6c02c17ca85cb7213cc0dc46cb92bc2b8526d2a4" alt=""><figcaption></figcaption></figure>

</details>

{% stepper %}
{% step %}

### Create a new connection in Akeneo

* Log in to your Akeneo account.
* Go to **Connect > Connection settings > CREATE**.<br>

  <figure><img src="/files/5bef2d1c0ea9869c80c327fa7043ede100ed8f60" alt=""><figcaption></figcaption></figure>
* Create your Channable connection:

  * For **Label**, call your connection "Channable".
  * For **Code**, this should automatically be filled in after creating your label. If it isn't, fill in "channable".
  * For **Flow type**, set it to **Data destination**.
  * Click **Save**. You'll be directed to a page with your connection credentials.
  * Make note of your **Client ID**, **Secret**, **Username** and **Password**, as you will need these in a later step.
  * For **Permissions**, make sure the **Role** is set to **API** and **Group** is set to **API Connections**.

  ![Akeneo - Connection-settings.png](/files/3a630857e490853a71203391d46dc508aaed15d8)
  {% endstep %}

{% step %}

### Set up image importing

If you want to import product images, you can use built-in Akeneo image sharing or TwicPics.

{% tabs %}
{% tab title="Built-in image import" %}
To import images without a third-party plugin, enable **Share links** in Akeneo for each asset family that contains the images you want to import.

1. In Akeneo, go to **Assets > Edit Family > Properties**.
2. Enable **Share links** for the relevant asset family.
3. Make sure the product images you want to import belong to that asset family.

Once **Share links** is enabled, Channable detects images from the Akeneo CDN automatically and imports them as a list of URLs.
{% endtab %}

{% tab title="TwicPics" %}
If you already use TwicPics, you can keep using it.

1. Follow the TwicPics Akeneo setup guide: <https://www.twicpics.com/docs/integrations/akeneo#connect-your-pim-with-akeneo-twicpics-app>
2. After creating your account and following the steps, go to **Workspaces** and click your domain in **Favorite domains**.
3. Ensure you have a path where nothing is added and the path is `/`.

Example: A correct setup where 1) is the **domain**, 2) is the **path**, and 3) is the **source**.

![Test Akeneo.png](/files/a589e720da9915f17026e4739a421e7d13b6839d)

4. Make note of your **TwicPics domain**, as you may need it in the next step.
   {% endtab %}
   {% endtabs %}
   {% endstep %}

{% step %}

### Create your Akeneo connection in Channable

1. In Channable, open the project where you want to import your product data.
2. Go to **Setup > Import** and click **+ Choose import method**. Select **Akeneo**.
3. Click **Add new connection** or select an existing connection.
4. Fill in the required information:
   * For **Label**, give your import channel a descriptive name, for example Akeneo.
   * For **Akeneo URL**, enter your [Akeneo webshop URL](#user-content-fn-1)[^1]. Remove any trailing `/`. The URL must end with a domain extension, such as `.com`.

     <div data-gb-custom-block data-tag="hint" data-style="info" class="hint hint-info"><h4>Example</h4><p>If your URL was <code>www.channable.com/</code>, you would need to remove the trailing <code>/</code> and enter <code>www.channable.com</code>.</p></div>
   * For **Client ID**, fill in the **Client ID** you noted earlier.
   * For **Client secret**, fill in the **Secret** you noted earlier.
   * For **Username**, fill in the **Username** you noted earlier.
   * For **Password**, fill in the **Password** you noted earlier.
   * If you use TwicPics, fill in **TwicPics domain** with the domain you noted in the previous step.
5. Click **Connect with Akeneo**. This takes you to your import settings.
   * For **Name**, give your Akeneo import a descriptive name, for example Akeneo FR.
   * For **Choose language**, select the language your product data is in.
6. Click **Run import**. You'll be redirected to the **Import Mapping** page to map your product information.
   {% endstep %}

{% step %}

#### Map your product data to project fields <a href="#map-your-product-data-to-project-fields" id="map-your-product-data-to-project-fields"></a>

After you run the import, you land on the **Import mapping** page. It shows the fields pulled from Akeneo, such as `price`, `description`, and `title`.

In this step, you match those imported fields to Channable's standard project fields. Channable maps most fields automatically, but you should review and adjust them before importing.

{% hint style="success" %}
Want to learn more about how import mapping works in Channable? Read our [dedicated guide on mapping](/get-started/getting-started/fields-in-channable/field-mapping-in-channable).
{% endhint %}

<img src="https://helpcenter.channable.com/~gitbook/image?url=https%3A%2F%2F3042294697-files.gitbook.io%2F%7E%2Ffiles%2Fv0%2Fb%2Fgitbook-x-prod.appspot.com%2Fo%2Fspaces%252FZa0iYflHeXmKWGnfFMAN%252Fuploads%252F6yCsJmSm5pdTTF5DwdNZ%252Finstructor_7u6jffr8fr7ks9ag5d1bwagc1_public_1751372530_mapping-manual.1751372530671.gif%3Falt%3Dmedia%26token%3D4c93b04d-5365-4863-93ed-21aee5e5fbf8&#x26;width=768&#x26;dpr=3&#x26;quality=100&#x26;sign=e6bd0d47&#x26;sv=2" alt="" height="720" width="1575">

1. **Compare and adjust mapping.**
   * Review your **Imported data fields** against Channable's matched **Project fields**. If a field was matched incorrectly, click on the field to select a different field.
2. **Check and correct field types.**
   * Check that the right field type is assigned to your project fields. If a field has the wrong type, click **Edit** next to the field, select the correct type in the dropdown, and click **Save & import**.
3. **Exclude fields (optional).**
   * To exclude a field from being included in your product data, click the checkbox in the **Exclude from import** column for that field.
4. Once you've finished mapping, click **Save & Import** to start importing your Akeneo product data.

{% hint style="info" %}
Check the **Status** column in **Setup** to check your import progress. Your product data is fully imported when the Status is **Finished**.
{% endhint %}
{% endstep %}

{% step %}

### Review your imported items

After your product data has finished importing:

* Go **Overview** to view your imported products.
* Click on an item to see detailed information.

You're good to go! Your items are ready to use to create and optimize Feeds, Marketplaces, Shopping Ads, and more in Channable.
{% endstep %}
{% endstepper %}

[^1]: Can be found in Akeneo Activity dashboard.


# Amazon AWS S3 server

Import product data from files hosted on Amazon AWS S3.

You can import an XML, CSV, TXT, or JSON file directly from your Amazon AWS S3 bucket by these steps:

{% stepper %}
{% step %}

### Add a new XML/CSV/TXT/JSON import

* Go to **Setup > Import**.
* Click **Setup import** (or **Combine imports** if you added an import in this project).
* Pick the file type you need (XML, CSV, TXT, or JSON).
  {% endstep %}

{% step %}

### Configure the Amazon S3 settings

To configure the import setup for Amazon S3, use the following settings:

* **Protocol:** "https\://".
* Enter the **URL** to your file.

{% hint style="info" %}
Important: The URL should contain the region in which your bucket is hosted (for example 'eu-central-1'). The import will only work with an S3 bucket URL, not with a custom domain.
{% endhint %}

* **Authentication:** Amazon S3.
* Enter your **AWS Access key ID** and your **AWS secret access key**.

<figure><img src="/files/3b5e9919410f76c1ed9612a621b3ca145257c5d7" alt=""><figcaption></figcaption></figure>
{% endstep %}

{% step %}

### Import your items

After configuring the Amazon S3 settings for your new import, click **Start import**. You will be directed to the mapping, where you need to click **Save & Import**.

Your feed will now start importing from the Amazon AWS S3 server.
{% endstep %}
{% endstepper %}


# BigCommerce

Import product data from your BigCommerce store into Channable.

In this article, you'll learn how to import product data from your BigCommerce webshop into Channable.

***

{% hint style="info" %}
Before you start

You’ll need:

* A Channable account with a project
* A BigCommerce account with a webshop
  {% endhint %}

{% stepper %}
{% step %}

### Create a new API account in BigCommerce

* Log in to your BigCommerce account.
* Go to **Settings > API > Store-level API accounts**.
* Click **+ Create API account**. To connect with Channable, you'll need to create a V2/V3 API token.<br>

  <figure><img src="/files/ee9669e62b747073426c363d2c5bbb83bce293a1" alt=""><figcaption></figcaption></figure>
* Give your connection a name.
* Set up your API. For **OAuth scope:**

  * Set **Products** to **read-only**.
  * Set **Information & settings** to **read-only**.
  * Set any remaining scopes to **None**.

  ![BigCommerce.png](/files/492b2b31c4ab5e7f13245609ecfcc4cf962d3a95)
* Save your API.
* Your new credentials will appear, and a text file containing your credentials will download automatically.
* Make note of your **API Path**, **Client ID** and **Access token**, as you will need them in the next step.

{% hint style="info" %}
Tip: Store your credentials somewhere safe.
{% endhint %}
{% endstep %}

{% step %}

### Set up your BigCommerce connection: Your data source & Import settings

* In Channable, open the project you want to import your product data to.
* Go to **Setup > Import** and click **+ Choose import method**. Select **BigCommerce**.
* Click **Add new connection** or select an existing connection.&#x20;
* Fill in the required information using the credentials you generated in the previous step (API path, Client ID, Access token):
  * For **Label**, give your connection a descriptive name (e.g. "BigCommerce").
  * For **Store ID**, fill in the number sequence in your API path URL after /stores/ and before your version.
  * For **Access token**, fill in your access token.
  * For **Client ID**, fill in your Client ID.
* Click **Connect with BigCommerce**. You'll be redirected to the Import **mapping** page to map your product information.

![bigcommerce-connect-1](/files/3888b5eb54e3a403c4c431eb8c9183f29fbe8022) ![bigcommerce-connect-2](/files/e89df0168d09b2d5a0ddee83ddd2b51c5e1df7b7)
{% endstep %}

{% step %}

### Import mapping

This page displays fields retrieved from your BigCommerce account (e.g. price, description, title). We match these fields to standardized fields to make it easier for you to set up multiple channels with the same product data.

{% hint style="info" %}
Tip: Want to learn more about how import mapping works in Channable? Read our [dedicated guide on mapping](/get-started/getting-started/fields-in-channable/field-mapping-in-channable).
{% endhint %}

* Compare and adjust mapping.
  * Review your **Imported data fields** against Channable's matched **Project fields**. If a field was matched incorrectly, click on the field to select a different field.
* Check the field type.
  * If a field has the wrong field type, click **Edit** next to the field, select the correct type in the dropdown, and click **Save & Import**.
* Exclude fields (if needed).
  * To exclude a field from being included in your product data, click the checkbox in the **Select** column for that field and select the **Exclude** checkbox.&#x20;
* When you’re ready, click **Save & Import** to start importing your BigCommerce product data.
  {% endstep %}

{% step %}

### Overview

* Go to **Overview** to view your imported products.
* After your product data has finished importing, click on an item to see detailed information.

<figure><img src="/files/OOmR6aDntkdmtBWWCtEH" alt=""><figcaption></figcaption></figure>

Your BigCommerce import is now successfully set up! You can now use this product data to create and optimize Feeds, Marketplaces, Shopping Ads, and more in Channable.
{% endstep %}
{% endstepper %}


# CCV Shop

Import product data from your CCV Shop store into Channable.

You'll need

* A CCV Shop account

***

{% stepper %}
{% step %}

### Step 1: Install the Channable app in CCV Shop (Your data source)

* In Channable, open the project where you want to import your product data.
* Go to **Setup > Import** and click **+ Choose import method**. Select **CCV Shop**.
* Click **Add new connection** or select an existing connection.&#x20;
* Click **Connect with CCVShop**. This will redirect you to CCV Shop to install the Channable app.
* If you aren't automatically directed to CCV Shop's Channable app page, in CCV Shop, go to **App Store > Show all apps**. In **Sales channels**, search for **Channable** and select it.
* Install the Channable app from CCV Shop. A pop-up will appear explaining the permissions/rights Channable will have after connecting.
* Click **Continue**.

<figure><img src="/files/20f0006075e6023c599db41558138ee3d312acc7" alt=""><figcaption></figcaption></figure>

You'll be redirected back to Channable to finalize your connection.
{% endstep %}

{% step %}

### Step 2: Import settings

After installing the Channable extension, a pop-up window will appear in Channable to configure your CCV Shop connection.

* For **Name**, give your connection a descriptive name (e.g. "CCV import").
* For **Choose language**, select the language your product data is in.
* Click **Run import**. You'll be redirected to the **Edit Mapping** page to map your product information.
  {% endstep %}

{% step %}

### Step 3: Import mapping

This page displays your import fields (fields retrieved from your CCV Shop webshop — e.g. price, description, title), and corresponding project fields (Channable's standardized fields used to streamline channel setups).

{% hint style="info" %}
Note: Our system will automatically detect and [map](/get-started/getting-started/fields-in-channable/field-mapping-in-channable) most import fields to our standardized fields, but it's important to review and adjust these before importing.
{% endhint %}

#### Before you continue:

* Compare and adjust mapping\
  Review your **Imported datat fields** against Channable's matched **Project fields**. If a field was matched incorrectly, click on the field to select a different field.
* Check and correct field types\
  Check that the right field type is assigned to your project fields. If a field has the wrong type, click **Edit** next to the field, select the correct type in the dropdown, and click **Save & Import**.
* Exclude fields (optional)\
  To exclude a field from being included in your product data, click the checkbox in the **Select** column for that field and select the **Exclude** checkbox.&#x20;

Once you've finished mapping, click **Save & Import** to start importing your product data. Depending on how much data you're importing, this can take some time.

{% hint style="info" %}
Note: Check the **Status** column in **Setup** to check your import progress. Your product data is fully imported when the Status is **Finished**.
{% endhint %}
{% endstep %}

{% step %}

### Step 4: Overview

* Go to **Overview** to view your imported products.
* After your product data has finished importing, click on an item to see detailed information.

<figure><img src="/files/OOmR6aDntkdmtBWWCtEH" alt=""><figcaption></figcaption></figure>

You're good to go! Your items are ready to use to create and optimize Feeds, Marketplaces, Shopping Ads, and more in Channable.
{% endstep %}
{% endstepper %}


# inRiver

Import product data from inRiver into Channable.

{% stepper %}
{% step %}

### Before you start

You'll need:

* An API URL and key from [XSARUS](http://www.xsarus.nl/).
* An inRiver account

### Step 1: Create your inRiver connection (Your data source & Import settings)

1. In Channable, open the project you want to import your product data to.
2. Go to **Setup > Import** and click **+ Choose import method**. Select **inRiver by Xsarus**.
3. Click **Add new connection** or select an existing connection.&#x20;
4. Fill in the following information:
   * For **Label**, give your connection a descriptive name.
   * For **URL**, paste your webshop URL.

{% hint style="warning" %}
Important: Be sure to remove any extra / at the end of your URL. The URL should end with the domain extension (e.g. .com, .net)
{% endhint %}

* For **API Key**, enter the API key you received from Xsarus.
* For **Language**, select the language your product data is in.

4. Click **Connect with inRiver by Xsarus** to finalize your connection.
5. Give your connection a name.
6. Click **Run import**. You'll be redirected to the **Import Mapping** step to map your product information.
   {% endstep %}

{% step %}

### Step 2: Import mapping

**Edit mapping** displays fields retrieved from your inRiver account (e.g. price, description, title).

In this step, match your imported fields to Channable's standardized project fields. Channable does most mapping automatically, but review and adjust before importing.

{% hint style="success" %}
Tip: Want to learn more about how import mapping works in Channable? Read our [dedicated guide on mapping](/get-started/getting-started/fields-in-channable/field-mapping-in-channable).
{% endhint %}

* Compare and adjust mapping.\
  Review your **Imported data fields** against Channable's matched **Project fields**. If a field was matched incorrectly, click on the field to select a different field.
* Check and correct field types.\
  Ensure the right field type is assigned to your project fields. If a field has the wrong type, click **Edit** next to the field, select the correct type in the dropdown, and click **Save & Import**.
* Exclude fields (optional).\
  To exclude a field from being included in your product data, click the checkbox in the **Select** column for that field and select the **Exclude** checkbox.&#x20;
* Once you've finished mapping, click **Save & Import** to start importing your product data.
  {% endstep %}

{% step %}

### Step 3: Overview

After your product data has finished importing:

* Go **Overview** to view your imported products.
* Click on an item to see detailed information.<br>

  <figure><img src="/files/OOmR6aDntkdmtBWWCtEH" alt=""><figcaption></figcaption></figure>

Your inRiver import is now successfully set up! You can now use this product data to create and optimize Feeds, Marketplaces, Shopping Ads, and more in Channable.
{% endstep %}
{% endstepper %}


# Lightspeed

Import product data from your Lightspeed store into Channable.

If you have a Lightspeed based webshop, you can import your product data into Channable using our Channable plugin.

***

### <i class="fa-memo-circle-check">:memo-circle-check:</i> Before you start

**You’ll need**

* A Channable account with a project
* A Lightspeed account with a webshop
* Full permissions for your Lightspeed account (required to install the Channable app)

{% stepper %}
{% step %}

### Install the Channable app in your Lightspeed App Store

1. In your Lightspeed backend, open the Lightspeed App Store (**Apps > App store**).
2. In the search bar, search "Channable" and select it.
3. Provide the login details requested to verify the install. After verifying, you'll be redirected to Channable to log in to your account, if you haven't already done so.
4. Once logged in, you'll be redirected back to Lightspeed to accept permissions to connect Channable to your Lightspeed account.
5. After accepting permissions in Lightspeed, you'll be directed back to your Channable account to accept permissions and finalize your connection.
6. Click **Connect with Lightspeed.**
   {% endstep %}

{% step %}

### Set up your Lightspeed connection in Channable

1. In Channable, open the project you want to import your product data to.
2. Go to **Setup > Import** and click **+ Choose import method**. Select **Lightspeed**.
3. Click **Select an existing connection** and select the connection you set up in the previous step.
   * For **Name**, give your channel a descriptive name (like "Lightspeed EN")
   * For **Language**, select the language your product data is in.
4. Click **Run import**. You'll be redirected to the **Import mapping** step to map your product information.
   {% endstep %}

{% step %}

### Set advanced Lightspeed import settings <mark style="color:$primary;">(optional)</mark>

If you would like to further customize your Lightspeed setup, you can customize your import with additional advanced settings.

1. Click <i class="fa-arrow-left">:arrow-left:</i> **Import settings** to return to your import settings.
2. Click <i class="fa-gear">:gear:</i> **Advanced settings**.
3. Apply your preferred settings, clicking **Save** after each change.

<details>

<summary><i class="fa-toggle-large-on">:toggle-large-on:</i> <strong>Lightspeed: Advanced setting options</strong></summary>

#### **Additional fields**

**Metafields**

Choose whether to import product custom fields with additional information.

* **Enabled:** Channable imports custom fields for the main product.
* **Disabled:** Channable does not import product-level metafields.

{% hint style="info" %}
Metafields in your imports will be prefixed with `meta_` .
{% endhint %}

</details>
{% endstep %}

{% step %}

### Map your product data to project fields

After you run your import, you'll land on the **Import mapping** page. It shows the fields pulled from Lightspeed, such as `price`, `description`, and `title`.

In this step, you match those imported fields to Channable's standard project fields. Channable maps most fields automatically, but you should review and adjust them before importing.

{% hint style="success" %}
Want to learn more about how import mapping works in Channable? Read our [dedicated guide on mapping](/get-started/getting-started/fields-in-channable/field-mapping-in-channable).
{% endhint %}

<figure><img src="/files/yTj9rZ62nAlD8gALDY0n" alt=""><figcaption></figcaption></figure>

{% hint style="info" %}
If you specifically use Google categories in Lightspeed and want to import that data into Channable, [contact our Technical Support team](https://www.channable.com/contact).
{% endhint %}

1. **Compare and adjust mapping.**
   * Review your **Imported data fields** against Channable's matched **Project fields**. If a field was matched incorrectly, click on the field to select a different field.
2. **Check and correct field types.**
   * Check that the right field type is assigned to your project fields. If a field has the wrong type, click **Edit** next to the field, select the correct type in the dropdown, and click **Save & import**.
3. **Exclude fields (optional).**
   * To exclude a field from being included in your product data, click the checkbox in the **Exclude from import** column for that field.
4. Once you've finished mapping, click **Save** to start importing your Lightspeed product data.
   {% endstep %}

{% step %}

### Overview

When the import completes, you arrive on the **Overview** page. Review the imported product data there.

* In the **Imported data** table, click an item to view its details.

<figure><img src="/files/OOmR6aDntkdmtBWWCtEH" alt=""><figcaption></figcaption></figure>

Your Lightspeed import is ready! Use this product data to create and optimize Feeds, Marketplaces, Shopping Ads, and more in Channable.
{% endstep %}
{% endstepper %}


# Can I import multiple languages from Lightspeed?

Learn how multi-language imports work for Lightspeed and what to expect.

When you want to advertise in other languages and have multiple languages in one Lightspeed shop backend, you can import your products in those languages.

**I connected my Lightspeed to Channable**

If you are new to Channable and just created your first connection, you should see we already created a project per language for you. In each of the projects, you will find the products for that specific language.

<figure><img src="/files/8378979c30ab72eb036c73cef7c6e50b4dcb15d5" alt=""><figcaption></figcaption></figure>

**I connected my Lightspeed to Channable some time ago**

If you added new languages to your Lightspeed shop backend recently, but don't see them in your Channable account yet, please contact our support team via <support@channable.com>. Because we do not continuously check for new languages in your Lightspeed, we have to manually create new connections for those languages.

**I have separate Lightspeed accounts for different languages**

When you do not have all languages in one Lightspeed shop backend, but in multiple accounts, you have to download the Channable app for each Lightspeed account.


# Lightspeed eCom E-series (Ecwid)

Import product data from your Lightspeed eCom E-series store into Channable.

Lightspeed E-series is the new Lightspeed eCommerce platform (also known as Ecwid). This guide explains how to import product data from your Lightspeed eSeries webshop into Channable.

Before you start

You’ll need

* A Channable account with a project
* A Lightspeed eSeries account

Step-by-step setup

{% stepper %}
{% step %}

### Install the Channable app in Lightspeed App Market

* Open Lightspeed App Market.
* In the search bar, search for "Channable". The Channable app will appear as a search result.
* Select the Channable app and click **Install**.<br>

  <figure><img src="/files/f42cba0a8b2e50bd89fa2c7a7b6e478d0eb9d192" alt=""><figcaption></figcaption></figure>
* Accept the permissions to allow Channable to connect to your Lightspeed account. After accepting permissions, you'll be directed back to log in to your Channable account to finalize your connection.<br>

  <figure><img src="/files/6dff8aead4f5f6579e90bbf8796d3a28feba66d7" alt=""><figcaption></figcaption></figure>
* Log in to your Channable account.
  * If you are already logged into your Channable account you will automatically be sent to the connections page to save your connection.
* Click **Save**.

Your Channable account will be connected to Lightspeed and ready for when you create a Lightspeed import channel in a project.
{% endstep %}

{% step %}

### Set up your Lightspeed connection (Your data source **&** Import settings)

* In Channable, open the project you want to import your product data to.
* Go to **Setup > Import** and click **+ Choose import method**. Select **Lightspeed E - Series**.
* Click **Add new connection** or select an existing connection.&#x20;
  * For **Name**, give your channel a descriptive name (e.g. "Lightspeed eSeries EN").
  * For **Language**, select the language your product data is in.
* Click **Run import**. You'll be redirected to the **Edit Mapping** step to map your product information.
  {% endstep %}

{% step %}

### Import mapping

Edit mapping displays fields retrieved from your Lightspeed account (e.g. price, description, title).

Match your imported fields to Channable's standardized project fields. Channable does most mapping automatically, but review and adjust before importing.

{% hint style="info" %}
Tip: Want to learn more about how import mapping works in Channable? Read our [dedicated guide on mapping](/get-started/getting-started/fields-in-channable/field-mapping-in-channable).
{% endhint %}

{% stepper %}
{% step %}

#### Compare and adjust mapping

Review your **Imported data fields** against Channable's matched **Project fields**. If a field was matched incorrectly, click on the field to select a different field.
{% endstep %}

{% step %}

#### Check and correct field types

Check that the right field type is assigned to your project fields. If a field has the wrong type, click **Edit** next to the field, select the correct type in the dropdown, and click **Save & Import**.
{% endstep %}

{% step %}

#### Exclude fields (optional)

To exclude a field from being included in your product data, click the checkbox in the **Select** column for that field and click **Do not import selected fields**.
{% endstep %}

{% step %}

#### Finalize mapping and import

Once you've finished mapping, click **Save & Import** to start importing your Lightspeed product data.

{% hint style="info" %}
If you specifically use Google categories in Lightspeed and want to import that data into Channable, [contact our Technical Support team](https://www.channable.com/contact).
{% endhint %}
{% endstep %}
{% endstepper %}
{% endstep %}

{% step %}

### Overview

After your product data has finished importing:

* Go **Overview** to view your imported products.
* Click on an item to see detailed information.

<figure><img src="/files/OOmR6aDntkdmtBWWCtEH" alt=""><figcaption></figcaption></figure>

Your Lightspeed import is now successfully set up! You can now use this product data to create and optimize Feeds, Marketplaces, Shopping Ads, and more in Channable.
{% endstep %}
{% endstepper %}

### Importing variants and translations

#### Variants

Channable imports each variant as a single item. Variants are configured in each product in Lightspeed E-Series in **Options > Variations**.

<figure><img src="/files/0585de43f8ab02010178f81e0d886bd403a3ce4d" alt=""><figcaption></figcaption></figure>

#### Translations

Some attributes of an item in Lightspeed E-Series are translatable. Channable imports all translations following the naming convention: “{attribute\_name}\_{locale}”. Each attribute will have a “main” translation in Lightspeed, which is the language of the shop itself.

Example: If you have a Dutch Lightspeed E-Series shop with the attribute “color” in both Dutch and English, Channable will import the following fields for the item: {"color": "rood", "colorr\_en": "red"}


# Magento 1

Import product data from your Magento 1 store into Channable.

If you have a Magento based webshop, you can import your projects in Channable using our Channable Connect plugin.&#x20;

{% stepper %}
{% step %}

### Installation

Download the official *Channable Connect* plugin [here](http://www.magmodules.eu/magento-extensions/channable-connect.html). You will receive a zip file and a serial number. Install and register the plugin. Now go to "System > Configuration" and click "Channable Connect". You can find instructions on how to install the plugin [here](https://www.magmodules.eu/help/magento2-channable-connect.html).
{% endstep %}

{% step %}

### Magento

<figure><img src="/files/150e8ac747d770a785022128ffa8ad665e128339" alt=""><figcaption></figcaption></figure>

Go through the fields under "Products - Data" and make sure that the correct fields are mapped. Under "Products - Data Extra fields & Shipping" you can optionally import extra values into Channable.

<figure><img src="/files/6c7d5ba8339eaaac19afaca5ff3b749784adb73c" alt=""><figcaption></figcaption></figure>
{% endstep %}

{% step %}

### Connect with Channable

In Channable Connect for Magento, scroll down to "Feeds - Available" and click one of the links. We can make a connection for every store.

<figure><img src="/files/9d50f9b56d9a6e3b3b3813236c0bcddbd7b3f8b8" alt=""><figcaption></figcaption></figure>
{% endstep %}

{% step %}

### New connection

Now create a new Channable account or log in to Channable. [Create a new project](/get-started/getting-started/create-a-new-project), go to **Setup** and select the Magento store you want to connect.

<figure><img src="/files/2f1a0447dbfae0acc021d40fe2e6a3a9baf4a528" alt=""><figcaption></figcaption></figure>

Click **Continue** and the next step shows which fields are imported from Magento. Click **Save & Import** to import all products.
{% endstep %}
{% endstepper %}


# Magento 2

Import product data from your Magento 2 store into Channable.

Learn how to install the Channable Connect plugin and import Magento 2 product data into Channable.

***

### <i class="fa-memo-circle-check">:memo-circle-check:</i> Before you start

**You’ll need**

* A Magento 2 account
* [Composer](https://getcomposer.org/doc/00-intro.md) installed to your server to install and configure your Channable Connect plugin

**Good to know**

<details>

<summary><strong>How to check whether Composer is installed</strong></summary>

You can check if your server (the computer hosting your Magento 2 online store) has Composer installed by running the following command: `composer -v`

</details>

<details>

<summary><strong>Back up your webshop first</strong></summary>

Back up your webshop files before you start. This helps prevent problems and downtime.

</details>

***

{% stepper %}
{% step %}

### Install the Channable Connect plugin

Download the official [Channable Connect plugin](https://www.magmodules.eu/magento2-channable-connect.html). You receive a ZIP file.

Choose one installation method:

<details>

<summary><strong>Option 1: Install using Magento Marketplace</strong></summary>

To install using Magento marketplace, you need to use authentication tokens. This is free to download.

1. Go to [Channable’s Connect extension](https://marketplace.magento.com/magmodules-magento2-channable.html).
2. For **Edition**, select **Magento Open Source**. For **Your store version**, select **2.4 (Magento Open Source)**.
3. Click **Add to cart**, click the cart icon, then click **Proceed to checkout**.
4. Click **Sign in with Adobe ID**. If needed, click **Create an account** to create a free account. You only need this account to download the plugin.
5. In the **Marketplaces** section, go to **Access Keys**. Find your **Public Key** and **Private Key** for **Magento Marketplace**.
   1. If you don't have keys, click **Create a new access key**. Enter a descriptive name, then click **Generate new**.
6. Make note of the **Public Key** and **Private key** as you’ll need them to install the plugin.
7. Continue with [step 2 of this guide](https://www.magmodules.eu/help/magento2-channable-connect/install-using-marketplace.html).

</details>

<details>

<summary><strong>Option 2: Install using FTP and SSH </strong><mark style="color:$primary;"><strong>(recommended for developers)</strong></mark></summary>

This method is recommended for developers. It requires familiarity with command-line tools and server environments.

Follow [this installation guide](https://github.com/magmodules/magento2-channable?tab=readme-ov-file#channable-connect-for-magento-2).

</details>
{% endstep %}

{% step %}

### Configure the plugin in Magento 2

1. Log in to your Magento backend.
2. In the sidebar, click **Channable**.
3. In **Configuration**, select **Product feed**. This page shows the product attributes sent to Channable.
4. Map each attribute to its corresponding field.

<figure><img src="/files/b580744e4acc7a4013e5d075842fe1ed3c15c08a" alt=""><figcaption></figcaption></figure>

{% hint style="info" %}
Under **Advanced Options**, add attributes to improve your data quality.
{% endhint %}

5. Scroll to **Feeds**. For the storefront you want to add, click **Auto Connect with Channable**.

<figure><img src="/files/b7d0e4e614bb7ce13680b4ebd52693fff2d5b387" alt=""><figcaption></figcaption></figure>

This redirects you to Channable and creates a connection with the required information. Log in to Channable if needed.

6. Click **Save** to save the connection.
   {% endstep %}

{% step %}

### Set up your Magento import

1. In Channable, open the project where you want to import product data.
2. Go to **Setup > Import** > **+ Choose import method** > **Magento**.
3. Under **Choose an existing connection or create a new one**, select the Magento connection you created.
4. Enter a descriptive connection name. For several storefronts, include the store name and locale. For example: `STORE NAME - EN`.
5. Click **Connect with Magento**.
   {% endstep %}

{% step %}

### Map your product data to project fields

The **Import mapping** page shows fields from your Magento 2 account, such as `price`, `description`, and `title`.

Match these fields to Channable's standard project fields. Review the automatic mappings before importing.

{% hint style="info" %}
Tip: Want to learn more about how import mapping works in Channable? Read our [dedicated guide on mapping](/get-started/getting-started/fields-in-channable/field-mapping-in-channable).
{% endhint %}

1. **Compare and adjust mapping.**
   * Review your **Imported data fields** against the matched **Project fields**. Select a different project field if a match is incorrect.
2. **Check and correct field types.**
   * Click **Edit** next to a field with the wrong type. Select the correct type, then click **Save & Import**.
3. **Exclude fields (optional).**
   * Select the field in the **Select** column, then select the **Exclude** checkbox.
4. Confirm that the import fields are mapped to the correct project fields.
5. Click **Save & Import** when you are ready.
   {% endstep %}

{% step %}

### Overview

After importing, your products are synced from Magento 2.

1. In the sidebar, go to **Items** to view your products.
2. Click an item and scroll down to view its product details.
   {% endstep %}
   {% endstepper %}


# Mijnwebwinkel (MyOnlineStore)

Import product data from your Mijnwebwinkel store into Channable.

We can import your products directly from your webshop through the Mijnwebwinkel API.

{% hint style="info" %}
You’ll need a Mijnwebwinkel (MyOnlineStore) account.
{% endhint %}

{% stepper %}
{% step %}

### Generate a API token in Mijnwebwinkel (MyOnlineStore)

To import your product data from Mijnwebwinkel (MyOnlineStore), you'll need to generate a token. A token provides access to your product data so Channable can import it into your Channable account.

* Log in to your Mijnwebwinkel account: <https://account.mijnwebwinkel.nl/login>

[![channable\_setting-up\_importing-products-importing-products-from-mijnwebwinkel-0.png](/files/c89f3363d338b8a5b3f39496ade10d417f2abb68)](https://helpcenter.channable.com/hc/article_attachments/21017797351442)

* Go to Settings > API.
* Click + Add new token.

<figure><img src="/files/b54480df722be61a98849f96a370ff5204172562" alt=""><figcaption></figcaption></figure>

* For Partner, select Channable. Leave all remaining fields at their default values.

[![channable\_setting-up\_importing-products-importing-products-from-mijnwebwinkel-2.png](/files/3e2b9aca25eb29890318bdfd9bbd7671e153951d)](https://helpcenter.channable.com/hc/article_attachments/21017797356690)

* Click Save.
* Your new Channable token will appear. Click Show token and copy your token. You'll need it in the next step.

<figure><img src="/files/f79b25b4d3877457df54bc5b9fc47ead14f0b114" alt=""><figcaption></figcaption></figure>
{% endstep %}

{% step %}

### Create a Mijnwebwinkel connection in Channable (Your data source & Import settings)

* In Channable, open the project you want to import your product data to.
* Go to **Setup > Import** and click **+ Choose import method**. Select **Mijnwebwinkel**.
* Click **Add new connection** or select an existing connection.&#x20;
  * For **Label**, give your connection a descriptive name (e.g. "Mijnwebwinkel import").
  * For **Token**, paste the token you copied in the previous step.
* Click **Connect with Mijnwebwinkel**.

In your new Mijnwebwinkel connection:

* For **Name**, give your import connection a name (e.g. "Mijnwebwinkel EN").
* For **Choose language**, select the language your product data is in.
* Click **Run import**. You'll be redirected to the **Import mapping** step to map your product information.
  {% endstep %}

{% step %}

### Import mapping

Import mapping displays fields retrieved from your Mijnwebwinkel (MyOnlineStore) account (e.g. price, description, title).

In this step, match your imported fields to Channable's standardized project fields. Channable does most mapping automatically, but it's important to review and adjust before importing.

{% hint style="info" %}
Tip: Want to learn more about how import mapping works in Channable? Read our [dedicated guide on mapping](/get-started/getting-started/fields-in-channable/field-mapping-in-channable).
{% endhint %}

* **Compare and adjust mapping**\
  Review your Imported data fields against Channable's matched Project fields. If a field was matched incorrectly, click on the field to select a different field.
* **Check and correct field types**\
  Check that the right field type is assigned to your project fields. If a field has the wrong type, click Edit next to the field, select the correct type in the dropdown, and click Save & Import.
* **Exclude fields (optional)**\
  To exclude a field from being included in your product data, click the checkbox in the Select column for that field and select the **Exclude** checkbox.&#x20;
* Once you've finished mapping, click **Save & Import** to start importing your Mijnwebwinkel (MyOnlineStore) product data.
  {% endstep %}

{% step %}

### Overview

* Go to **Overview** to view your imported products.
* After your product data has finished importing, click on an item to see detailed information.

<figure><img src="/files/OOmR6aDntkdmtBWWCtEH" alt=""><figcaption></figcaption></figure>

Your Mijnwebwinkel import is now successfully set up! You can now use this product data to create and optimize Feeds, Marketplaces, Shopping Ads, and more in Channable.
{% endstep %}
{% endstepper %}


# Oxid

Import product data from your Oxid store into Channable.

Oxid eSales is a German eCommerce platform. You can import your product data from Oxid using a plugin created by our partner Response GmbH.

### Before you start

You'll need

* A Oxid account
* An Oxid Channable plugin that's installed in your Oxid backend.

{% stepper %}
{% step %}

### Step 1: Generate tokens in Oxid

* Log in to your Oxid eshop backend.
* Go to **Extensions > Modules**.
* Select the Channable plugin.

<figure><img src="/files/4683e46ab8bcb4535076574c563cc230f149310b" alt=""><figcaption></figcaption></figure>

* Within your Channable plugin, go to the **Settings** tab.
* In the **Basic settings** dropdown, choose how you want to export your product data to Channable.
* Note your **Store token** and **Store URL**, as you will need these in the next step.

<figure><img src="/files/cbd28adddb09953ba736b500f364505627a3c171" alt=""><figcaption></figcaption></figure>
{% endstep %}

{% step %}

### Step 2: Create your Oxid connection (Your data source & Import settings)

* In Channable, open the project where you want to import your product data.
* Go to **Setup > Import** and click **+ Choose import method**. Select **Oxid**.
* Click **Add new connection** or select an existing connection.&#x20;
* Fill in the required information:
  * For **Label**, give your import channel a descriptive name (e.g. "Oxid").
  * For **Oxid token**, fill in the **Store token** generated in Step 1.
  * For **Oxid URL**, paste the **Store URL** you noted in Step 1.
* Click **Connect with Oxid**. This takes you to your import settings.
  * For **Name**, give your Oxid connection a descriptive name (e.g. "Oxid").
* Click **Run import**. You'll be redirected to the **Import mapping** page to map your product information.
  {% endstep %}

{% step %}

### Step 3: Import mapping

This page displays your import fields (fields retrieved from your Oxid webshop — e.g. price, description, title), and corresponding project fields (Channable's standardized fields used to streamline channel setups).

{% hint style="info" %}
Note: Our system will automatically detect and map most import fields to our standardized fields, but it's important to review and adjust these before importing.
{% endhint %}

* Compare and adjust mapping\
  Review your **Imported data fields** against Channable's matched **Project fields**. If a field was matched incorrectly, click on the field to select a different field.
* Check and correct field types\
  Check that the right field type is assigned to your project fields. If a field has the wrong type, click **Edit** next to the field, select the correct type in the dropdown, and click **Save & Import**.
* Exclude fields (optional)\
  To exclude a field from being included in your product data, click the checkbox in the **Select** column for that field and select the **Exclude** checkbox.&#x20;

Once you've finished mapping, click **Save & Import** to start importing your product data. Depending on how much data you're importing, this can take some time.

{% hint style="info" %}
Tip: Check the **Status** column in **Setup** to monitor your import progress. Your product data is fully imported when the Status is **Finished**.
{% endhint %}
{% endstep %}

{% step %}

### Step 4: Overview

After your product data has finished importing:

* Go **Overview** to view your imported products.
* Click on an item to see detailed information.<br>

  <figure><img src="/files/OOmR6aDntkdmtBWWCtEH" alt=""><figcaption></figcaption></figure>

You're good to go! Your items are ready to use to create and optimize Feeds, Marketplaces, Shopping Ads, and more in Channable.
{% endstep %}
{% endstepper %}


# Odoo

Import product data from your Odoo store into Channable.

In this article, you'll learn how to import product data from Odoo into Channable.

{% hint style="warning" %}
Channable works with Odoo version 19 and later. You can check your version in your Odoo account settings.
{% endhint %}

### <i class="fa-memo-circle-check">:memo-circle-check:</i> Before you start

**You'll need**

* A Channable account with a project
* An active Odoo subscription
* An active Odoo database with products
* The Odoo product module enabled

<details>

<summary>I’m not sure if I have the Odoo product module enabled</summary>

In your Odoo account, go to Settings. If you see the option Inventory, the product module is enabled.

<img src="/files/ZzplL03VzHndVMZGH3yH" alt="" height="84" width="624">

If you don’t see it, contact Odoo’s Support team.

</details>

**Good to know**

* Channable connects to Odoo through the external JSON2 API.
* Channable only works with Odoo version 19 or later.&#x20;
* Order connections are not available for Odoo yet
* Domain filtering is not available for Odoo yet

{% hint style="warning" %}
You cannot currently exclude records such as disabled products, `active=false` products, or services during setup.
{% endhint %}

{% stepper %}
{% step %}

### Generate an API key in Odoo

1. Log in to your Odoo account.
2. In the top corner, click on your profile > **My preferences**.
3. Open the **Security** tab.
4. Click **Add API Key**.
5. Give your key a description.
6. Set the duration of the key's validity to indefinite or 90 days (\~3 months).
7. Click **Generate key**.
8. Copy/note the API key and store it somewhere safe. You will need it in the next step.
   {% endstep %}

{% step %}

### Create your Odoo connection in Channable

1. In Channable, open the project where you want to import your product data.
2. Go to **Setup** and click **+ Choose import method**.
3. For **Data source**, select **Odoo**.
4. Click **Add a new connection**.
5. Fill in the required information:
   1. For **Name**, give your connection a clear name (e.g. `Odoo US`).
   2. For **Odoo API Key**, paste/enter the key you generated in Odoo in the previous step.
   3. For **Odoo URL**, enter your Odoo URL (e.g. `https://demo-channable.odoo.com/`)
   4. For **Odoo Database Name**, enter the name of the database that contains your products (e.g. `demo-channable`)
6. Click **Connect with Odoo**.

{% hint style="info" %}
Make sure the database you connect contains active product data and can be accessed with your API key.
{% endhint %}
{% endstep %}

{% step %}

### Run your import

1. After connecting, give your import a clear name.
2. Review the available import settings.
3. Click **Run import**.

Once Channable reads your product data, you will be redirected to the **Import Mapping** page.
{% endstep %}

{% step %}

### Import mapping

This page shows the fields retrieved from your Odoo database, such as `title`, `description`, and `price`.

Before you continue:

* Compare and adjust mapping.
  * Review your **Imported data fields** against the matched **Project fields**.
  * If a field is matched incorrectly, click it and select a different field.
* Check and correct field types.
  * If a field has the wrong type, click **Edit**, select the correct type, and click **Save & Import**.

<figure><img src="/files/nalbWoHx0MA2QrQOnql5" alt=""><figcaption></figcaption></figure>

* Exclude fields if needed.
  * To skip a field, select it in the **Select** column and exclude it from the import.

When you're done, click **Save & Import** to start importing your product data.
{% endstep %}

{% step %}

### Review your imported items

After your product data has finished importing:

* Go to **Overview** to view your imported products.
* Click an item to see its details.

Your Odoo import is now ready to use in Feeds, Marketplaces, Shopping Ads, and more.
{% endstep %}
{% endstepper %}


# PrestaShop

Import product data from your PrestaShop store into Channable.

### Before you start

**You’ll need**

* A Prestashop account with a webshop

{% hint style="info" %}
Note: Channable no longer supports PrestaShop 1.5.
{% endhint %}

***

{% stepper %}
{% step %}

### Step 1: Download and set up the Channable plugin — Version 1.7

Follow these steps to install the Channable app from PrestaShop for PrestaShop 1.7.

1. Log in to your PrestaShop account.
2. Download [the Channable plugin.](https://addons.prestashop.com/en/marketplaces/95673-channable.html)
3. In the backend of your PrestaShop account, go to **Modules** > **Modules and** **Services**.

![capture\_image\_12\_\_1\_.png](/files/ff09d28cec597ce61a21ad6ae0f2d19d7034d290)

4. Select **Upload a module**.

<figure><img src="/files/0369858222ca9ba6a06c1d5495e3550ee422a98f" alt=""><figcaption></figcaption></figure>

5. Click **Select file**. Select the plugin.zip file you downloaded.
6. After installing, click **Configure**.
7. Open your Channable plugin and scroll to the **Feed-URL section**.
8. Click **Click here to auto-connect with Channable**. You will be redirected to Channable to log in to your account.

<figure><img src="/files/7e3c209b02ac2d75ce9155ca3c1dc594f0a61eaf" alt=""><figcaption></figcaption></figure>

{% hint style="info" %}
If you are already logged into your Channable account you will automatically be sent to the permissions page.
{% endhint %}

9. A pop-up window will appear in Channable. Click **Save**.
   {% endstep %}

{% step %}

### Step 1: Download and set up the Channable plugin — Version 1.6

Follow these steps to install the Channable app from PrestaShop for PrestaShop 1.6.

1. Log in to your PrestaShop account.
2. Download [the Channable plugin.](https://addons.prestashop.com/en/marketplaces/95673-channable.html)
3. In the backend of your PrestaShop account, go to **Modules and Services** > **Modules and** **Services**.

![capture\_image\_7\_\_2\_.png](/files/e83004831bf652c1bdf6ee7899dc495ed7dabda0)

4. Select **Add a new module**.

<figure><img src="/files/1f16eaa7f9be79023471bceba147a910147e6403" alt=""><figcaption></figcaption></figure>

5. At **Add a new module**, click **Choose a file**. Select the plugin.zip file you downloaded.
6. Click **Upload this module**.
7. In the search bar, search for "Channable". The Channable plugin will appear as a search result.
8. Click **Install**.

<figure><img src="/files/e3b435c895dabe631b8b6ab1e19765b0626f9c2d" alt=""><figcaption></figcaption></figure>

9. Click **Proceed with the installation**. Channable will be added to your modules.
10. Open your Channable plugin and scroll to the **Feed-URL section**.
11. Click **Click here to auto-connect with Channable**. You will be redirected to Channable to log in to your account.

{% hint style="info" %}
If you are already logged into your Channable account you will automatically be sent to the permissions page.
{% endhint %}

12. A pop-up window will appear in Channable. Click **Save**.

Your Channable account will be connected to PrestaShop and ready to create a PrestaShop import channel.
{% endstep %}

{% step %}

### Step 2: Set up your PrestaShop connection (Your data source & Import settings)

1. In Channable, open the project you want to import your product data to.
2. Go to **Setup > Import** and click **+ Choose import method**. Select  **PrestaShop Plugin**.
3. Select your PrestaShop connection.
4. For **Name**, give your channel a descriptive name (e.g. "PrestaShop EN")
5. Click **Run import**. You'll be redirected to the Import m**apping** step to map your product information.
   {% endstep %}

{% step %}

### Step 3: Import mapping

**Import mapping** displays fields retrieved from your PrestaShop account (e.g. price, description, title).

Match your imported fields to Channable's standardized project fields. Channable does most mapping automatically, but review and adjust before importing.

{% hint style="info" %}
Tip: Want to learn more about how import mapping works in Channable? Read our [dedicated guide on mapping](/get-started/getting-started/fields-in-channable/field-mapping-in-channable).
{% endhint %}

* Compare and adjust mapping\
  Review your **Imported data fields** against Channable's matched **Project fields**. If a field was matched incorrectly, click on the field to select a different field.
* Check and correct field types\
  Check that the right field type is assigned to your project fields. If a field has the wrong type, click **Edit** next to the field, select the correct type in the dropdown, and click **Save & Import**.
* Exclude fields (optional)\
  To exclude a field from being included in your product data, click the checkbox in the **Select** column for that field and select the **Exclude** checkbox.&#x20;

Once you've finished mapping, click **Save & Import** to start importing your PrestaShop product data.
{% endstep %}

{% step %}

### Step 4: Overview

After your product data has finished importing:

* Go **Overview** to view your imported products.
* Click on an item to see detailed information.

<figure><img src="/files/OOmR6aDntkdmtBWWCtEH" alt=""><figcaption></figcaption></figure>

Your PrestaShop import is now successfully set up! You can now use this product data to create and optimize Feeds, Marketplaces, Shopping Ads, and more in Channable.
{% endstep %}
{% endstepper %}


# Modify Channable's PrestaShop module

Customize Channable’s PrestaShop module to adjust how your product data is imported.

If you want to start importing your products to Channable from Prestashop, you will have to follow [the guide](/import-data/import-how-to/import-your-product-data/import-via-a-webshop/prestashop), which includes downloading the Channable module in your Prestashop account. This module has certain parameters that you can modify and in this article we will explain the different setup options of these parameters.

Once you have installed the Channable module, you should be able to find it in your modules section and by clicking on “Configure” you will enter the module and will see its parameters.

<figure><img src="/files/fd17afcc259edcc54c448d255d80897946279124" alt=""><figcaption></figcaption></figure>

You will see the following different sections in the module:

* Configuration: order configuration section. Only necessary if you contracted an order connection in Channable.
* Feed-URL and Webhook-URL & Order-API-URL: connection information.
* Feed settings: some modifiable import parameters for the import creation.
* Expert: Additional fields in feed: section to add extra fields to the import.

{% hint style="info" %}
Note: Every time you make a change in a different section of the module, remember to save the changes in that same section.
{% endhint %}

<details>

<summary><strong>How do I choose my order settings for my order connection?</strong></summary>

First of all, it is important to explain that the order connection is a separate functionality that Channable offers. If you are interested in knowing what the order connection does, you can read [this article](/list-advertise/orders/order-connections/how-to-set-up-an-order-connection). If you already know what it is and want to request it, you just need to follow [these steps](/list-advertise/orders/order-connections).

In the Configuration section, you will see all the different parameters that you have to set up for your order connection to work. If you do not have, or have requested, an order connection in Channable, this section of the module will not affect you, you can skip it.

<figure><img src="/files/9643784156ec0f6e34a01e61787046c2eae2feed" alt=""><figcaption></figcaption></figure>

We will explain the different parameters you can find in this section and which values you can use:

* Order states "shipped": when Channable sees that one of the orders has any of these states you have selected, it will send the message to the export platform that the order is “shipped”.
* Order states "cancelled": when Channable sees that one of the orders has any of these states you have selected, it will send the message to the export platform that the order is “cancelled”.
* Order state for imported orders: state that will be assigned to all imported orders when they arrive to Prestashop.
* Carrier to use for generated orders: carrier you want to assign to your orders. You can also assign it from Channable, so this option can be empty.
* Use Channable order comment as Private Note: Yes/No. When active it will create all comments as private notes in your Prestashop.
* Warehouse for imported orders: You can select the warehouse you use for your orders here. It's only needed if you use the warehouse functionality in Prestashop and you have need to relate imported orders to a specific warehouse.
* Use Channable order comment as Customer Thread: Yes/No. In PrestaShop there's a "customer thread" for each order. We can put order IDs (for example from Amazon) or something else here when this option is activated.

</details>

<details>

<summary><strong>How can I check what I am sending to Channable?</strong></summary>

In the section Feed-URL and Webhook-URL you can find more information about the connection with Channable.

* Feed-URL: By accessing this URL in the browser, you will be able to see the feed that the module is sending to Channable with all the import information. Here you can also find the API key that you need to create a Prestashop connection in Channable, and also the Lang-ID of the connected store.
* Webhook-URL & Order-API-URL: existing URLs necessary for an order connection with Channable.

</details>

<details>

<summary><strong>Can I apply any filter or modify the way I import my products?</strong></summary>

All the filters or different ways to send the import file can be found in these two sections of the module:

Feed settings

<figure><img src="/files/5611d2f1cdb415f083a9d11f8f860737e6b3ff62" alt=""><figcaption></figcaption></figure>

The plugin can be a bit heavy for smaller servers. If your Prestashop import in Channable gives a time-out error, you can try these three options:

* Timeout optimization mode: when on, it reduces the initial query one more time, to decrease the risk of potential timeouts. If inactive, there will be a lot more combined fields fetched. This reduces the number of queries, but needs more power.
* Alternative mode: when on, it fetches specific fields by various standalone-methods, and not within the general query. If a server has not enough power or resources, this could help, but might be a bit slower than the regular mode.
* SQL Optimization mode: when on, it does a "prefiltering" for valid product- and attribute-IDs. This reduces the load for the following query which only fetches data for the previously checked valid IDs and not all products and attributes in the database. This is something that usually should always be activated.

There are also some other parameters:

* Disable out of stock products: filter to exclude products without stock from the import.
* Disable inactive products: filter to exclude inactive products from the import.
* Skip shipping calculation: if enabled it does not calculate the shipping cost.
* Default Customer-ID: customer and corresponding default address used for the shipping cost calculation in the feed.
* Default page size: it needs to be filled for the import to work correctly, unless you send a "limit" parameter for the size of the product page you're exporting to Channable. If you don't know which value would be best, you can try with 50 or 100.
* Use Guest checkout: If inactive, all incoming orders will have created a “real” customer account.

Expert: Additional fields in feed

<figure><img src="/files/6b4d2c7476e280ccf12e9508e48fff889109e4dc" alt=""><figcaption></figcaption></figure>

Maybe you have some more information in Prestashop that is not getting imported into Channable. That is because we do not automatically import all fields. If you want to add another field in the import you just have to go to this section, and search for the field you want to add inside the “Available fields” tab. Once you have found it you just need to select it, press the > "assign” button and then press “save”. Once this is done, you just need to run your import in Channable again for the new information to get imported and you should then be able to see the new field you added to the import.

</details>


# Can I import multiple languages from PrestaShop?

Learn how multi-language imports work for PrestaShop and available limitations.

{% hint style="info" %}
**Note:** This article explains importing multiple languages via the PrestaShop **plugin**, not via the API.
{% endhint %}

When you want to advertise in other languages and have multiple languages in one PrestaShop backend, you can import your products in those languages. This article explains how!

**I have multiple languages in one PrestaShop account**

Make sure you have [our PrestaShop plugin](https://www.channable.com/platform/prestashop/) installed.

Go to 'Connections' in the upper right corner of Channable and click 'Add a new connection'. For each new language you can create a new connection that contains the webshop URL for that country. View the image below:

![Channable\_\_25\_.png](/files/076be86558ea5a1f5585c109931131fe2ab524a8)

After creating these connections you can use them to [import your products](broken://pages/hIQl9ilwVlspX312zJrj) in Channable.

**I have different PrestaShop accounts for each language**

Make sure you have [our PrestaShop plugin](https://www.channable.com/platform/prestashop/) installed in each PrestaShop account. If this is the case, please follow the steps that are described in the article about [importing your products from PrestaShop](broken://pages/c300188b12107bff3d0afee214bfdcebefec8286).


# Shopify

Import product data from your Shopify store into Channable.

In this article, you'll learn how to install the Shopify Channable app to import product data from your Shopify web shop into Channable.

***

### <i class="fa-memo-circle-check">:memo-circle-check:</i> Before you start

**You’ll need**

* A Shopify account with a webshop
* At least one [market](https://help.shopify.com/en/manual/markets-new/manage) set up in Shopify

{% hint style="warning" %}
When setting up your market in Shopify, make sure that you click the :heavy\_plus\_sign: next to the options (e.g. the option **Catalogs -> All products**) at the **Inherited** section in order to add/save them.

<img src="/files/5R2CuEmYl8qzJjXACmYH" alt="" data-size="original">
{% endhint %}

{% hint style="warning" %}
In Shopify, make sure your market has a **catalog assigned that contains products**. If your market has no catalog (or an empty catalog), the Shopify Markets import can fail or import no items.

Quick fix: [In Shopify, create a new catalog](https://help.shopify.com/en/manual/markets-new/catalogs) that includes **All products** (Shopify’s default) and assign it to the market.
{% endhint %}

**Good to know**

<details>

<summary><strong>Imported prices can differ from storefront currencies</strong></summary>

Channable imports the original source currency from Shopify, so price values may not reflect [currency conversions](/import-data/import-how-to/import-your-product-data/import-via-a-webshop/shopify/currency-discrepancies-in-shopify-imports) displayed in your storefront.

</details>

<details>

<summary><strong>Billing works a little differently for Shopify</strong></summary>

Subscriptions and add-ons related to your Shopify integration are invoiced through Shopify in USD, meaning your billing cycle might differ from our standard invoicing. All charges will appear on your Shopify invoices.

For more information about Channable payments for Shopify users, check our [detailed guide](/account-billing/manage-your-subscription/manage-your-channable-subscription/readme).

</details>

<details>

<summary><strong>Variant product images are imported for each product</strong></summary>

When you create variants in Shopify, we import images for all variants for that product so you can use them when setting up a channel.

For more control over which images are imported, you could:

* Create separate "parent" products in Shopify for each variant.
* Set up an import rule to filter `additional_image_links` based on a unique identifiers (e.g. size, color) in the image URL.

</details>

***

{% stepper %}
{% step %}

### Install the Channable app in Shopify

Follow these steps to install the Channable app from the Shopify App Store:

1. In Channable, open the project where you want to import your product data.
2. In the sidebar, go to **Setup >** **+ Choose import method** > **Shopify Markets**.
3. Add a new connection, or select an existing one.
   1. If adding a new connection, click **+ Add a new connection** > **Connect with Shopify**. You will be redirected to Channable's Shopify app store page.
   2. Click **Install**.
   3. You'll be redirected to your Shopify store's backend to authorize the connection. In the page header, click **Install app**.
   4. Once installation is complete, you'll be redirected back to Channable.
      {% endstep %}

{% step %}

### Set up your Shopify Markets import

{% hint style="warning" %}
You must have at least one market to import items from. If you don't have any, [create one](https://help.shopify.com/en/manual/markets-new/manage) before continuing.
{% endhint %}

Continue setting up your Shopify markets import.

1. **Name**: Give your importer a clear name (like ‘Shopify Markets - EU’).
2. **Choose language:** Select any additional language(s) you want to import. The primary language is always included.
3. **Shopify Markets to import:** Select the market you want to import. If you don’t add one, we’ll import all markets by default.

{% hint style="info" %}
Enabling advanced settings may slow down your import update speed.
{% endhint %}

5. Click **Run import**.
   {% endstep %}

{% step %}

### Set advanced Shopify importer settings <mark style="color:$primary;">(optional)</mark>

If you would like to further customize your Shopify setup, you can customize your import with additional advanced settings.

1. Click <i class="fa-arrow-left">:arrow-left:</i> **Import settings** to return to your import settings.
2. Click <i class="fa-gear">:gear:</i> **Advanced settings**.
3. Go through each tab and apply your preferred settings, clicking **Save** after each change.

<details>

<summary><i class="fa-shopify">:shopify:</i> <strong>Shopify: Advanced setting options</strong></summary>

#### **Additional fields**

**Price by country**

Set different prices for each country. This only works with currencies in your Shopify store.

For each supported currency, we import two fields: one for the price and one for the currency. For example: `price_be` and `price_be_currency`.

* **How to add:** Click the dropdown, click **Add**, then select countries.

**Include translated metafields**

Enable this to import translated metafield values. Keep it enabled for localized listings in different countries.

* **Enabled:** Channable automatically imports metafield translations.
* **Disabled:** Channable imports only the default source language.

**Metaobjects**

Choose whether to import metaobject fields with additional information.

* **Enabled:** Channable imports metaobject display names and custom fields for the main product.
* **Disabled:** Channable imports only metaobject display names. It does not import product-level metaobject fields.

{% hint style="info" %}
Imported metaobjects use the name of their associated metafield as a prefix. This setting can add many fields, depending on your metaobject setup.
{% endhint %}

**Metafields**

Choose whether to import product custom fields with additional information.

* **Enabled:** Channable imports custom fields for the main product.
* **Disabled:** Channable does not import product-level metafields.

**Variant metafields**

Choose whether to import variant metafields. These are custom fields for each product variant, such as a T-shirt size or color.

* **Enabled:** Channable imports custom fields for product variants.
* **Disabled:** Channable does not import variant-level metafields.

{% hint style="info" %}
Imported metafields use the `meta_` prefix.
{% endhint %}

#### **Import filter**

**Collection ID**

Enter a collection ID to import only items from that collection. Find the ID in the Shopify collection page URL. For example:

`https://my-shop-name.myshopify.com/admin/collections/123456789`

**Only import active markets**

Enable this to import only active markets.

* **Enabled:** Channable imports products from active markets only.
* **Disabled:** Channable imports products from all markets, regardless of status.

**Only import active items**

Enable this to import only active items. Active items are visible and available for sale.

* **Enabled:** Channable imports active items only.
* **Disabled:** Channable imports all items, regardless of status.

</details>
{% endstep %}

{% step %}

### Map your product data to project fields

After you run the import, you land on the **Import mapping** page. It shows the fields pulled from Shopify, such as `price`, `description`, and `title`.

In this step, you match those imported fields to Channable's standard project fields. Channable maps most fields automatically, but you should review and adjust them before importing.

{% hint style="info" %}
Tip: Want to learn more about how import mapping works in Channable? Read our [dedicated guide on mapping](/get-started/getting-started/fields-in-channable/field-mapping-in-channable).
{% endhint %}

<figure><img src="/files/nalbWoHx0MA2QrQOnql5" alt=""><figcaption></figcaption></figure>

1. **Compare and adjust mapping.**
   * Review your **Imported data fields** against Channable's matched **Project fields**. If a field was matched incorrectly, click on the field to select a different field.
2. **Check and correct field types.**
   * Check that the right field type is assigned to your project fields. If a field has the wrong type, click **Edit** next to the field, select the correct type in the dropdown, and click **Save & import**.
3. **Exclude fields (optional).**
   * To exclude a field from being included in your product data, click the checkbox in the **Exclude from import** column for that field.

{% hint style="info" %}
If you have several markets set up in Shopify, check that any market-specific fields (like `price_netherlands` or `title_fr`) are mapped to the right field type.
{% endhint %}

4. Once you've finished mapping, click **Save & Import** to start importing your Shopify product data.
   {% endstep %}

{% step %}

### Overview

After your product data has finished importing:

* Go to the **Overview** page to view your imported products.
* Click on an item to see detailed information.

<figure><img src="/files/OOmR6aDntkdmtBWWCtEH" alt=""><figcaption></figcaption></figure>

Your Shopify import is now successfully set up! You can now use this product data to create and optimize Feeds, Marketplaces, Shopping Ads, and more in Channable.
{% endstep %}
{% endstepper %}


# Currency discrepancies in Shopify imports

Understand why Shopify prices in Channable can differ from storefront currencies.

After importing your products, you may notice that the currency in Channable does not match the currency displayed in your Shopify store. For example, a product listed in GBP on Shopify might appear in EUR within Channable.

#### Why this happens

Channable always imports the source currency from your Shopify data. If Shopify automatically converts a price into a local currency based on exchange rates, it often retains the original currency in the underlying data. Channable pulls that original value.

#### Fixed prices and Shopify Markets

This discrepancy often occurs when using Shopify Markets with multiple countries in a single market.

* **Automatic Conversion:** If multiple countries share one market (e.g., a "Pacific" market including Australia and New Zealand), Shopify converts the base price (AUD) to the local currency (NZD) for the customer. Channable will still import the base price (AUD).
* **The Solution:** To ensure Channable imports a specific currency for a specific region, you must create a single-country market in Shopify. This allows you to set a fixed price in the local currency, which Channable can then recognize as the source data.


# Guide for switching to Shopify Markets

Move from the old Shopify importer to Shopify Markets with the required setup steps.

{% hint style="warning" %}
**Important:** Moving to Shopify Markets requires recreating any projects currently using your old Shopify importer. We recommend dedicating 2-3 hours, depending on your number of channels and/or projects.
{% endhint %}

[Shopify Markets](https://www.shopify.com/nl/markets) is an upgraded version of Shopify that makes it easier to scale your business and sell to multiple markets from a single store.

Our new Channable Shopify Markets importer is built for this new structure, offering significantly faster import times and simplified multi-market data management.

This guide is designed to help you transition from our old Shopify importer to Shopify Markets.

**Why switch to Shopify Markets?**

Shopify Markets offers significant benefits, including:

* Drastically faster import times
* Multi-market data and translations
* Simpler setup (since essential data is included by default

***

### <i class="fa-memo-circle-check">:memo-circle-check:</i> **Before you start** <a href="#h_01kfg0v41mgm4e873dnqra5vjt" id="h_01kfg0v41mgm4e873dnqra5vjt"></a>

**You’ll need**

* [Shopify Markets enabled in your Shopify webshop](https://help.shopify.com/en/manual/markets-new/manage)
* Shopify Markets permission enabled for your Shopify connection in Channable

**Good to know**

* Draft items are currently not supported for Shopify Markets.&#x20;
* **You need to recreate your old setups to use Shopify Markets**. The old Shopify importer stored translations and market data differently.
  * E.g. fields like title and price are now market-specific (e.g `title_fr`, `price_netherlands`)
  * Items with the `Draft` or `Archived` status are no longer imported and should be converted to `Unlisted` if possible.
* Setting up a new project ensures your rules and mappings reference the correct fields.

<details>

<summary><strong>Old vs new importer differences</strong></summary>

The old importer placed translated content into the default field (title, description). The new importer creates specific fields for localized data.

| Data Type               | Old Shopify behavior                                               |                                                     New Shopify markets field name(s)                                                     |
| ----------------------- | ------------------------------------------------------------------ | :---------------------------------------------------------------------------------------------------------------------------------------: |
| **Product Translation** | Translated content was placed in the default field (e.g. `title`). |                                        `title_{language_code}` (e.g., `title_fr`, `description_es`)                                       |
| **Market Price**        | Only one default price field (e.g. `price`) was available.         | `price_{market_name}` (e.g., `price_netherlands`, `price_belgium`) and the corresponding currency field (`price_{market_name}_currency`). |
| **Inventory Quantity**  | Total in `inventory_quantity`. Stock per location was optional.    |                               inventory\_quantity (total) and quantity\_{location\_name} for each location.                               |
| **Product Category**    | Limited category data.                                             |                               product\_category (e.g., "Dog Food") and product\_category\_path (full path).                               |

</details>

{% hint style="success" %}
Use two screens or a large monitor to compare your old and new setups as you work.
{% endhint %}

{% stepper %}
{% step %}

### Create a new project

1. In your Channable account, go to **Projects**.
2. Click **Add new project**.
3. Give your project a descriptive name (e.g. ‘Shopify Markets change’).
4. Click **Save**.
   {% endstep %}

{% step %}

### Set up your Shopify Markets import

You’ll notice fewer settings are available. For Shopify Markets, essential data (like stock, location and collections) are included by default, simplifying your setup.

1. On the **Getting started** page, click **+ Add import**.
2. Select **Shopify Markets** from the list of available imports.
3. Select your existing Shopify connection, or create a new one.
   1. **New connection:** Click **Connect with Shopify**. You will be redirected to Shopify to link your account and accept required permissions.
   2. **Existing connection:** Check you have Shopify Market permissions enabled for the connection.
4. **Name**: give your importer a clear name (e.g. ‘Shopify Markets’).
5. **Choose language:** Select any additional language(s) you want to import. The primary language is always included.
6. Click **Start import**.
   {% endstep %}

{% step %}

### Set your advanced settings (optional)

After we read your product data, you’ll land on the **Edit mapping** page.

If you would like to further customize your Shopify setup (e.g. import metafields, only import active markets):

1. Click on the **Settings** tab to return to your import settings.
2. Click **Advanced settings**.
3. Go through each tab and apply your preferred settings, clicking **Save** after each change.
   {% endstep %}

{% step %}

### Review and update import mapping

In the **Edit mapping** tab, you’ll see several new import fields. These mostly concern localized data (e.g. price\_be for prices for Belgium-based customers).

1. Review and compare the **Import fields** and **Project field** columns.
2. Ensure all fields are mapped correctly.
3. Check that new market-specific fields (like price\_netherlands or title\_fr) are mapped to the right field type.
4. Click **Save & import** to begin importing your data.
   {% endstep %}

{% step %}

### Check your items

1. Go to **Items**.
2. Check your items and ensure all prices, translations, location information, etc. look correct.
3. If you find issues, return to the **Edit mapping** page to adjust your product data.
   {% endstep %}

{% step %}

### Copy and recreate your import rules (if using)

After running your import, copy and review any import rules that reference localized data (e.g. prices or translated titles) and update them to use the new market-specific fields.

1. Go to **Setup > Import rules**.
2. Click **+ Create rule.**
3. In the pop up, click **Copy rule(s)**.
4. At the field **From project**, select the project that contains the import rules you want to copy.
5. Click **Copy here**.
6. **Review each copied rule**. Update any references to old fields (like title or price) to the new market-specific fields (e.g. title\_fr, price\_netherlands).
7. Click **Save**.
8. Repeat this for each import rule.
   {% endstep %}

{% step %}

### Recreate your channels

After importing and fixing your import rules, you can start recreating your channels in a new project. You’ll need to update all channel rules and mapping to use the new field structure.

<details>

<summary><strong>Recreating marketplace (API) channels</strong></summary>

Go to **Channels**.

1. Click **+ Create channel**.
2. Select the channel you need to recreate.
3. Fill in your channel settings to match your old channel.
4. In **Categories**, go to **Manual categorization > Copy categories**. A pop up will appear.
5. For **From project**, select your old project containing your channel. For **From channel**, select the channel within that project that matches the channel you’re recreating.
6. Click **Copy here**. This applies your old categorization to your new channel, saving you time.
7. Go to the **Rules** step and click + **Create rule**.
8. In the pop up, click **Copy rule(s)**.
9. At the field **From project**, select the project that contains the rules you want to copy.
10. Click **Copy here** to copy the rule(s).
11. Check your copied rule. If applicable or relevant, update the project fields used.
12. Click **Save**.
13. Repeat the rule copying process for each rule.
14. Go to the **Build** step.
15. Carefully go through and map your **Shared** and **Category** attributes.
16. Click **Save**.
17. Go to the **Quality** step and review any fields missing data or presenting issues.
18. Return to the **Settings** step and provide your seller account.
19. Click **Activate API**.

Repeat these steps for each marketplace channel.<br>

</details>

<details>

<summary><strong>Recreating feed channels</strong></summary>

1. Go to **Channels**.
2. Click **+ Create channel**.
3. Select the feed you need to recreate.
4. Fill in your channel settings to match your old channel.
5. In **Categories**, go to **Manual categorization > Copy categories**. A pop up will appear.
6. For **From project**, select your old project containing your channel. For **From channel**, select the channel within that project that matches the channel you’re recreating.
7. Click **Copy here**. This applies your old categorization to your new channel, saving you time.
8. Go to the **Rules** step and click + **Create rule**.
9. In the pop up, click **Copy rule(s)**.
10. At the field **From project**, select the project that contains the rules you want to copy.
11. Click **Copy here** to copy the rule(s).
12. Check your copied rule. If applicable or relevant, update the project fields used.
13. Click **Save**.
14. Repeat steps 12-13 for each rule.
15. Go to the **Mapping** step.
16. Carefully go through and map your fields to the listed attributes.
17. Click **Save**.
18. Go to the **Quality** step and review any fields missing data or presenting issues.
19. Go to the **Preview & export** step.
20. Click **Activate feed**.

Repeat these steps for each feed you want to recreate.

</details>

<details>

<summary><strong>Recreating dynamic ads</strong></summary>

1. Go to **Dynamic ads**.
2. Click **+ Create ad channel**.
3. Select the tab of the dynamic ad channel you need to recreate.
4. Fill in your channel settings to match your old channel.
5. Go to the **Rules** step and click + **Create rule**.
6. In the pop up, click **Copy rule(s)**.
7. At the field **From project**, select the project that contains the rules you want to copy.
8. Click **Copy here** to copy the rule(s).
9. Check your copied rule. If applicable or relevant, update the project fields used.
10. Click **Save**.
11. Repeat steps 12-13 for each rule.
12. Go to the **Campaigns** step and re-do your old dynamic ads channel settings.
13. In **Ad groups**, copy/recreate any rules previously used.
14. Click **Save**.
15. In **Build**, -do your old dynamic ads settings, updating or mapping any relevant fields.
16. Go to the **Preview** step and resolve any open issues.
17. Return to the **Settings** step.
18. Click **Activate**.

Repeat these steps for each dynamic ad channel you want to recreate.

</details>
{% endstep %}

{% step %}

### Deactivate your old channels <a href="#h_01kfg0v48d4wnjxwjm3p4gy8t5" id="h_01kfg0v48d4wnjxwjm3p4gy8t5"></a>

Once your new channels ready, deactivate the old ones in your old project to prevent duplicate listings.

{% hint style="success" %}
**Tip:** Deactivating also allows you to reference them in case you need to check or adjust your new settings to match your old channels.
{% endhint %}

1. Return to **Projects** and select your old project.
2. Go to **Channels** / **Dynamic ads**.
3. Go through your channels and deactivate (not delete) each one.
   1. Marketplaces (APIs): **Settings > Deactivate API**
   2. Feeds: **Settings > Deactivate**
   3. Ads: **Preview & export > Deactivate feed**
      {% endstep %}

{% step %}

### Run your new channels

1. Click **Projects** and select your new project.
2. Go to **Channels**.
3. Click **Run now** for each channel.
   {% endstep %}

{% step %}

### Troubleshooting

Since multiple channels may be running simultaneously, wait 24 hours before reviewing each channel for errors or issues.
{% endstep %}
{% endstepper %}


# Shoptrader

Import product data from your Shoptrader store into Channable.

### Before you start

**You'll need**

* A Shoptrader account

{% stepper %}
{% step %}

### Generate tokens in Shoptrader

* Log in to your Shoptrader backend.
* Go to **Configuration > API**.<br>

  <figure><img src="/files/fc8115aef657eb6b05823888650494b3bb831670" alt=""><figcaption></figcaption></figure>
* At **Add a new token**, create a new token for Channable.
  * For the name, give it a descriptive name (e.g. "Channable token").
  * Tick the **To read**, **To write**, and **To delete** checkboxes.
  * Click **Add token**.<br>

    <figure><img src="/files/d26eedf2b3d9864290c67b7c2470cad761dd5e6b" alt=""><figcaption></figcaption></figure>
* This generates a token. Make note of it, as you'll need it in the next step.
  {% endstep %}

{% step %}

### Create your Shoptrader connection (Your data source & Import settings)

* In Channable, open the project where you want to import your product data.
* Go to **Setup > Import** and click **+ Choose import method**. Select **Shoptrader**.
* Select your Shoptrader connection.
* Fill in the required information:
  * For **Label**, give your import channel a descriptive name (e.g. "Shoptrader")
  * For **Shop URL**, provide your Shoptrader webshop URL.
  * For **Token**, fill in the token generated in the previous step.
  * Click **Connect with Shoptrader**. This takes you to your import settings.
* Configure import settings:
  * For **Name**, give your Shoptrader import a descriptive name (e.g. "Shoptrader")
  * For **Choose language**, select the language your product data is in.
* Click **Run import**. You'll be redirected to the **Import mapping** page to map your product information.
  {% endstep %}

{% step %}

### Import mapping

This page displays your import fields (fields retrieved from your Shoptrader webshop — e.g. price, description, title), and corresponding project fields (Channable's standardized fields used to streamline channel setups).

{% hint style="info" %}
Note: Our system will automatically detect and map most import fields to our standardized fields, but it's important to review and adjust these before importing.
{% endhint %}

* Compare and adjust mapping:\
  Review your **Imported data fields** against Channable's matched **Project fields**. If a field was matched incorrectly, click on the field to select a different field.
* Check and correct field types:\
  Ensure the right field type is assigned to your project fields. If a field has the wrong type, click **Edit** next to the field, select the correct type in the dropdown, and click **Save & Import**.
* Exclude fields (optional):\
  To exclude a field from being included in your product data, click the checkbox in the **Select** column for that field and select the **Exclude** checkbox.&#x20;

Once you've finished mapping, click **Save & Import** to start importing your product data. Depending on how much data you're importing, this can take some time.

{% hint style="info" %}
Tip: Check the **Status** column in **Setup** to check your import progress. Your product data is fully imported when the Status is **Finished**.
{% endhint %}
{% endstep %}

{% step %}

### Overview

After your product data has finished importing:

* Go **Overview** to view your imported products.
* Click on an item to see detailed information.

<figure><img src="/files/OOmR6aDntkdmtBWWCtEH" alt=""><figcaption></figcaption></figure>

You're good to go! Your items are ready to use to create and optimize Feeds, Marketplaces, Shopping Ads, and more in Channable.
{% endstep %}
{% endstepper %}


# Shopware 5

Import product data from your Shopware 5 store into Channable.

{% hint style="info" %}
**Note:** This article is about importing your products from **Shopware 5**. If you have Shopware 6, follow the steps in [this article.](/import-data/import-how-to/import-your-product-data/import-via-a-webshop/shopware-6)
{% endhint %}

### Before you start

You’ll need

* A Channable account with a project
* A Shopware account

{% stepper %}
{% step %}

### Download the Channable Connector plugin

{% stepper %}
{% step %}
In the Shopware store, download the [Channable Connector plugin](https://store.shopware.com/en/res6026584109026f/channable-connector.html).

<figure><img src="/files/d8aeb995bfe591e51ffb914003532636c05bea50" alt=""><figcaption></figcaption></figure>
{% endstep %}

{% step %}
In your Shopware backend, go to **Configuration > Plugin Manager**.
{% endstep %}

{% step %}
Click **Installed**. Find the Channable Connector plugin and click the pencil icon to edit your plugin.

<figure><img src="/files/127deed84baae4d0f4f16eea07b5b6fcc0b1fb44" alt=""><figcaption></figcaption></figure>
{% endstep %}

{% step %}
Click **Auto connect**.

Note: If you have different shops/languages set in your Shopware account, choose which shop to connect with by selecting the locale tab > **Auto connect**.

<figure><img src="/files/c5960116f88ea621084dc52cae76765c73c0e768" alt=""><figcaption></figcaption></figure>
{% endstep %}

{% step %}
You will be redirected to Channable to finalize your connection. If you haven't logged in yet, you'll be prompted to do so.
{% endstep %}

{% step %}
Click **Add connection**.

<figure><img src="/files/b9a88d30cdd3153a31449e0e579417eb0e6448f8" alt=""><figcaption></figcaption></figure>
{% endstep %}
{% endstepper %}
{% endstep %}

{% step %}

### Set up your Shopware 5 connection (Your data source & Import settings)

{% stepper %}
{% step %}
In Channable, open the project you want to import your product data to.
{% endstep %}

{% step %}
Go to **Setup > Import** and click **+ Choose import method**. Select **Shopware 5**.
{% endstep %}

{% step %}
Select the Shopware connection you just made.
{% endstep %}

{% step %}
For **Name**, give your channel a descriptive name (e.g. "Shopware EN")
{% endstep %}

{% step %}
Click **Run import**. You'll be redirected to the **Import mapping** step to map your product information.
{% endstep %}
{% endstepper %}
{% endstep %}

{% step %}

### Import mapping

This page displays your import fields (fields retrieved from your Shopware 5 webshop \[e.g. price, description, title]), and corresponding project fields (Channable's standardized fields used to streamline channel setups).

{% hint style="info" %}
Tip: Want to learn more about how import mapping works in Channable? Read our [dedicated guide on mapping](/get-started/getting-started/fields-in-channable/field-mapping-in-channable).
{% endhint %}

{% stepper %}
{% step %}
Compare and adjust mapping:

Review your **Imported data fields** against Channable's matched **Project fields**. If a field was matched incorrectly, click on the field to select a different field.
{% endstep %}

{% step %}
Check and correct field types:

Check that the right field type is assigned to your project fields. If a field has the wrong type, click **Edit** next to the field, select the correct type in the dropdown, and click **Save & Import**.
{% endstep %}

{% step %}
Exclude fields (optional):

To exclude a field from being included in your product data, click the checkbox in the **Select** column for that field and select the **Exclude** checkbox.&#x20;

Once you've finished mapping, click **Save & Import** to start importing your product data. Depending on how much data you're importing, this can take some time.

{% hint style="success" %}
Tip: Check the **Status** column in **Setup** to check your import progress. Your product data is fully imported when the Status is **Finished**.
{% endhint %}
{% endstep %}
{% endstepper %}
{% endstep %}

{% step %}

### Overview

After your product data has finished importing:

* Go to **Overview** to view your imported products.
* Click on an item to see detailed information.

<figure><img src="/files/OOmR6aDntkdmtBWWCtEH" alt=""><figcaption></figcaption></figure>

You're good to go! Your items are ready to use to create and optimize Feeds, Marketplaces, Shopping Ads, and more in Channable.
{% endstep %}
{% endstepper %}


# Shopware 6

Import product data from your Shopware 6 store into Channable.

In this article, you'll learn how to import product data from Shopware 6 into Channable.

{% hint style="info" %}
**Note:** This article is about importing your products from **Shopware 6** using our **app**. If you have Shopware 5, check out our [Shopware 5 setup guide](/import-data/import-how-to/import-your-product-data/import-via-a-webshop/shopware-5).
{% endhint %}

***

### Before you start

You'll need

* A Shopware 6 account

Good to know

* Importing from a staging environment: You must whitelist Channable's IP addresses to connect through a staging environment. Without whitelisting, you may receive misleading errors suggesting your credentials are incorrect.

To prevent this, please contact our Support team to request our IP addresses and add them to your staging environment whitelist before continuing.

***

{% stepper %}
{% step %}

### Step 1: Download the Channable Integration app

To import your product data from Shopware 6 to Channable, you'll need to install the Shopware 6 Channable Integration app.

The app can be installed in two ways: through your **Shopware admin account**, or **Composer**.

**Important:** You must connect to Channable within 24 hours of installing the app to prevent your connection from expiring. If your connection expires, you'll need to install the app again.

{% stepper %}
{% step %}

#### Install with Shopware 6 admin

* Log in to your Shopware 6 admin account (accessible by adding /admin to the end of your shop domain).
* Go to **Extensions > Store**.
* In the search bar, search for “Channable” and select the **Channable integration** app.
* Click **Add extension**.
* Follow the steps in the installation wizard.
* Go to **Extensions > My extensions**.
* Click **Install** next to the Channable app.
* Click the to activate the app.
  {% endstep %}

{% step %}

#### Install with Composer

* In the Shopware store, download the Channable Integration app: <https://store.shopware.com/en/chann96219641361f/channable-integration.html> (free to install).
* Add the app to the cart and proceed to checkout.
* You will need to log in to the Shopware store, if you haven't done so.
  * Note: Make sure you select your shop's domain on the checkout page.
* Click **Complete payment**.
* In the **Merchant** section of your Shopware account, go to **Shops** and select the correct shop.
* Scroll to **License list** and click **Channable Integration**.
* Click **Install via Composer**.
* A pop-up will appear with further instructions. Follow these to install the app.
  {% endstep %}
  {% endstepper %}
  {% endstep %}

{% step %}

### Step 2: Connect with Channable

At this point, the Channable Integration app should be installed to your Shopware 6 account.

* In your Shopware 6 admin account, go to **Settings > Connect to Channable.**
* Click **Connect to Channable.**

<figure><img src="/files/b5e96f45e1fb566733b5bef781e532abe23030be" alt=""><figcaption></figcaption></figure>

* You will be redirected to Channable to create your connection. If you haven't logged in yet, you'll be prompted to do so.
* Click **Add connection**.
* Open the project you want to import your product data to.
* Go to **Setup > Import** and click **+ Choose import method**. Select **Shopware 6**.
* Select the Shopware 6 connection you just made.
* Provide the requested information:
  * For **Name**, give your channel a descriptive name (e.g. "Shopware EN")
  * For **Choose language**, select the language your import data is in.
  * For **Import filter**, select whether you only want to import active products or not.
* Click **Run import**. You'll be redirected to the **Import mapping** step to map your product information.
  {% endstep %}

{% step %}

### Step 3: Import mapping

This page displays your import fields (fields retrieved from your Shopware 6 webshop — e.g. price, description, title), and corresponding project fields (Channable's standardized fields used to streamline channel setups).

{% hint style="info" %}
Tip: Want to learn more about how import mapping works in Channable? Read our [dedicated guide on mapping](/get-started/getting-started/fields-in-channable/field-mapping-in-channable).
{% endhint %}

{% stepper %}
{% step %}

#### Compare and adjust mapping

Review your **Imported data fields** against Channable's matched **Project fields**. If a field was matched incorrectly, click on the field to select a different field.
{% endstep %}

{% step %}

#### Check and correct field types

Check that the right field type is assigned to your project fields. If a field has the wrong type, click **Edit** next to the field, select the correct type in the dropdown, and click **Save & Import**.
{% endstep %}

{% step %}

#### Exclude fields (optional)

To exclude a field from being included in your product data, click the checkbox in the **Select** column for that field and select the **Exclude** checkbox.&#x20;
{% endstep %}
{% endstepper %}

Once you've finished mapping, click **Save & Import** to start importing your product data. Depending on how much data you're importing, this can take some time.

{% hint style="success" %}
Tip: Check the **Status** column in **Setup** to check your import progress. Your product data is fully imported when the Status is **Finished**.
{% endhint %}
{% endstep %}

{% step %}

### Step 4: Overview

After your product data has finished importing:

* Go to **Overview** to view your imported products.
* Click on an item to see detailed information.

<figure><img src="/files/OOmR6aDntkdmtBWWCtEH" alt=""><figcaption></figcaption></figure>

You're good to go! Your items are ready to use to create and optimize Feeds, Marketplaces, Shopping Ads, and more in Channable.

### Adding additional Shopware connections

* To add more Shopware connections (e.g. for different locales), repeat the steps in this article starting from Step 2.
  {% endstep %}
  {% endstepper %}

***

### Troubleshooting

<details>

<summary>Error: Connection with your eCommerce platform expired.</summary>

To solve this error, you'll need uninstall and reinstall the Channable app in your Shopware backend.

<figure><img src="/files/1b8382ae3e93a3807df558741f0ad1bfbdc3098b" alt=""><figcaption></figcaption></figure>

* In your Shopware backend, go to **Extensions > My Extensions**.
* At your Channable extension, click > **Uninstall**.
* Repeat the steps in this article again, starting from Step 2.

**Important:** You must connect to Channable within 24 hours of installing the app to prevent your connection from expiring. If your connection expires, you'll need to install the app again.

</details>

<details>

<summary>The `link&#x3C;>` field for my product contains an incorrect URL.</summary>

We create these links by retrieving information from your Shopware backend. The domain for each URL is retrieved from the sales channel settings, so please ensure these settings are filled in correctly.

<figure><img src="/files/031841eeb93df7c791ec17b2cf644dc594885f9d" alt=""><figcaption></figcaption></figure>

</details>

<details>

<summary>I have a custom field that contains an image, but I only receive an ID instead of an image link.</summary>

Retrieving the URL instead of the ID will put additional strain on your server, as we’re doing one additional request per product. Therefore, we only want to do this when it’s necessary. If you want us to activate the feature that turns these IDs into URLs, you can [contact our support team](https://www.channable.com/contact).

</details>


# How to migrate from the Shopware 6 plugin to the Shopware 6 app

Migrate your existing Shopware 6 connection from the plugin to the app.

We have developed our own Shopware 6 app, which will replace the Shopware 6 plugin developed by Response GmbH. This plugin will no longer be actively maintained and updated, therefore, we ask you to install the app instead and migrate your existing projects.

{% hint style="info" %}
Note: This article is about migrating your products from the Shopware 6 plugin to the Shopware 6 app.\
If you are trying to set up a new Shopware app connection, please see the article on [this page](/import-data/import-how-to/import-your-product-data/import-via-a-webshop/shopware-6). If you have Shopware 5, follow the steps from [the article on this page](/import-data/import-how-to/import-your-product-data/import-via-a-webshop/shopware-5) instead.
{% endhint %}

{% hint style="info" %}
Tip: [Contact our support team](https://www.channable.com/contact) to create a copy of your project(s) and perform the following steps in a copied project. That way, you can compare the original project with the copy to ensure all fields are correctly mapped.
{% endhint %}

### Install the app

Please refer to [this guide](/import-data/import-how-to/import-your-product-data/import-via-a-webshop/shopware-6) for instructions on how to download and install the Channable app for Shopware 6.

### Migrate your existing projects

If you import your products with the app instead of the plugin, you can expect minor differences in some of the fields (see "What differences can you expect" below). These differences might not affect your projects; in that case, you can switch your connections via the steps outlined under "Change import connection" and "Change order connection". If the differences do potentially affect your projects, we advise you to perform some extra steps that are shown at the end of the article, to ensure no problems arise.

Note: For the plugin, each combination of sales channel and language had its own connection. For the app, you will just create a connection for each sales channel, meaning you can re-use the same connection for multiple languages.

#### Change import connection

{% stepper %}
{% step %}

### Change the import connection — select the new app connection

* Go to "Setup > Setup Import".
* Find your Shopware 6 import, and click on "Settings".
* Click on "Change import".
* Select the new app connection from the import options.
* Make sure you select the correct language from the dropdown (the same as you previously used for this import) and click "Save".
* You are now redirected to the import mapping. Click "Save & import".
  {% endstep %}

{% step %}

### Verify and update mapping

Field names can be different, so before continuing make sure your new import fields are correctly mapped to your existing project fields. Follow these steps:

* Go to "Setup > Edit mapping" of your new connection.
* Make sure all of the fields are correctly mapped, by comparing the new mapping with the mapping you have in the original project. Fields that are not in the import anymore can safely be deleted.
* When you’re finished, click "Save & import".
  {% endstep %}
  {% endstepper %}

#### Change order connection

We can’t change the platform connection in an order connection, so instead you will need to deactivate the old order connection for the plugin and create a new one for the app.

{% stepper %}
{% step %}

### Deactivate the old order connection(s)

* Go to "Setup > Setup orders".
* For each active order connection that uses the Shopware 6 plugin, click on "Settings".
* Click on "Deactivate order connection" and then click "Save".
* Make sure you do this for all active order connections!
  {% endstep %}

{% step %}

### Create new order connection(s) for the app

* Add new order connections using the button "Setup orders".
* For the Platform connection, make sure you select the new Shopware app connection. For all the other settings, simply choose what you had in the old order connection you just deactivated.
* Make sure to activate the order connection and click "Save".
  {% endstep %}
  {% endstepper %}

### What differences can you expect?

* If a field name contains a special character, your field names might change slightly. For instance, if you have a field called `properties_grösse`, the plugin importer would import this as `properties_groesse` but the new app importer imports this field as `properties_grosse`. You can fix this in the importer mapping. For example:

{% stepper %}
{% step %}

### Example: mapping special-character field names

* The field `properties_groesse` was imported via the plugin, and mapped to the project field `properties_groesse`
* The app now imports this field as `properties_grosse`. By mapping it to `properties_groesse`, you ensure that no field names are changed.
* The old `properties_groesse` field from the plugin can then safely be deleted.
  {% endstep %}
  {% endstepper %}

<figure><img src="/files/35f46b606c360de35829289cbb1cda88324543b2" alt=""><figcaption></figcaption></figure>

* The plugin didn’t round some prices. The new app importer will round all prices to two decimals.
* If you have a custom field with a `True/False` value, we will import these as 1 (for `True`) and 0 (for `False`). If needed, you can transform these back to `True/False` using a (master)rule.

<figure><img src="/files/5a4e5eb0f3325ed7c0f4829f90438b0794db70b5" alt=""><figcaption></figcaption></figure>

* The plugin allowed you to set a custom sales channel domain in the plugin settings. This domain would be used to build the `link` and `shopware_url` fields for each product. The app doesn’t have this option, it will use the sales channel domain from the sales channel settings:

<figure><img src="/files/fafd54b4272da620bfa956e50c50a0d8adb67ec8" alt=""><figcaption></figcaption></figure>

* If `price_net` is 0 in your backend, it will also be 0 in Channable. The plugin would calculate `price_net` itself, but the app no longer does this. You can fix this by either making sure `price_net` always has a value in your backend, or by calculating the `price_net` using a rule, using the `price_gross` and the `tax_rate`.
* If you have custom fields with type `Media field`, we will no longer automatically retrieve the URL of the media. This would put additional strain on your server as we’re doing one additional request per product, so we only want to do this when it’s necessary. If you find that some custom fields contain an ID in Channable where you expect a URL, you can [contact us](https://www.channable.com/contact) to activate the feature that retrieves the URLs instead.

{% hint style="info" %}
Note: this only works for media field types!
{% endhint %}


# Squarespace

Import product data from your Squarespace store into Channable.

**You'll need**

* A Squarespace account

{% stepper %}
{% step %}

### Install the Channable extension in Squarespace

* In Channable, open the project where you want to import your product data.
* Go to **Setup > Import** and click **+ Choose import method**. Select **Squarespace**.
* Click **Add new connection** or select an existing connection.&#x20;
* Click **Connect with Squarespace**. This will redirect you to the Channable extension in Squarespace's extension store.
* Install the Channable extension to the site you want to connect to. You will need to log in to your Squarespace account if you haven't yet done so.
* Agree to the requested permissions. By clicking **Allow**, you provide Channable with the necessary rights needed to synchronize your product and orders data.

![blobid0.png](/files/9b5dd211def62b3e5091e3dc60fa0ababf73267f)

You'll be redirected back to Channable to finalize your connection.
{% endstep %}

{% step %}

### Set up your Squarespace connection

After installing the Channable extension, a pop-up window will appear in Channable to configure your Squarespace connection.

* Give your Squarespace connection a descriptive name (e.g. "Squarespace import").
* Click **Run import**. You'll be redirected to the **Import mapping** page to map your product information.
  {% endstep %}

{% step %}

### Import mapping

This page displays your import fields (fields retrieved from your Squarespace site — e.g. price, description, title), and corresponding project fields (Channable's standardized fields used to streamline channel setups).

{% hint style="info" %}
Tip: Want to learn more about how import mapping works in Channable? Read our [dedicated guide on mapping](/get-started/getting-started/fields-in-channable/field-mapping-in-channable).
{% endhint %}

{% stepper %}
{% step %}

#### Compare and adjust mapping

Review your **Imported data fields** against Channable's matched **Project fields**. If a field was matched incorrectly, click on the field to select a different field.
{% endstep %}

{% step %}

#### Check and correct field types

Check that the right field type is assigned to your project fields. If a field has the wrong type, click **Edit** next to the field, select the correct type in the dropdown, and click **Save & Import**.
{% endstep %}

{% step %}

#### Exclude fields (optional)

To exclude a field from being included in your product data, click the checkbox in the **Select** column for that field and select the **Exclude** checkbox.&#x20;
{% endstep %}
{% endstepper %}

Once you've finished mapping, click **Save & Import** to start importing your product data. Depending on how much data you're importing, this can take some time.

{% hint style="info" %}
Check the **Status** column in **Setup** to monitor your import progress. Your product data is fully imported when the Status is **Finished**.
{% endhint %}
{% endstep %}

{% step %}

### Review your imported items

After your product data has finished importing:

* Go to **Overview** to view your imported products.
* Click on an item to see detailed information.

<figure><img src="/files/df75486bf844d8e044a22e0a11bf1f39a1eab3c5" alt=""><figcaption></figcaption></figure>

You're good to go! Your items are ready to use to create and optimize Feeds, Marketplaces, Shopping Ads, and more in Channable.
{% endstep %}
{% endstepper %}


# WooCommerce

Import product data from your WooCommerce store into Channable.

Learn how to connect your WooCommerce store and import product data into Channable.

***

### <i class="fa-memo-circle-check">:memo-circle-check:</i> Before you start

**You’ll need**

* A WooCommerce account
* Access to create WooCommerce REST API keys

**Good to know**

<details>

<summary><strong>Meta fields are imported automatically</strong></summary>

Channable imports all meta fields automatically. To exclude them, [contact Support](https://www.channable.com/company/contact/).

</details>

<details>

<summary><strong>Each language needs a separate import</strong></summary>

Create a separate import for each language. Use separate projects, or [combine imports](/import-data/import-how-to/combine-multiple-imports) in one project.

</details>

***

{% stepper %}
{% step %}

### Create WooCommerce API keys

WooCommerce REST API keys control access to your store. Each key is linked to a site user.

<figure><img src="/files/d660df61e219f771a56fbd960ca781c24018db46" alt=""><figcaption></figcaption></figure>

1. In WooCommerce, go to **Settings** > **Advanced** > **REST API**.
2. Click **Create an API key** or **Add Key**.
3. Enter a **Description**.
4. Select the **User** for the key in the dropdown.
5. Select the access level: **Read**, **Write**, or **Read/Write**.
6. Click **Generate API Key**.
7. You should see **Consumer Key** and **Consumer Secret** keys, a **QR Code**, and a **Revoke Key** link.
8. Note down your **Consumer Key** and **Consumer Secret**, as you will need them in the next step.
   {% endstep %}

{% step %}

### Set up your WooCommerce import

1. In Channable, open the project you want to import your product data to.
2. Go to **Setup** > **+ Set up import** > **WooCommerce**.
3. Click **+ Add a new connection**.
4. Fill in the connection details:
   * **Name:** Give your import a descriptive name (like 'WooCommerce UK').
   * **WooCommerce URL:** Enter your webshop URL. Remove any trailing `/`. The URL must end with the domain extension, such as `.com` or `.net`.
   * **Consumer Key:** Enter the key from WooCommerce you noted in the previous step.
   * **Consumer Secret:** Enter the secret from WooCommerce you noted in the previous step
   * **Version:** Select your WooCommerce version.
5. Click **Connect with WooCommerce**.
   {% endstep %}

{% step %}

### Map your product data to project fields

After you run your import, you'll land on the **Import mapping** page. It shows the fields pulled from WooCommerce, such as `price`, `description`, and `title`.

In this step, you match those imported fields to Channable's standard project fields. Channable maps most fields automatically, but you should review and adjust them before importing.

{% hint style="success" %}
Want to learn more about how import mapping works in Channable? Read our [dedicated guide on mapping](/get-started/getting-started/fields-in-channable/field-mapping-in-channable).
{% endhint %}

<figure><img src="/files/yTj9rZ62nAlD8gALDY0n" alt=""><figcaption></figcaption></figure>

1. **Compare and adjust mapping.**
   * Review your **Imported data fields** against Channable's matched **Project fields**. If a field was matched incorrectly, click on the field to select a different field.
2. **Check and correct field types.**
   * Check that the right field type is assigned to your project fields. If a field has the wrong type, click **Edit** next to the field, select the correct type in the dropdown, and click **Save & import**.
3. **Exclude fields (optional).**
   * To exclude a field from being included in your product data, click the checkbox in the **Exclude from import** column for that field.
4. Once you've finished mapping, click **Save** to start importing your Lightspeed product data.
   {% endstep %}

{% step %}

### Overview

When the import completes, go to **Overview** to review your imported products.

* Click an item to view its details.

<figure><img src="/files/OOmR6aDntkdmtBWWCtEH" alt=""><figcaption></figcaption></figure>

{% hint style="warning" %}
If you tested with WooCommerce’s development environment, replace the development URL with your live URL. This keeps your product data updated.

Go to **Setup** > **Settings** in your WooCommerce channel > **WooCommerce** > **WooCommerce URL**.
{% endhint %}

Your WooCommerce import is ready. Use this product data to create and optimize Feeds, Marketplaces, Shopping Ads, and more in Channable.
{% endstep %}
{% endstepper %}


# Combine multiple imports

Merge product data from multiple sources into one Channable import.

If your product data is not all in one place, you can improve or add to your product data in Channable by [combining data from different sources](/import-data/import-how-to/combine-multiple-imports).

What you can do with combined imports:

* **Add new products:** Add products that are not in your original import feed.
* **Enrich product data:** Add information such as EAN numbers to your existing products.
* **Add the same information to all products:** Add information to all products in a new field.

### Before you start

* **Order of imports:** the sequence of imports matters. The first import determines which items are imported. Subsequent imports combine fields where matches are found, but any IDs not present in the first import are ignored.
* **Field name consistency:** Keep field names consistent within each of your import files. If you don't do this, you might hit a "name already exists" error message when you try to map a field from your second import file.
* **Case sensitivity:** When combining on fields, the values must match exactly (case-sensitive). This means if one import has **“SKU123”** and another has **“sku123”**, they will not be considered the same value.
* **Field overwriting:** Mapping to a field already filled by the first import will overwrite its data.
  * Solution 1: For different titles or prices for marketplaces, use unique field names (e.g., title\_amazon, title\_ebay).
  * Solution 2: To manage different language translations, rename fields or create new fields for each language to keep the original and allow multiple translations to be imported (e.g., title\_en, description\_en, title\_nl, description\_nl).

{% hint style="info" %}
Tip: In Channable, click **See visualization** at each merge option to see a visual explanation of how your import data will be affected.
{% endhint %}

<details>

<summary>Example: Import 1 has <code>link</code>, import 2 has <code>blog_link</code></summary>

You want to combine on the URL.

* Import 1 has a column header `link`.
* Import 2 has a column header `blog_link`.

To combine on field, both imports must end up using the same project field:

1. In import 2, change the column header from `blog_link` to `link` (in the file).
2. Re-import. Channable will auto-map it to the existing `link` project field.
3. Pick **Combine on field** and select `link`.

</details>

{% stepper %}
{% step %}
Go to **\[your project] > Setup > Import** and click **+ Combine imports**.
{% endstep %}

{% step %}

### Your data source and Import settings

Select your import data type, complete the import file information and click **Run import**.
{% endstep %}

{% step %}

### Import mapping

This page displays fields retrieved from your data feed (e.g. price, description, title).

* **Imported data field:** Fields from your import data.
* **Project field:** Corresponding project fields in Channable. Our system will automatically detect and link most fields to standardized fields.

Match (map) your imported fields to a corresponding project field. Channable does most mapping automatically, but it's important to review and adjust before importing.
{% endstep %}

{% step %}

### Choose merge options

At **Merge settings**, select one of the merge options based on the outcome you want for your data. You can click <i class="fa-circle-question">:circle-question:</i> **View visualization** for more information and you can view the [options table](#options-to-combine-imports) for descriptions and examples.&#x20;
{% endstep %}

{% step %}

<figure><img src="/files/yuh9RoQI7pv8LG5FV9Cf" alt=""><figcaption></figcaption></figure>

### Save & import

Click **Save & Import** to complete the process.
{% endstep %}
{% endstepper %}

### Options to combine imports

| Merge option      | Description                                                                                                                                                                                                                                                                                                                                                                                 | Example                                                                                                                                                                                              |
| ----------------- | ------------------------------------------------------------------------------------------------------------------------------------------------------------------------------------------------------------------------------------------------------------------------------------------------------------------------------------------------------------------------------------------- | ---------------------------------------------------------------------------------------------------------------------------------------------------------------------------------------------------- |
| Add as new items  | Adds new items from the new import as distinct, separate entries.                                                                                                                                                                                                                                                                                                                           | If you have products **“A”** and **“B”** in the first import and **“B”** and “D” in the new import, both versions of **“B”** are added separately, along with **“A”** and **“D”**.                   |
| Combine on field  | Combines items that match a specific field value (e.g., ID to ID). For the merge to work, **the field name in both imports must match exactly**. If your sources use different column names, rename the column to match the name in the original import. When a match is found, values from the new import overwrite those in the existing one, and any new fields are automatically added. | If both imports have product **“B”** with the same ID, the fields from the second import overwrite those from the first.                                                                             |
| Item enrichment   | Adds extra information from the new import to all items from the first import without creating new items.                                                                                                                                                                                                                                                                                   | If you import a field called **“URL\_1”** and you have **“A”**, **“B”**, **“C”** from the first import, all three get **“URL\_1”** regardless of whether they initially had it.                      |
| Insert or merge   | Merges new data from the second import with data from the first, retaining all unique information.                                                                                                                                                                                                                                                                                          | If both imports contain product **“B”**, the result will include all unique fields from both imports. Product **“D”** is added as a new item if it's only in the second.                             |
| Insert or replace | Replaces fields from the first import with those from the second if items match. Removes extra fields from the first import that aren't in the second.                                                                                                                                                                                                                                      | Product **“B”** from the first import will be replaced with **“B”** from the second. Product **“D”** from the second import will be added as a new item, while **“A”** and **“C”** remain unchanged. |

### Adjust the order of your imports

You can [reorder your imports](/import-data/import-how-to/reorder-your-imports) by dragging and dropping them.


# Reorder your imports

Change the order of your imports to control how data is combined.

{% stepper %}
{% step %}

### Navigate to your imports

Go to **\[your project] >** **Setup > Import** to view your imports.
{% endstep %}

{% step %}

### Locate the import

Find the import you want to move.
{% endstep %}

{% step %}

### Drag the import

Click the **hamburger icon** to select the import, then drag it to the desired position in the list. As you drag, a popup will appear — read the cautionary information carefully, as the order of imports can significantly impact how data is processed and combined.
{% endstep %}

{% step %}

### Drop the import

Release your mouse to drop the import in its new location.
{% endstep %}

{% step %}

### Confirm the change

Click **Continue** on the popup to save the new order of your imports.
{% endstep %}
{% endstepper %}

<figure><img src="/files/nV6kySZYF1adXq9JFSN3" alt=""><figcaption></figcaption></figure>

{% hint style="warning" %}
Adjusting the order can alter how data is processed and presented in your project. The arrangement of the imports forms a hierarchy that directly affects the functionality and outcomes of [combined imports](/import-data/import-how-to/combine-multiple-imports).
{% endhint %}


# Change the frequency of data updates

Set how often Channable updates your imported product data.

Channable automatically updates your product data once a day. This daily update keeps your product listings fresh without you having to do anything.

{% hint style="info" %}
Tip: If your inventory changes often, or you run frequent sales, you might need to update your data more than once a day.
{% endhint %}

## Edit your project schedule settings

You can edit your project **Schedule settings** in **\[your project] >** **Settings > Schedule settings***.* You can select your time zone and set up and at which scheduled time slots your project should run.

These time slots are the times all imports and **active** exports (feeds, Marketplaces, and Text Ads/Shopping Campaign generators) will run and your data will sync with these channels.

<figure><img src="/files/V40kXpD1ze768VRruwN4" alt=""><figcaption></figcaption></figure>

**In timezone**

This is the timezone of the daily data sync. You can adjust it to the timezone of your choice or to the timezone that your webshop is based in.

**Schedule time slots**

This shows how many times per day the project is scheduled to run the imports and exports. The default setting is 1 time slot a day.

{% hint style="info" %}
With our **Core Plus** or **Core Pro** plan, we can offer extra data syncs to a maximum of 24 timeslots per day at a quarter of an hour interval. Find more about our more our [Core plans](https://www.channable.com/pricing).
{% endhint %}

{% hint style="warning" %}
**Note:** This is only applicable after your activate your project in the [project settings](/get-started/getting-started/create-a-new-project/project-settings).
{% endhint %}

<figure><img src="/files/GgsTLRed7WTbD0Ck5KA4" alt=""><figcaption></figcaption></figure>


# View your items

Review imported items and inspect product field values in Channable.

{% stepper %}
{% step %}

### Open the Items overview

To get an overview of the items you imported to the Channable platform, click the "Items" tab located on the left-hand side of the screen. The Items tab contains a full overview of all the items that are on your datafeed file.

<figure><img src="/files/e87ptuAKHQIJx5S8erTu" alt=""><figcaption></figcaption></figure>
{% endstep %}

{% step %}

### Viewing one item

Click any item to see an overview of that item's attributes (title, description, brand, color, size, etc.). If you're looking for a specific item, use the search bar in the Items tab — you can search by product ID, title, or other attribute. After finding the item, click it to display the full attribute overview.
{% endstep %}
{% endstepper %}


# Importing a password protected feed

Import a protected feed using supported authentication methods.

Importing a password-protected feed is similar to importing a non-protected feed. The only additional thing you will need to do is configure the authentication.

### Step 1 - Choose your feed type <a href="#h_01hvrpk7k4x7m3vqm23e4bsdhd" id="h_01hvrpk7k4x7m3vqm23e4bsdhd"></a>

In your project navigate to *Setup* and click "Setup import". You will be given a few options through which to import your products. Select your type of feed and click "Continue". We support authentication for the following file-based imports:

* XML
* CSV
* JSON
* Text file (.txt)

<figure><img src="https://helpcenter.channable.com/hc/article_attachments/19237280250002" alt=""><figcaption></figcaption></figure>

***Note:*** we do **not** support importing a protected Google Spreadsheet. A Google Spreadsheet needs to be published online to be imported successfully. See [this article](/import-data/import-how-to/import-your-product-data/import-via-a-data-file/google-sheets/share-a-google-sheet-make-publicly-available) for more information.

### Step 2 - Fill in the URL <a href="#h_01hvrpk7k4m8hfwtws16gcdceg" id="h_01hvrpk7k4m8hfwtws16gcdceg"></a>

Next, fill in the URL of your feed.

<figure><img src="https://helpcenter.channable.com/hc/article_attachments/19237280258322" alt=""><figcaption></figcaption></figure>

### Step 3 - Configure your authentication <a href="#h_01hvrpk7k5d8s0xzshdnegdgyx" id="h_01hvrpk7k5d8s0xzshdnegdgyx"></a>

We support various means of authentication for file-based imports depending on the protocol:

* HTTP and HTTPS
* FTP
* SFTP

First you need to pick the relevant protocol in the drop-down menu.

<figure><img src="https://helpcenter.channable.com/hc/article_attachments/19237268046866" alt=""><figcaption></figcaption></figure>

#### HTTP and HTTPS <a href="#h_f045fc33-e9a7-45b8-8687-a46a7536709d" id="h_f045fc33-e9a7-45b8-8687-a46a7536709d"></a>

For HTTP and HTTPS protocols we support two authentication types:

* **Username & password (basic auth)**. Select “Username & password (basic auth)” next to the URL and fill in the username and password.

<figure><img src="https://helpcenter.channable.com/hc/article_attachments/19237280270098" alt=""><figcaption></figcaption></figure>

* **Username & password (digest auth).** This is another form of username-password authentication. It works the same as 'basic auth', but is less common.

***Note:*** If you are unsure whether to use 'basic auth' or 'digest auth', consult your server administrator.

* **Authentication header**. In this case, we will include an x-api-key header with the request. Select “Authentication header” next to the URL and fill in the header token.

<figure><img src="https://helpcenter.channable.com/hc/article_attachments/19237268055058" alt=""><figcaption></figcaption></figure>

***Note:*** for both "Username & Password" and "Authentication header", **HTTP** means that your credentials will be transmitted in the clear. To keep your credentials secure, use **HTTPS**.

#### FTP <a href="#h_66e17991-99f0-41a0-a184-6605c69204af" id="h_66e17991-99f0-41a0-a184-6605c69204af"></a>

For FTP, we also only support **Username & password** authentication. You can configure this the same way as for HTTP/HTTPS.

***Note:*****&#x20;FTP** is an inherently insecure protocol, your credentials will be transmitted in the clear. To keep your credentials secure, use **SFTP.**

#### SFTP (SSH File Transfer Protocol) <a href="#h_495f837f-91a1-4c70-9a5f-8dce3dd2eb99" id="h_495f837f-91a1-4c70-9a5f-8dce3dd2eb99"></a>

For SFTP, we currently only support **Username & password** login. You can configure this the same way as for HTTP/HTTPS. SFTP is secure, your credentials will be transmitted over an encrypted connection.


# Add weather data to your import

Add weather data to your import by combining it with your feed.

{% stepper %}
{% step %}

### Step 1 - Import your webshop data in Channable

In our example, the webshop data feed is called "Webshop". For more info on how to add your webshop data in Channable, check out [our import support article](/import-data).
{% endstep %}

{% step %}

### Step 2 - Search for a weather data feed on the internet

Here we use the [Dutch Buienradar data](https://data.buienradar.nl/1.0/feed/xml) which you can import. It is also possible to use other weather data feeds

{% hint style="warning" %}
I**mportant:** Do not add your weather data feed just yet! First, you will have to create a link feed and follow a specific order when combining all data files. This is explained in the following steps.
{% endhint %}
{% endstep %}

{% step %}

### Step 3 - Within the weather data find the most relevant weather observation station

The weather data will likely contain several weather observation stations that contain different data. Select the station for which the data is most relevant to you. In this example, we chose "Meetstation De Bilt".
{% endstep %}

{% step %}

### Step 4 - Make sure that your webshop and weather data feeds contain a shared field

To add the weather data to your current import you will need to combine both feeds. To combine feeds there needs to be a field and a value that is the same in both feeds. The webshop data feed and weather data feed in our example **do not** contain such a field, which is why we are going to add a field to the webshop data feed import.

We have chosen to use the field " *stationnaam* " as a shared field, but you could also use another unique identifier field like " *stationcode* ". Add this field to your project by going to Setup > Setup project fields, scroll down, and click on "Add project field" in the left bottom corner. You will see the following screen, fill in a name, and click "Save & import".

<figure><img src="/files/f8219439211651ab0ada279bfe7aefca8a1ffc63" alt=""><figcaption></figcaption></figure>
{% endstep %}

{% step %}

### Step 5 - Create a link feed

After you have added the field to the mapping of your webshop import, we will need to create a link feed to ensure the field is filled with the correct value. You can [create a new XML export feed](/import-data/import-how-to/import-your-product-data/import-via-a-data-file/xml) for this.

Within this feed, you will need to set up a rule which gives the "stationnaam" field the value of the chosen weather observation station, in this case, "Meetstation De Bilt".

<figure><img src="/files/69e90eb216c619ce0e9247ddd29d7d827e07181a" alt=""><figcaption></figcaption></figure>

After creating and saving the rule, you can set up the Finalize step by including the fields "id" and "stationnaam".

<figure><img src="/files/e481183b779dec9a4946bdfb4b40f739c7ae66de" alt=""><figcaption></figcaption></figure>

Finally, in the Preview step [get the feed file URL](/list-advertise/list-on-channels/feeds-faq/how-do-i-get-the-feed-file-url) — you will need this for the next step.
{% endstep %}

{% step %}

### Step 6 - Combine the three data feeds in the Setup

You now have three feeds: your webshop datafeed, the weather datafeed, and the linkfeed. In the **Setup** tab, you will need to [combine these three feeds](/import-data/import-how-to/combine-multiple-imports).

{% stepper %}
{% step %}
First, combine the link feed:

* Fill in the feed file URL for the link feed.
* In the mapping under "More options" choose "Combine on Field" to combine the imports on the field "id".

<figure><img src="/files/yuh9RoQI7pv8LG5FV9Cf" alt=""><figcaption></figcaption></figure>

After this you should have two imports in your Setup import overview: your webshop data feed and the link feed.
{% endstep %}

{% step %}
Next, add the weather data feed:

* Add the weather data feed.
* In the mapping choose to combine the feed on the field "stationnaam" so that all data of the "Meetstation De Bilt" will be added to your items.

{% hint style="warning" %}
I**mportant:** In this feed also make sure the field "id" is set to "Exclude", otherwise your product ID codes will be overwritten!
{% endhint %}

<figure><img src="/files/3JXgM1NGjVyA7lL5vcNm" alt=""><figcaption></figcaption></figure>
{% endstep %}
{% endstepper %}
{% endstep %}

{% step %}

### Step 7 - Enjoy your handiwork!

After adding the weather data feed, your Setup import overview should look like the screenshot below.

<figure><img src="/files/9f548a5647529671a1703ab5fc64e171f1d93731" alt=""><figcaption></figcaption></figure>
{% endstep %}
{% endstepper %}


# Troubleshooting import errors

Fix common import errors and resolve data or setup issues.

<details>

<summary>Shopify Markets: Import fails or imports no items</summary>

This often happens when your Shopify **market has no catalog assigned**, or the assigned catalog contains no products.

#### Fix

1. [In Shopify](https://help.shopify.com/en/manual/markets-new/catalogs), open the market you want to import.
2. Check which **catalog** is assigned to that market.
3. If needed, **create a new catalog** that includes **All products** (Shopify’s default).
4. Assign that catalog to the market.
5. Run your import again in Channable.

If you’re setting up the integration for the first time, follow the steps in [Shopify](/import-data/import-how-to/import-your-product-data/import-via-a-webshop/shopify).

</details>

<details>

<summary>Error: Too many fields to import</summary>

{% hint style="warning" %}
If you encounter this error, it means you have **exceeded the limit of 700 fields for import**. While we cannot increase this limit, you can resolve the issue by setting fields to **"Exclude"**. Once the total number of imported fields is below 700, the import will run successfully.
{% endhint %}

To resolve this, adjust your import mapping by setting fields to **Do not import**.

1. Go to **Setup > \[select the relevant import] > Mapping**.
2. In **Mapping** screen, find the field that you do not want to import.
3. Select the **Exclude** checkbox.
4. Click **Save** at the bottom left of the page.

<figure><img src="/files/zR76SPEhCgcrkUXAP7Zq" alt=""><figcaption></figcaption></figure>

This feature simplifies adjusting your import settings by eliminating the need to configure each field manually, helping you stay within the 700-field limit.

</details>

<details>

<summary>Error: Quality errors</summary>

In the **quality check** any errors that the import contains are shown alongside the number of items for which the error occurs. In order to check out the errors, you have to select the field within your import you want to check. In your project, navigate to *Setup > Setup import > Project settings*. Here you can select a field for which you want to check if there are any errors by clicking on the dropdown menu under “Unique ID per item” and clicking the “Save” button. After saving, navigate to the *Import quality* tab to see if your imports contain any errors.

<figure><img src="https://helpcenter.channable.com/hc/article_attachments/360007440119" alt=""><figcaption></figcaption></figure>

### Types of errors <a href="#h_01hsb0eg758dk5keqw2mc6t99h" id="h_01hsb0eg758dk5keqw2mc6t99h"></a>

There are a number of different errors that the *Quality check* will show. You will mostly encounter the following error messages:

1. 'id'/'description'/'brand' is empty
2. 'id'/'gtin'/'ean' contains values that are not unique
3. There were missing values in import \<name> at field \<name>, default values were used

### 'id'/'description'/'brand' is empty <a href="#h_01hsb0eg76p6448z43t6h4ardg" id="h_01hsb0eg76p6448z43t6h4ardg"></a>

**What does the error mean?** If the error is shown it means that the field you linked in the *"*&#x49;mport settings" is empty for a number of products. You can click on the error to see for which items the field is empty.

**How do I solve this error?** How to solve this error depends on the missing information and if the information is available in another field of your items. For example, if the size is missing for some products but you have always included the size in your titles, you can use a [search for value rule](https://channable-test.gitbook.io/channable-test-docs/manage-improve-product-data/rules-bulk-edit-and-enrich/how-to-use-actions-then-in-rules/rule-action-search-for-value) in your export channels to fill in the missing sizes. However, if the information is not available in another you will have to add the information in your import file.

### 'id'/'gtin'/'ean' contains values that are not unique <a href="#h_01hsb0eg766anm9fd0pq24dtps" id="h_01hsb0eg766anm9fd0pq24dtps"></a>

**What does the error mean?** Identifiers such as id, gtin, and ean codes should be unique for every item, meaning that there should not be multiple items that have the same identifier. If it does happen that one of these identifiers is shared between items you will see this error.

**How do I solve this error?** There are two ways to solve the error. If the items that share the identifier are the same item, you can use a [deduplicate items rule](https://channable-test.gitbook.io/channable-test-docs/manage-improve-product-data/rules-bulk-edit-and-enrich/how-to-use-actions-then-in-rules/rule-action-remove-duplicate-items) in every export channel. Consider using [our master rule groups feature](https://channable-test.gitbook.io/channable-test-docs/manage-improve-product-data/rules-bulk-edit-and-enrich/rules-in-channable/create-master-rule-groups) to save time.\
However, if you want to keep both items because they are two different variants of the same product you need to change the identifiers in your import file.

### There were missing values in import \<name> at field \<name>, default values were used <a href="#h_01hsb0g34va34vz52h47p48gfm" id="h_01hsb0g34va34vz52h47p48gfm"></a>

**What does the error mean?** When this error shows up, it means there is information missing in the named field, which is imported in the named import. The default value most likely ends up being empty, which causes this error to show up.

**How do I solve this error?** Check the import and the field that is mentioned. Make sure the relevant product data is added to this field.

</details>

<details>

<summary>Error: Missing field "field_name"</summary>

#### What does this error mean? <a href="#h_01jwtkgc21ngp7xmbw8wy0n8kx" id="h_01jwtkgc21ngp7xmbw8wy0n8kx"></a>

This error occurs when you're using a project field that no longer exists. The field is still used in the Categories, Rules, Mapping or Build steps but Channable can no longer find it in your import.

<figure><img src="https://helpcenter.channable.com/hc/article_attachments/29949986790162" alt=""><figcaption></figcaption></figure>

#### How can I solve this error? <a href="#h_01jwtkgc21a1g6t12kp6mjphps" id="h_01jwtkgc21a1g6t12kp6mjphps"></a>

**Option 1: Add the project field again**

You can [add the field ](/get-started/getting-started/fields-in-channable/map-and-add-fields)in **Setup > Project fields** or you can [add it in the Rules step.](https://channable-test.gitbook.io/channable-test-docs/manage-improve-product-data/rules-bulk-edit-and-enrich/using-rules/rule-templates#h_01jpm4c1xm42my9qefeev00vtx)

**Option 2: Change the field with the error to a different field in the Rules, Mapping or Build steps**

[Map/select a different project field](/get-started/getting-started/fields-in-channable/map-and-add-fields) to use instead of the field that's missing. You can also select a different field to use in the Rules step.

<figure><img src="https://helpcenter.channable.com/hc/article_attachments/29949986795922" alt=""><figcaption></figcaption></figure>

**Option 3: Pause or delete the rule**

If you aren't using the rule with the missing field, you can [pause or delete the rule](https://channable-test.gitbook.io/channable-test-docs/manage-improve-product-data/rules-bulk-edit-and-enrich/using-rules) if you're sure you don't need it in your setup.

</details>

<details>

<summary>Error: Circular dependency fields "field a" -> "field b"</summary>

### What does it mean?

The circular dependency error tells you that you are creating a circular dependency by using the same field names for two different fields in the import mapping of your project. The image below shows an example of this.

<figure><img src="https://helpcenter.channable.com/hc/article_attachments/21020603591826" alt=""><figcaption></figcaption></figure>

### How can I fix it?

In this case you should rename one of your fields in your import mapping. Following the example above, it would make sense to rename the "content" to "content" and the "description" to "description". However, you can type in any field name that does not exist yet.

You can edit the import mapping via "Setup" in the left menu, and then clicking "Setup project fields" and clicking on the name of the field:

<figure><img src="https://helpcenter.channable.com/hc/article_attachments/4487125937938/mceclip0.png" alt=""><figcaption></figcaption></figure>

After changing the field name, do not forget to click "Save & import" at the bottom of the page.

</details>

<details>

<summary>Error: We could not download (a part of) your Magento products</summary>

### Step 1 - Check the preview of the Channable feed plugin

Log in to your Magento, go to "**System** > **Configuration**" and scroll down until you see the "**Channable feed**" plugin.

<figure><img src="https://helpcenter.channable.com/hc/article_attachments/360007439319/EN_-_Magento_products.png" alt=""><figcaption></figcaption></figure>

Click the "Channable feed" plugin. On the next screen, make sure the "**Enabled Feed**" option says "**Yes**".

<figure><img src="https://helpcenter.channable.com/hc/article_attachments/21018735430802" alt=""><figcaption></figcaption></figure>

Next, scroll all the way to the bottom of the Channable Feed plugin. You should see a list of your Magento Store views, with a "Preview" link next to it. Find the store view that you want to import into Channable and click the "Preview" link next to it.

<figure><img src="https://helpcenter.channable.com/hc/article_attachments/21018735434130" alt=""><figcaption></figcaption></figure>

If clicking this link opens a new page that contains information that looks similar to the following screenshot, it means your plugin is working correctly. If so, continue to step 2. *If it doesn't open a page like the page below, first update the plugin to the newest version. If that does not solve the issue please* [*contact Magmodules*](mailto:info@magmodules.eu) *and ask them to check your plugin.*

<figure><img src="https://helpcenter.channable.com/hc/article_attachments/21018687761170" alt=""><figcaption></figcaption></figure>

### Step 2 - Auto connect with Channable

If the preview link above works, Channable should be able to import your products. When there is no import, most of the time this means that the connection with Channable wasn't created correctly. Make sure you use the "Click to auto connect with Channable" url of the image below to connect with Channable. You will be redirected to Channable and will be shown a pop-up in which you have to click "Add connection".

<figure><img src="https://helpcenter.channable.com/hc/article_attachments/21018735462162" alt=""><figcaption></figcaption></figure>

### Step 3 - Try the new connection

Now that you've created a new connection using the official auto connection option, let's try and see if the new connection works. Go to Setup and click Setup import. In the next screen choose the **newly created Magento connection**.

<figure><img src="https://helpcenter.channable.com/hc/article_attachments/21018687770386" alt=""><figcaption></figcaption></figure>

If the import still fails after this point *while the preview link in step 1 did work*, contact support to investigate a bit further on how to get your import working.

</details>

<details>

<summary>How can I whitelist Channable's IP addresses?</summary>

If your import link added successfully yet fails to function, ensure you can access the link in your browser. If it displays correctly but fails in our tool, a firewall or server setting might be blocking access. To resolve, whitelist our office IP addresses.\
\
Send an email to <support@channable.com> containing the following:

* **Subject:** Whitelisting Channable office IP's
* **To be mentioned:** Company ID and all concerned projects and imports

We will provide you with a list of our IPs that need to be whitelisted. Please let us know when you successfully whitelisted our IP addresses, so we can make sure the settings are correct on our side and the import works.

</details>


# Import fields

Understand import fields and how Channable uses them during mapping.

When you [import product data](/import-data) into Channable, either by connecting an eCommerce platform, or by uploading a data source like an XML file, Channable will use the information in your import to structure your product data in Channable.

We call this ‘mapping’. Essentially, it’s the process of looking at the data you provide and saying “Okay, in your source, you call this piece of information ‘country’, but in Channable we call it ‘shipping country’, and that’s what Google Shopping (or another export channel) will expect it to be called when we send it to them. Let’s make sure we match the data you’ve provided to what the channel will receive”.

Mapping makes it possible for Channable to process and standardize product data from a variety of sources so that you can list your products on any supported channel.

### Import fields <a href="#h_01jcdkzvvs1exe53r7d3wcrryt" id="h_01jcdkzvvs1exe53r7d3wcrryt"></a>

Regardless of the import method you use, Channable will look at your imported data and automatically separate and organize all of the information into what we call ‘import fields’. For example, you might have import fields that look like this:

* shipping country
* price
* Image Src


# Map your import fields to project fields

Match import fields to the right project fields before importing.

After you add an import to your project, Channable maps your product data and you are navigated to **Setup.**

To ensure that your product data fields are recognized by Channable, you need to map your fields in **Setup > Import > \[Added import] > Mapping**.

If you have warnings about the fields id, link, image\_link, or price, this means that Channable cannot map your import data to these fields. It is likely that your import field names are named differently because Channable creates project fields based on your import field names.

We recommend changing the names of the project fields so that your fields are mapped correctly and so that there are no warnings.

Follow these steps to edit your project fields so that they have the recommended field names, using the image\_link field (with the warning “Please map one field to **image\_link**”) as an example:

1. Find the field in your import fields that contains the product URL or link and check the name of the field. The field could be named “Image Src” or something similar.
2. In the **Project field** column, find the corresponding mapped field (“image\_src”) and click on **Edit**. In the popup, rename the field to “image\_link”. This is the recommended name for this field, as indicated in the warning.
3. Click on **Save and import**. Now the warning should no longer be showing because your import field “Image Src” is mapped to the project field image\_link.

{% hint style="info" %}
**Tip:** Instead of editing the project field “image\_src”, you can add a new project field with the name “image\_link”.
{% endhint %}


# Update import mapping

Refresh your import mapping to add new fields and remove old ones.

When you update your import mapping, Channable checks if any new fields have not been imported and adds them to the existing mapping. This is necessary when you have added new fields to your import that do not appear in the mapping automatically. Channable will also remove fields that are no longer in your import.

To update the mapping of your import feed, follow these steps:

{% stepper %}
{% step %}

### Navigate to the import settings

Go to **Setup > Import**. Locate the import you want to update and go to **Settings**.
{% endstep %}

{% step %}

### Update mapping

Click the <i class="fa-gear">:gear:</i> gear icon and select **Update mapping** in the dropdown.
{% endstep %}
{% endstepper %}

<figure><img src="/files/2iwppuxVUOQU5oF4yyHr" alt=""><figcaption></figcaption></figure>

{% hint style="info" %}
Note: Updating the import mapping will **not** remove any fields you added manually or change any other configuration you previously made in the Edit mapping tab of your import.
{% endhint %}


# Use a date field in the import mapping

Map date fields correctly and use supported date formats.

If you have an import in Channable that contains a field with a date in it, map it to a 'Date & Time' field type so that you can use special ['Date' rules](https://channable-test.gitbook.io/channable-test-docs/manage-improve-product-data/rules-bulk-edit-and-enrich/how-to-use-conditions-if-in-rules/rule-conditions-dates) to filter based on this date.

Follow these steps to map your field to the 'Date & Time' type:

{% stepper %}
{% step %}

### Map the field

Go to **Setup > Imports > \[Added import] > Mapping.** Locate your internal field with the date in it.
{% endstep %}

{% step %}

### Edit the field

Click **Edit**.
{% endstep %}

{% step %}

### Set type to Date & Time

In the pop up, at the **Type** field, select 'Date & Time'.
{% endstep %}

{% step %}

### Save and import

Click **Save and import.** There will be a new **Custom date format** dropdown next to the **Edit** field.
{% endstep %}

{% step %}

### Choose or specify date format

Click on the **Custom date format** dropdown. Choose a default date format, or choose to specify a custom date format.
{% endstep %}
{% endstepper %}

<figure><img src="/files/z82QYwCOUbixo1oG7S5h" alt=""><figcaption></figcaption></figure>

#### Date formats <a href="#h_01j29386ja26ew163yjc1wqj1d" id="h_01j29386ja26ew163yjc1wqj1d"></a>

| **Date in your import**                                     | **Date format to choose in Channable** |
| ----------------------------------------------------------- | -------------------------------------- |
| 2017-10-19T15:03:23                                         | ISO 8601                               |
| <p>2017-10-19T15:03:23Z</p><p>2017-10-19T15:03:23+02:00</p> | ISO 8601 TZ                            |
| Thu, 19 Oct 2017 15:03:23 +0200                             | RFC 2822                               |
| 2017-10-19                                                  | Year-month-day                         |
| 19-10-2017                                                  | Day-month-year                         |
| 10-19-2017                                                  | Month-day-year                         |

or use a custom format:

#### Custom formats <a href="#id-01k60pabm1qqefy9ccvenktck5" id="id-01k60pabm1qqefy9ccvenktck5"></a>

Custom formats specify the format of a date.

| **Date in your import** | **Custom date**   |
| ----------------------- | ----------------- |
| 25-07-2017 11:53        | %d-%m-%Y %H:%M    |
| 25-07-2017 11:53:39     | %d-%m-%Y %H:%M:%S |
| 25-07-2015T11:53        | %d-%m-%YT%H:%M    |

The date format is defined by a string containing two types of characters:

* Static text: Characters that appear literally in the output (e.g., /, -, space)
* Specifiers: Variable date parts that start with a percentage symbol (e.g., %m for the month number)

{% hint style="info" %}
**Note:** Format specifiers expect numbers to have their full format (i.e. 05 instead of 5) by default. To use the shortened version, use %- followed by the specifier (e.g. %-d).
{% endhint %}

| **Format specifiers** | **Description**                                                                                                     |
| --------------------- | ------------------------------------------------------------------------------------------------------------------- |
| %Y                    | The year                                                                                                            |
| %y                    | The year of the century, so two digits                                                                              |
| %m                    | The month of the year (as a number)                                                                                 |
| %B                    | The name of the month of the year (January, February, etc.)                                                         |
| %b                    | The short name of the month year (Jan, Feb, etc.)                                                                   |
| %V                    | The week of the year (as a number 1-53)                                                                             |
| %d                    | The day of the month                                                                                                |
| %A                    | The name of the day of the week (Monday, Tuesday, etc.)                                                             |
| %a                    | The short name of the day of the week (Mon, Tue, etc.)                                                              |
| %p                    | The day-half of the day (so AM or PM)                                                                               |
| %H                    | The hour of the day (so from 0 to 23, inclusive)                                                                    |
| %I                    | The hour of the day-half (so from 1 to 12, inclusive)                                                               |
| %M                    | The minute of the hour                                                                                              |
| %S                    | The second of the minute                                                                                            |
| %Q                    | Optional period and fraction part of the second. To specify fractional seconds, combine this with %S, i.e. use %S%Q |
| %z                    | Timezone offset in the format ±HHMM                                                                                 |
| %Z                    | Timezone name, or offset in the format ±HHMM                                                                        |

{% hint style="success" %}
**Tip:** To use a % in a string, use %%.
{% endhint %}


# Best practices: Change the import in an active project

Safely change an active project import without breaking existing setups.

### Why this matters

Is your webshop going to change from the e-commerce platform it is running on? This will also impact your Channable account if you import directly from your e-commerce platform to Channable. Even though you will import the same products, it can still cause problems because every e-commerce platform is different.

This article gives recommendations and best practices for customers switching their e-commerce platform in Channable.

### General recommendations

#### Start in a test project

Start with a test project.

* Add the import connection with your new e-commerce platform there first.
* This lets you check how products import without affecting active export channels.
* Keep the test project inactive so it does not affect subscription usage.
* Only switch your live project when the new import works properly.

#### Review the old and new mappings

Review both mappings before you switch your live project.

* Compare the old import mapping with the new one.
* Fields may have different names, even when they contain the same information.
* This can cause errors in **Rules**, **Build**, **Finalize**, and **Attributes**.
* The old fields used there may no longer exist after the switch.

#### Keep field references working

You can solve this in two ways:

1. Adjust the mapping of your new import so internal Channable fields keep the names of the old fields used in the project.
2. Change the fields used in your export channels to the new fields.

Channable will show errors where fields are used that no longer exist. Check all export channels for errors after switching the import in your live project.

#### Check field values, not only field names

Also check fields that keep the same name but use different values.

* Example: a field called `visibility` might be `true`/`false` in the old import and `yes`/`no` in the new one.
* Rules that rely on the old values may stop working after the switch.
* For example, a rule that excludes `visibility = false` may no longer work.
* Verify that your feeds and APIs still send the correct number of products.

#### Recreate custom fields

Recreate any custom fields you added manually in the old import mapping.

* Add the same custom fields in the new import connection.
* A screenshot of the old custom fields can make this easier.

#### Verify categorization

Check categorization in your export channels after the switch.

* Categories in the new e-commerce platform may be structured differently.
* Category names may also differ.
* They will likely still import into standard fields like `categories`, `category`, or `category_path`.
* Products may still end up categorized incorrectly, so verify the result carefully.

### If you use order connections

If you have one or more order connections, there are extra points to check.

* [Contact us for assistance](https://www.channable.com/company/contact/) when switching imports.
* We will remove the old order connections and set up the new ones.

Product IDs also need extra attention.

* The `id` field is likely different in the new import.
* This identifier is generated by the e-commerce platform.
* Order connections identify products by ID.
* Orders to your new back-end will fail if products still contain the old ID as `Unique ID per item`.
* You can find `Unique ID per item` in the **Settings** of an API export or in the **Finalize** step of a feed export.
* In feed exports, this setting may have a different name.
* Ensure the new IDs are sent to all marketplaces that have an order connection.

### Switch APIs safely

To make sure you send the IDs from your new import to all APIs you have an order connection for, follow this process:

{% stepper %}
{% step %}

### Clear the APIs

Clear the APIs so all listings with the old ID as 'unique ID per item' are removed.

(Note: Go to **APIs > Settings > \[gear icon] > Clear API**.)
{% endstep %}

{% step %}

### Switch the import(s)

After clearing your APIs, switch the import(s) in the project to the new import.
{% endstep %}

{% step %}

### Verify setup

Check the project and make sure everything is set up correctly using the general tips above (mapping, custom fields, categorization, rules, etc.).
{% endstep %}

{% step %}

### Run the APIs again

If everything looks good, run your APIs again so all listings re-appear with the correct unique ID per item.

{% hint style="warning" %}
Important: If you clear your APIs, there is a risk of losing some product reviews on marketplaces, especially if you are the only seller of the products you list. Also consider possible listing costs, for example on eBay. Clearing and re-running the API will re-list all products. Check with the marketplace first to confirm that clearing and re-running the API is safe. If you are unsure, [contact us](https://www.channable.com/company/contact/) for advice.
{% endhint %}
{% endstep %}
{% endstepper %}


# Manage & improve product data

Edit your product data to meet channel requirements and get the best results.

{% columns %}
{% column valign="middle" %}

### Get started

Use rules, AI, creatives, and insights to improve product data at scale.
{% endcolumn %}

{% column %}

<figure><img src="/files/7CDVO1cJOndgj68wfKm0" alt=""><figcaption></figcaption></figure>
{% endcolumn %}
{% endcolumns %}

***

#### Fix and standardize product data

<table data-view="cards"><thead><tr><th></th><th></th><th></th><th data-hidden data-card-target data-type="content-ref"></th></tr></thead><tbody><tr><td><i class="fa-code">:code:</i></td><td><strong>Bulk-edit fields with rules</strong></td><td>Update titles, prices, and other fields to meet channel requirements.</td><td><a href="/spaces/u8whzIfip72Kvn3M1bsc/pages/mNOE81fyYEiTWouDXWmi">/spaces/u8whzIfip72Kvn3M1bsc/pages/mNOE81fyYEiTWouDXWmi</a></td></tr><tr><td><i class="fa-file-arrow-up">:file-arrow-up:</i></td><td><strong>Clean data before channel setup</strong></td><td>Apply import rules early so your product data starts in better shape.</td><td><a href="/spaces/u8whzIfip72Kvn3M1bsc/pages/f00ed7c534027141644d24ffa72bb5b4219d499d">/spaces/u8whzIfip72Kvn3M1bsc/pages/f00ed7c534027141644d24ffa72bb5b4219d499d</a></td></tr><tr><td><i class="fa-share-nodes">:share-nodes:</i></td><td><strong>Reuse improvements across channels</strong></td><td>Share the same rule logic across projects and channels.</td><td><a href="/spaces/u8whzIfip72Kvn3M1bsc/pages/6d44a712a192952f3cfd907774ee244e34bdc1b1">/spaces/u8whzIfip72Kvn3M1bsc/pages/6d44a712a192952f3cfd907774ee244e34bdc1b1</a></td></tr></tbody></table>

#### Create better product images

<table data-view="cards"><thead><tr><th></th><th></th><th></th><th data-hidden data-card-target data-type="content-ref"></th></tr></thead><tbody><tr><td><i class="fa-images">:images:</i></td><td><strong>Build branded images at scale</strong></td><td>Create product images from your feed with the Image Editor.</td><td><a href="/spaces/u8whzIfip72Kvn3M1bsc/pages/7c96ae1561c1fa7a2bcbcc04fae1959e555e0aef">/spaces/u8whzIfip72Kvn3M1bsc/pages/7c96ae1561c1fa7a2bcbcc04fae1959e555e0aef</a></td></tr><tr><td><i class="fa-code">:code:</i></td><td><strong>Apply templates automatically</strong></td><td>Use image rules to show the right creative for the right products.</td><td><a href="/spaces/u8whzIfip72Kvn3M1bsc/pages/VnNdkDLHetqiPat8xjU4">/spaces/u8whzIfip72Kvn3M1bsc/pages/VnNdkDLHetqiPat8xjU4</a></td></tr><tr><td><i class="fa-image-slash">:image-slash:</i></td><td><strong>Remove backgrounds with AI</strong></td><td>Create cleaner product visuals from your existing images.</td><td><a href="/spaces/u8whzIfip72Kvn3M1bsc/pages/738beaba915c4504e0673b27b9ebb83bdf9611db">/spaces/u8whzIfip72Kvn3M1bsc/pages/738beaba915c4504e0673b27b9ebb83bdf9611db</a></td></tr></tbody></table>

#### Optimize with performance insights

<table data-view="cards"><thead><tr><th></th><th></th><th></th><th data-hidden data-card-target data-type="content-ref"></th></tr></thead><tbody><tr><td><i class="fa-chart-simple">:chart-simple:</i></td><td><strong>Find top and low performers</strong></td><td>Use Insights to spot products that deserve more or less attention.</td><td><a href="/spaces/u8whzIfip72Kvn3M1bsc/pages/f452f00bd468f0b65938349df87be5ef0d45f0fb">/spaces/u8whzIfip72Kvn3M1bsc/pages/f452f00bd468f0b65938349df87be5ef0d45f0fb</a></td></tr><tr><td><i class="fa-code">:code:</i></td><td><strong>Automate actions from performance data</strong></td><td>Use Insights metrics in rules to label and optimize products automatically.</td><td><a href="/spaces/u8whzIfip72Kvn3M1bsc/pages/ec89b09695a0213fcb16d5ab622897980e896002">/spaces/u8whzIfip72Kvn3M1bsc/pages/ec89b09695a0213fcb16d5ab622897980e896002</a></td></tr><tr><td><i class="fa-circle-dollar">:circle-dollar:</i></td><td><strong>Measure real profitability</strong></td><td>Track profit on ad spend to go beyond revenue and ROAS.</td><td><a href="/spaces/u8whzIfip72Kvn3M1bsc/pages/042161242113cc348860a176583bf932897486e9">/spaces/u8whzIfip72Kvn3M1bsc/pages/042161242113cc348860a176583bf932897486e9</a></td></tr></tbody></table>

#### Fill gaps with AI

<table data-view="cards"><thead><tr><th></th><th></th><th></th><th data-hidden data-card-target data-type="content-ref"></th></tr></thead><tbody><tr><td><i class="fa-wand-magic-sparkles">:wand-magic-sparkles:</i></td><td><strong>Generate missing attributes</strong></td><td>Fill in values like brand, color, material, and size faster.</td><td><a href="/spaces/u8whzIfip72Kvn3M1bsc/pages/a999d93e60627f4e7f658e7e72c08af72192f52e">/spaces/u8whzIfip72Kvn3M1bsc/pages/a999d93e60627f4e7f658e7e72c08af72192f52e</a></td></tr><tr><td><i class="fa-sparkles">:sparkles:</i></td><td><strong>Generate stronger product text</strong></td><td>Create better titles and descriptions in bulk with AI.</td><td><a href="/spaces/u8whzIfip72Kvn3M1bsc/pages/Rbvmo4oRgwc42C3YHF2R">/spaces/u8whzIfip72Kvn3M1bsc/pages/Rbvmo4oRgwc42C3YHF2R</a></td></tr><tr><td><i class="fa-icons">:icons:</i></td><td><strong>Categorize products faster</strong></td><td>Use AI to map products to the most likely channel category.</td><td><a href="/spaces/u8whzIfip72Kvn3M1bsc/pages/68dc0c51808addbb72dec181cbba6cef36b4519a">/spaces/u8whzIfip72Kvn3M1bsc/pages/68dc0c51808addbb72dec181cbba6cef36b4519a</a></td></tr></tbody></table>

#### Explore all ways to improve product data

<table data-view="cards"><thead><tr><th></th><th></th><th></th><th data-hidden data-card-target data-type="content-ref"></th></tr></thead><tbody><tr><td><i class="fa-code">:code:</i></td><td><strong>Use rules to fix data at scale</strong></td><td>Make bulk changes to product data for better channel performance.</td><td><a href="/spaces/u8whzIfip72Kvn3M1bsc/pages/mNOE81fyYEiTWouDXWmi">/spaces/u8whzIfip72Kvn3M1bsc/pages/mNOE81fyYEiTWouDXWmi</a></td></tr><tr><td><i class="fa-wand-magic-sparkles">:wand-magic-sparkles:</i></td><td><strong>Use AI to enrich missing data</strong></td><td>Generate product attributes and text with less manual work.</td><td><a href="/spaces/u8whzIfip72Kvn3M1bsc/pages/a999d93e60627f4e7f658e7e72c08af72192f52e">/spaces/u8whzIfip72Kvn3M1bsc/pages/a999d93e60627f4e7f658e7e72c08af72192f52e</a></td></tr><tr><td><i class="fa-images">:images:</i></td><td><strong>Create stronger product creatives</strong></td><td>Turn product data into branded images for ads and channels.</td><td><a href="/spaces/u8whzIfip72Kvn3M1bsc/pages/7c96ae1561c1fa7a2bcbcc04fae1959e555e0aef">/spaces/u8whzIfip72Kvn3M1bsc/pages/7c96ae1561c1fa7a2bcbcc04fae1959e555e0aef</a></td></tr><tr><td><i class="fa-chart-simple">:chart-simple:</i></td><td><strong>Use performance data to improve results</strong></td><td>Connect product changes to revenue, cost, and profitability.</td><td><a href="/spaces/u8whzIfip72Kvn3M1bsc/pages/f452f00bd468f0b65938349df87be5ef0d45f0fb">/spaces/u8whzIfip72Kvn3M1bsc/pages/f452f00bd468f0b65938349df87be5ef0d45f0fb</a></td></tr></tbody></table>


# Categorize products

Map products to the right channel categories with less manual work.

{% columns %}
{% column %}

### Categorize products with less manual work

Categories connect your catalog to each channel's taxonomy. Good categorization improves approval, discoverability, and control.

[Start by creating product categories →](/manage-improve-product-data/categorize-products/create-product-categories)
{% endcolumn %}

{% column %}

<figure><img src="/files/avjquDU8rwngVPHrHTmE" alt=""><figcaption></figcaption></figure>
{% endcolumn %}
{% endcolumns %}

***

#### Why categorization matters

Each channel uses its own category tree. The same product often needs a different category per channel.

Strong category mapping helps channels understand what you sell. It also makes later optimization easier.

{% hint style="info" %}
Categorization shapes product visibility, structure, and downstream rule logic.
{% endhint %}

#### Start categorizing

<table data-view="cards"><thead><tr><th></th><th></th><th></th><th data-hidden data-card-target data-type="content-ref"></th></tr></thead><tbody><tr><td><i class="fa-icons">:icons:</i></td><td><strong>Create product categories</strong></td><td>See the main ways to map products, including generating, adding, copying, and managing categories.</td><td><a href="/spaces/u8whzIfip72Kvn3M1bsc/pages/4ea1283d099caf462be550d2e279a246c7b77bbe">/spaces/u8whzIfip72Kvn3M1bsc/pages/4ea1283d099caf462be550d2e279a246c7b77bbe</a></td></tr><tr><td><i class="fa-wand-magic-sparkles">:wand-magic-sparkles:</i></td><td><strong>AI product categorization</strong></td><td>Use AI to match products to likely categories faster and reduce manual work.</td><td><a href="/spaces/u8whzIfip72Kvn3M1bsc/pages/68dc0c51808addbb72dec181cbba6cef36b4519a">/spaces/u8whzIfip72Kvn3M1bsc/pages/68dc0c51808addbb72dec181cbba6cef36b4519a</a></td></tr><tr><td><i class="fa-circle-info">:circle-info:</i></td><td><strong>Categorization tips</strong></td><td>Learn how to create cleaner mappings and avoid unnecessary category work.</td><td><a href="/spaces/u8whzIfip72Kvn3M1bsc/pages/bbdbff5e4726d3e0b3fa1002f4dffca1aa00428c">/spaces/u8whzIfip72Kvn3M1bsc/pages/bbdbff5e4726d3e0b3fa1002f4dffca1aa00428c</a></td></tr></tbody></table>


# Create product categories

Properly categorizing your products in Channable is essential when setting up feeds or APIs. This step ensures that your category tree aligns with the platform you are exporting to, which is necessary for most channels.

### Category discrepancies

Before you begin categorizing your products, be aware that there may be discrepancies in the categories available in the data model used by the API or feed. If you notice a discrepancy, choose how to take action:

* **Regular updates:** Channable updates the data model of marketplaces regularly. However, if you notice a discrepancy, please [contact our support team for assistance.](https://www.channable.com/contact)
* **Marketplace restrictions:** It is possible that a marketplace may not provide a specific category for all items. In addition to reaching out to us, we recommend contacting the support department of the marketplace to determine the appropriate category for your products.

### Methods for categorizing items in Channable

Each export channel has its own unique category structure. For example, a girls' t-shirt might be categorized differently on different channels:

* Google Shopping: "Clothing & Accessories > Clothing > Shirts and tops"
* Amazon: "Clothing, Shoes & Jewelry > Girls > Clothing > Tops, T-shirts & blouses > T-shirts"

After adding a new export feed or API, you start with the **Categories** step. There are different methods you can use to categorize your items in Channable:

{% stepper %}
{% step %}

### Generate categories

If you import your own product categorization into Channable (often in a field called 'category', 'categories' or 'category\_path'), you can generate the category paths using the 'Generate categories' option. You still need to choose the category from the export platform yourself, but you don't have to set the filter rules manually. Find out more about [how to generate categories](/manage-improve-product-data/categorize-products/create-product-categories/use-the-generate-categories-function).
{% endstep %}

{% step %}

### Add category

This option allows you to manually add categories using category rules. These category rules contain a field of your choice, a filter, a value, and a category choice. Find out more about [how to add categories](/manage-improve-product-data/categorize-products/create-product-categories/add-categories-manually) manually.
{% endstep %}

{% step %}

### Copy categories

If you already have categories set up for the same export channel in another feed or API, you have the option to copy the categorization. This can be useful, for example, if you want to add a second Google Shopping feed for another country. Find out more about [how to copy categories](/manage-improve-product-data/categorize-products/create-product-categories/copy-categories-from-another-channel).
{% endstep %}

{% step %}

### Skip this step

In some cases, categorization may not be necessary and you can skip the categorization step.
{% endstep %}

{% step %}

### AI product categorization

[AI product categorization](/manage-improve-product-data/categorize-products/create-product-categories/ai-product-categorization) is made possible by a powerful machine learning algorithm, which suggests the most likely category for selection in some channels.

#### Channels Supported by AI product categorization

|                                                                         |              |
| ----------------------------------------------------------------------- | ------------ |
| Amazon                                                                  | Kleding.nl   |
| Google Shopping (and every channel that makes use of Google categories) | Kieskeurig   |
| Bol                                                                     | Shopalike    |
| eBay                                                                    | Marktplaats  |
| Facebook                                                                | Tweedehands  |
| FashionChick                                                            | Billiger     |
| Fruugo                                                                  | Go Banana    |
| Nextal and FonQ                                                         | Spartoo      |
| Cdiscount                                                               | StyleLight   |
| Kleding.nl                                                              | Vergelijk    |
| Kieskeurig                                                              | Winkelstraat |
| {% endstep %}                                                           |              |
| {% endstepper %}                                                        |              |


# Set the category field

Before you categorize your products, you need to select a **category field** in your project. This is the field in your data import that contains your product categories.

The category field is a project-wide field, so if you modify this field, the AI product categorization algorithm will re-run for all channels that have AI product categorization enabled.

{% hint style="info" %}
Tip: Select one category field that can be applied to all channels, rather than using different category fields per channel.
{% endhint %}

Follow these steps to set your project category field:

{% stepper %}
{% step %}

### Go to Categories

Navigate to **\[Your channel] > Categories**.
{% endstep %}

{% step %}

### Click Set Category field

Click **Set Category field**.
{% endstep %}

{% step %}

### Select the field

At **Set category field**, select the field containing the value for your categories (e.g. `product_category`). Channable will automatically suggest the most fitting categories based on your selected field.
{% endstep %}

{% step %}

### Save

Click **Save** to run AI Product Categorization.
{% endstep %}
{% endstepper %}

<figure><img src="/files/7d70f452ddaba7ddb9ac0c54d5dac47483a839f7" alt=""><figcaption></figcaption></figure>


# Use the 'Generate categories' function

{% hint style="info" %}
Note: If the 'Generate categories' option results in 35 pages of categories, you've reached the maximum number of categories that can be generated. Check our [tips for categorization](/manage-improve-product-data/categorize-products/categorization-tips) before filling in the generated categories.
{% endhint %}

{% stepper %}
{% step %}

### Go to the channel's Categories step

* Navigate to **\[Your channel]** where you want the categories.
* Go to the **Categories** step.
* Open the **Manual Categorization** tab.
  {% endstep %}

{% step %}

### Generate categories (if needed)

* If you don't have categories yet, click **Generate categories**.
* If you have already added categories, open More actions and click the + icon dropdown, then select **Generate categories**.

![Generate categories screenshot](/files/6aef32082373193a6c12bc08134cfa7c00e03116)
{% endstep %}

{% step %}

### Set the category field (if not set)

* If you have not [set the category field](/manage-improve-product-data/categorize-products/create-product-categories/set-the-category-field) yet, select a field in the pop-up and click **Save**.
  {% endstep %}

{% step %}

### Save the generated categories list

* Click **Save** below the list of categories to persist the generated categories.
  {% endstep %}

{% step %}

### Map values to categories using Field & Filter

* Use the 'Field' and 'Filter' fields to filter on the value of a field.\
  Example: if 'categories' 'is equal to' 't-shirts' then type 'T-shirt' to find the category (internal) 'Clothing & Accessories > Clothing > Shirts & Tops'.
* This will assign that category to all items that match this filter.
* The dropdown in the 'Set to category' column will also provide suggestions that best match the value, making manual categorization easier.

![Field & Filter screenshot](/files/d48686c97fc7cf6f1217b98bffd0079d28f6aca4)
{% endstep %}

{% step %}

### Save and review categorization coverage

* Click **Save**.
* The interface will show the percentage of items allocated to a category, and the number of items with and without a category.
* Aim for 100% of your items categorized. If you haven't reached 100%, add separate [rules](/manage-improve-product-data/rules-bulk-edit-and-enrich/rules-in-channable) to complete your categorization.

![Categorization coverage screenshot](/files/ba5256866738f2bff41ca3f0926100648c1e9d2b)
{% endstep %}
{% endstepper %}


---

[Next Page](/llms-full.txt/1)