> For the complete documentation index, see [llms.txt](https://helpcenter.channable.com/llms.txt). Markdown versions of documentation pages are available by appending `.md` to page URLs; this page is available as [Markdown](https://helpcenter.channable.com/manage-improve-product-data/rules-bulk-edit-and-enrich/using-rules.md).
# Using rules
Create a rule
Rules can fill fields, modify fields, split items, remove items and much more.
1. Go to the **Rules** step of your channel.
2. In the **Rules** tab, click **+ Create rule**.
3. Fill in a **Rule name** and **Description**. You can also [create a label](#add-and-create-a-label) for your new rule.
4. Click **Create**.
{% hint style="info" %}
**Tip:** Check out our [rule templates](/manage-improve-product-data/rules-bulk-edit-and-enrich/using-rules/rule-templates.md).
{% endhint %}

Order of rules
{% hint style="info" %}
**Note:** Channable applies your rules starting from top to bottom, one after the other. You can [check your rules](/manage-improve-product-data/rules-bulk-edit-and-enrich/using-rules.md#check-the-effects-of-a-rule) to see how they affect your data.
{% endhint %}
Make sure you arrange the order of your rules carefully. If you exclude items in your first rule, the rules that come after that one will not affect those excluded items.
#### Change the order of rules
1. Hover over the (hamburger icon) of the rule that you want to move.
2. Click and drag the rule to its new location.
3. Release your mouse to place the rule.
Check the effects of a rule
Once you have created a rule and saved it, you can check which items are affected by your rule to make sure that you set up your rule accurately.
#### Use a rule to check items
In addition to optimizing your data, you can use rules to check your items for missing data.
* IF the title field is empty (condition)
* THEN take all fields and do nothing (action)
***
### Excluding items with a rule
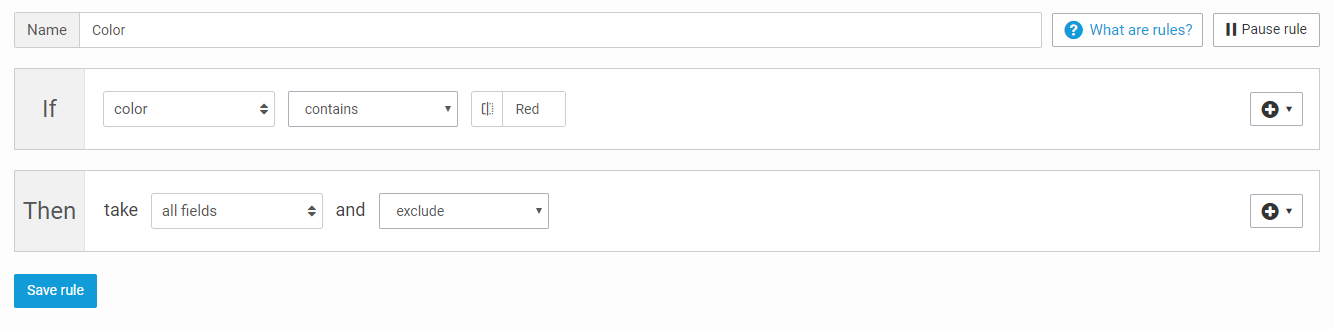
You can filter or exclude items for various reasons. One example being items out of stock. First you have to create a rule and you have to make sure the items you want the rule to be effective for meet the 'if' criteria.
If you want to exclude items: 'Then' take 'all fields' and 'exclude'. In the example below all items with 'Red' in the field 'color' will be excluded.
### Checking affected items in the Rules step
In the **Rules** step, you might change your item's titles, exclude items or set the category of your items.
In the top bar above your rule, you can see how many items are affected by your rule. For an overview of the items, click **View** **items**.

#### Check your items before and after you save your rule
In the bar below your rules, you have an overview of the number of items that were in your export *before* and *after* you created the rule.
To view the state of your items before this rule is applied, at 'Before this rule', click **View items.** To view how your items are affected by all previous rules and this rule, at 'After this rule', click **View items**.
#### Check your items with a rule
If you want to check if you have items with no image link for example, you can create a “check-rule”. This rule does not make any changes to your items:
* IF image\_link is empty ([condition](/manage-improve-product-data/rules-bulk-edit-and-enrich/how-to-use-conditions-if-in-rules.md))
* THEN take all fields and do nothing ([action](/manage-improve-product-data/rules-bulk-edit-and-enrich/how-to-use-actions-then-in-rules.md))
The top bar above the rule indicates the number of items that are selected (2 out the 123 items). This means that two items are missing data for the field 'image\_link'.
The bar below the rule indicates the number of items affected by this rule, which stays the same because the action type is **do nothing**.
Use different fields in rules
#### Internal fields
These are fields with information created in Channable. You can find fields like the “category” internal field, that contains all the categories assigned in the Categories step, or also other fields like the “cpc”.

#### Analytics fields
These are all the fields imported from your Google Analytics connection.

#### Channable Insights fields
These are all the fields imported from your Channable Insights connection.

#### Static values
For some fields in an export channel, the default option is to choose from a set of static values. This type of field is a value that you can select for all your products. You can find it for example in the *Build* step of eBay, when selecting the payment, shipping and return profiles, or also in the *Build* step of Bol.com.

{% hint style="info" %}
Tip: In most cases, you can also select a project field instead of a static value. This way you can set it up dynamically between products. Make sure you fill the field you select with accepted values.
{% endhint %}
Copy a rule
You can copy existing rules from your other channels and projects.
#### Copy rule(s) into the current channel
1. Click + Create rule.
2. In the pop up, click **Copy rule(s)**.
3. At the field **From project**, select the project that contains the rules that you want to copy.
4. Click **Copy here** to copy the rule(s).
Add a label to a rule
You can add labels to your rules to help you organize them. You can also customize the color of the label. You can use these labels in any of your projects in your Channable account.
1. Go to the **Rules** step of your channel.
2. Locate the rule(s) that you want to add a label to.
3. Select the rule(s) that you want to label using the checkboxes.
4. Click **Rule labels**.
5. In the pop up, click on **New label**.
* Fill in your label name in the field **Name**.
* Select a color for your label at **Color**.
6. Click **Create** to create your label.
{% hint style="warning" %}
Caution: If you delete a label, it will be removed from all rules in all projects in your Channable account.
{% endhint %}
Pause a rule
Since you may not want a rule to apply to your items at a specific time, you can pause a rule instead of deleting it.
1. Go to the **Rules** step of your channel.
2. Locate the rule that you want to pause and click on it. Click ⏸ **Pause rule**.
3. To pause multiple rules, select the rules that you want to pause using the checkboxes. Click ⏸ **Pause selected rules**.
4. To use the rule again, click **▷ Unpause rule**.
Delete a rule
To remove a rule permanently, follow these steps.
#### Delete a single rule
* Go to the **Rules** step.
* Locate and click on the rule that you want to delete.
* Click on the **Options** dropdown and select the option **Delete rule**.
* In the pop up, click **Delete** to confirm and delete the rule.
#### Delete multiple rules
* Select the rules that you want to delete using the checkboxes.
* Click 🗑 **Delete selected rules.**
{% hint style="warning" %}
Caution: Deleting a rule cannot be undone. If you might need a rule later, pause it instead.
{% endhint %}
{% hint style="info" %}
Tip: In the **Rules** step, to select multiple rules using the checkboxes, press the Shift key + click on the last checkbox that you want to be selected.
{% endhint %}
---
# Agent Instructions
This documentation is published with GitBook. GitBook is the documentation platform designed so that both humans and AI agents can read, navigate, and reason over technical content effectively. Learn more at gitbook.com.
## Querying This Documentation
If you need additional information that is not directly available in this page, you can query the documentation dynamically by asking a question.
Perform an HTTP GET request on the current page URL with the `ask` query parameter:
```
GET https://helpcenter.channable.com/manage-improve-product-data/rules-bulk-edit-and-enrich/using-rules.md?ask=
```
The question should be specific, self-contained, and written in natural language.
The response will contain a direct answer to the question and relevant excerpts and sources from the documentation.
Use this mechanism when the answer is not explicitly present in the current page, you need clarification or additional context, or you want to retrieve related documentation sections.